Legend of the Five Rings: FFG Beta Edition by Mors Rattus
Intro
Original SA post Legend of the Five RingsWe interrupt this broadcast of what would have been more Glorantha to bring you-

Fantasy Flight Games' new Legend of the Five Rings open beta! It is available free on DTRPG right now. I like a whole lot of it, though I have some issues I'll talk about on the way. They have put a physics-based diceroller app on Apple's App Store and Google Play, which lets you manually set up, change die fices, group dice, display results and so on. You can also print out a page at the back to stick on your dice, if you're weird. Because yes, this uses custom FFG dice.
...at least they have the app. Even if it costs 5 bucks.
There is also a canned adventure that is meant to let you test out all of the different kinds of conflict scenes. They request feedback on their forum, at their email address (L5RRPGbeta AT fantasyflightgames.com), in which they request you consolidate all of your questions and comments for your entire group to a single document, and via surveys they will occasionally be posting. They will also have surveys on social media to vote on more previews. Also, they have a mailing list signup.
The specific feedback they want will have accurate page citations and clearly state any issue. They are happy to listen to rules contradictions, typos or problems in play experience, but prefer you be very specific.
So, what is up in the lands of our...
We get a brief discussion of the Five Rings, which are the five elements as Rokugan has determined them, and again, you have Rings. They vary in value, from 1 to 6 now, and represent different ways to approach a problem or different ways to do things. None of them have skills that are always associated with them any more; any skill can be used with any ring, depending on how you do it and what you're trying to do. But first, we get a brief overviw of Rokugan. It's a feudal empire, and most samurai are bushi (warriors), courtiers, or shugenja (priests and wizards). The Emperor rules, commanding the Great Clans, who are led by daimyo, etc. Very little has changed here in the broad strokes. However, ther is one big change: social classes. The samurai, those who serve the empire, are mostly the same. The kuge noble families are the upper social class of these - the lineages of clan champions, vassal families, the Imperial families and the greatest servants of the Emperor. Who is a Hantei right now - the timeline has been rolled back to before any L5R metaplot ever happened. Below them are the buke, or chivalric houses, that are all other samurai - provincial rulers, governors, magistrates and, of course, the PCs. The least of those are the ji-samurai, or half-samurai, who are not permitted to take the name of their lord. This includes all ronin.
Below the samurai are the bonge, also called heimin, or half-people. These are the peasants. Farmers are at the top, below them the craftspeople, who make things. Below them are the merchants, who are seen with some contempt as they do not create things themselves. Bonge have few rights to carry weapons, save for the ashigaru levies and the budoka, who are armed servants of the samurai classes. A samurai can demand anything a bonge has without paying for it, as long as the bonge belongs to their lord, and may kill any who disobey or are disrespectful. However, samurai are also required to protect the bonge and administer the Empire, so killing one means you must answer to their lord. Most samurai are merely indifferent to the bonge, with only a rare few being actually cruel. However, the bonge rarely feel much towards their superiors but fear. Those treated with great compassion tend to be extremely loyal.
The third class is no longer referred to in the game's narration by an actual ethnic slur - what the game once called 'eta' are now the burakumin, sometimes known as hinin, or non-people. The word eta is noted as being an extreme pejorative term, meaning 'abundance of filth'. These are criminals, torturers, undertakers, butchers and tanners - people who are close to death or dishonorable action all the time. They are considered utterly unfit to be close to samurai in most circumstances, as they are seen as deeply unclean. Being near them requires special purification after, and most burakumin live on the outskirts of society in their own special villages. They are terrified of samurai, as they can be killed for no reason at all, with no consequences. Technically, any entertainer that is not a samurai is also hinin, including geisha - but this is a technicality, to allow samurai to fully relax around them without any social stigma for doing so.
We also have changed things to reflect Japanese tradition more closely. The virtues of Bushido now use their Japanese names. First is Gi, Righteousness. It is honesty and justice, the rejection of shades of grey. There is only right and wrong. Only truth and falsehood. Only justice and injustice. However, it can be hard to manage this - you must be committed to truth and justice even as you manipulate in court or ignore lesser injustices to be able to stop greater ones. Second is Yu, Courage. Every samurai is, the saying goes, only three feet from death. A samurai must be ready to die for their lord, their clan and their Empire, and a noble death is to be treasured. A samurai must not be afraid to act, though respect and caution are allowed. Third is Jin, Compassion. Samurai are above the others of the Empire, but they still serve. Most samurai focus on abstract compassion - defend the people from enemy incursions and the attacks of rival clans. Few work the logical extreme - preventing others from abusing the lower classes - though the Phoenix take it quite seriously.
Fourth is Rei, Courtesy. A samurai must be able to maintain proper social appearances and withstand adversity, even when others are being as rude as possible. This is why courtiers focus on indirect insults and subtle insinuations. It is socially inappropriate to lose one's temper with equals or those of higher rank, even when they become enraged with you. Fifth is Meiyo, Honopr. This is the must subtle yet most all-encompassing virtue, requiring a samurai to follow their own conscience and ensure that all of their decisions reflect their inner beliefs rather than merely what is expected of them. These are often the same action, but honor is the reason you do it, and honor can even justify disloyalty or disovedience, because without proper moral backing, obedience is hollow.
Sixth is Makoto, Sincerity or Integrity. Samurai must be sincere and full of conviction in both word and deed, no matter what. Sometimes, it is more important to convince others you believe what you say than to actually be honest, because even if you are wrong, if you commit the whole of your being to what you say and do, you are fulfilling your duty. Last is Chugi, Duty and Loyalty. This, even more than honor, is core to Rokugani bushido. Samurai are expected to do as they are told by their lord and to do their duty to their subordinates, no matter what the cost is to their own personal honor. Orders should always be honorable, of course, but 'should' is such a weak word. If a samurai feels their duty conflicts with bushido's virtues, they may commit seppuku in protest, even without their lord's permission. (Or they may disobey, but strictly speaking doing that is seen as wrong and dishonorable.)
Next time: The Great Clans, as they are spoke.
If I Could Turn Back Time
Original SA post Legend of the Five Rings: If I Could Turn Back TimeSo, how many Great Clans are there right now? Only seven. See, because the timetable has been turned back to before the metaplot and into the Clan Wars period, the Mantis Clan are not a Great Clan - just a minor one. Sorry, Mantis fans! Our Great Clans are the Crab (large, brusque and low on etiquette, warriors who stand guard on the Shadowlands from the Kaiu Wall and who often grumble about being taken for granted and dying to allow the effete to play courtly games), the Crane (Left Hand o the Emperor, politicians, traditional spouses of the Emperor and Emerald Champions, and practitioners of cultural art and craft), the Dragon (historians, weirdos, mystic monks and investigators who work to keep the Empire from becoming too focused on itself), the Lion (warriors and would-be exemplars of bushido, masters of war and pioneers of tactics and battle), the Phoenix (spiritual guardians of the Empire, scholars of religion and magic, peacemakers with a tendency to the self-sacrificing), the Scorpion (grim servants of the Empire, doing what is terrible but required to keep it safe and ensure no clan can challenge the Hantei line, at the cost of everyone hating them), and the Unicorn (barbaric horsemen, fierce warriors and keen masters of the foreign mind). There are no rules for minor clans in this beta; it is unclear which, if any, will be in the final product.
So, the game itself! Let's talk mechanics. We're pretty standard - multiple players controlling PCs, one player being the GM. Brief discussion of the social contract (the GM's got the last word but should always consider the ideas of the players and encourage them, and if anyone is uncomfortable with something, they should say so). Now, the dice. The game only uses two types of dice - one six-sided, one twelve-sided. They're still FFG dice, tho, with symbols rather than numbers. We combine this with Roll and Keep. You roll a pool of dice, but will only be keeping a certain number of the ones you roll; those not kept are discarded.
This is my biggest issue with the game. FFG dice are weird to figure out statistically; Roll and Keep is weird to figure out statistically. Combining them both together means that an intuitive grasp of the likelihood of making a roll is extremely difficult. It is also very unlikely that this will change regardless of feedback; FFG's committed to this.
Your d6s are Ring Dice, and d12s are Skill Dice. You always add together a number of Ring Dice from the Ring you're using for a check and Skill Dice from the skill. There are no negative dice here; instead, you are trying to get a set number of successes, the TN. TN can never go below 1, and typically won't go above 5 or 6 except in very rare cases, but maxes out at 8. Getting five successes is pretty hard.
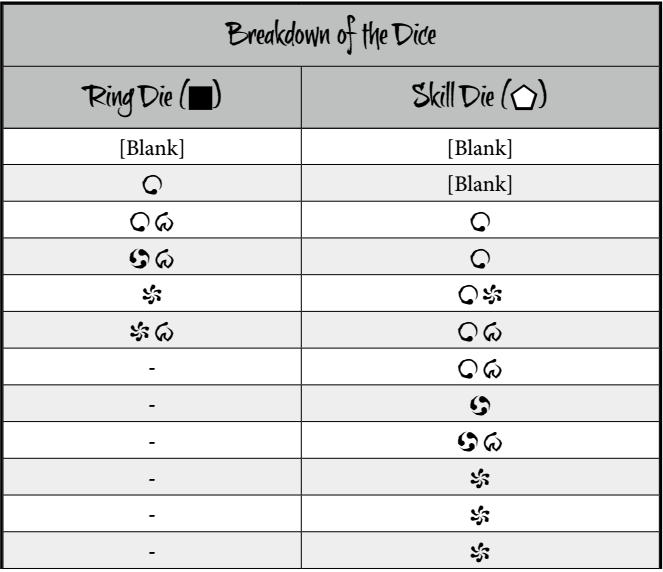
The one that looks basically like a circle is the Success symbol. Each one is a single success. The one that is three dots in a circle is the Explosive Success symbol. IT counts as a success, but you also get to roll an additional die of the same type, which you may choose to keep or drop. (There are circumstances where keeping it would be bad; it otherwise is added as an additional kept die on top of the ones you'd normally keep.) The symbol with six dots like a sun is the Opportunity symbol, and it does not count as a success. However, you can spend Oppurtunities to get additional side benefits, regardless of success or failure, so they're quite valuable. The final symbol, hwich looks like a W sort of, is meant to be a stylized cherry blossom, and it is the Strife symbol. It represents your character feeling a sudden surge of emotion. This can be positive, neutral or negative emotion, but the more you have, the harder it is to maintain your societally mandated decorum and stoic facade. Strife does not count as a success or a failure. Rather, each Strife symbol gives you 1 Strife to add to your Strife pool.
So, when do you make a check? It's when you do something that the GM decides: could fail or succeed, has conseuqences for success and for failure, and both are interesting. If you can't fail to do it, don't make a check. If you couldn't possibly succeed, don't make a check. If success and failure would have the same result, don't make a check. If the consequences of success wouldn't be interesting, don't make a check. If the consequences of failure wouldn't be interesting, don't make a check. Just do what works best for the story. IT is only when both outcomes could be interesting that you should turn to the dice.
The first step of making a check is to declare what you're trying to do. If you succeed at the check, you do it. If you fail, you don't manage it. Them, you need to determine what kind of check you're making. First, you determine what the appropriate Skill Group is. More on that later. Then, you pick the specific Skill used. Both of these are determined by discussion between GM and player. After that, you briefly describe how you are going to do the thing. The GM decides which of your Rings your approach corresponds to.
Broadly speaking, Air is used for approaches based on grace, perceptiveness, cunning or precision. Earth is used for resilience, memory, patience or discipline. Fire is used for passion, invention, candor or ferocity. Water is used for adaptability, awareness, gregariousness or power. Void is used for mysticism, wisdom, intuition or instinct. Sometimes a task can only be done by one approach; sometimes, the GM will decide the method the player is using could be one of several, and will give the player a choice of which.
The GM then determines the TN, between 1 and 8. TN 1 is easy, TN 2 is average, TN 3 is hard, TN 4 is very hard, and so on. TN 8 is where you hit feats of legend, like breaking a boulder with your bare hand. Once the TN is determined, you make your roll. Once you roll, you and the GM decide which, if any, of your Advantages and Disadvantages (more on those later) apply to the check. Each one can only be used once per check. You add up all the advantages that apply and all the disadvantages that apply. They then cancel each other out, 1 for 1. Distinctions cancel out Adversities, Passions cancel out Anxieties. Once you figure out what's left, you apply them.
If a Distinction advantage applies, you may choose and reroll up to two dice. If a Passion advantage applies, you lose 3 Strife after making the check. If an Adversity disadvantage applies, you must choose and reroll two dice that have Success or Explosive Success results showing; if there's only one, you only reroll that one. If there are none, reroll nothing. After the check resolves, you gain 1 Void Point if the check failed. If an Anxiety disadvantage applies, you gain 3 Strife after making the check. If you suffer an outburst from this, you regain 1 Void after the outburst resolves. (More on outbursts in a bit.)
Once all that's been settled, you select your Kept dice. You Keep at least 1 die, and can Keep up to the value of the Ring you rolled in dice. At this point we begin to resolve symbols. Explosive Success symbols are resolved first because you get to roll and potentially keep extra dice from them. Once all of those are resolved, you resolve the Strife symbols. Then you rsolve the Opportunity symbols and can start to select how you're going to use them. There's a bunch of lists of things you can do, or the GM can allow you to come up with creative narrative uses if none of those apply. Note that some Opportunity spends only work on successes, some only on failures, so you may want to hold off for the next step, where you finish counting up Success symbols and see if you fail or not.
If you succeed, you gety to narrate what happens, as long as you stay in the bounds of your declared intention when you began the check. You should also describe the emotions you feel if you got Strife results. The GM can modify or help you interpret how you want to do things, but you have narrative control over how your success is described. There are also effects that can modify checks.
If you get help from other characters, you roll an additional Skill die per assistant that has at least 1 rank in the relevant skill, and an additional Ring die per assistant that has 0 ranks in the relevant skill. The GM may also allow you to use up to one advantage from each assistant, and you get to keep up to 1 additional die per assistant. Each assistant may choose to take 1 Strife to prevent you from suffering the effects of a single Strife symbol. (Personally, I don't think keeping additional dice is a good idea and would remove that part.) Often, you will get bonus effects from having more successes than you need, and occasionally you may get negative effects based on how badly you fail a check.
Some checks are Resistance checks - say you get thrown off a balcony. You get a resistance check to avoid falling. The GM assigns TN normally, perhaps applying bonus successes from the person throwing you to the TN if they feel like it. There are also Competitive Checks, which are done normally but whoever gets the most bonus successes wins. (Or the smallest shortfall of successes, if you all fail.)
Next time: Strife
Toil and Strife
Original SA post Legend of the Five Rings: Toil and StrifeThe great ideal of samurai is that they maintain total composure at all times, and never show their emotions outside of carefully mandated situations. However, pretty much no one can do this, and that's because of Strife. The main way you gain Strife is by rolling dice with Strife symbols. However, you can also gain them via Anxiety disadvantages, or by neglecting your Ninjo or your Giri, or via certain abilities used by other characters. The GM can also inflict Strife for narrative reasons - usually at the player's suggestion, the book notes, though not always. NPCs also gain Strife, though some will use simplified Strife rules.
Every PC (and important NPC) has a Composure trait. As long as your Strife is less than or equal to your Composure, you can keep it together. However, the first time each scene in which your Strife exceeds your Composure, you suffer an Outburst, a moment in which the mask of soticism briefly slips. However, it should be noted, that's not always a totally bad thing. You never lose control of your character during an Outburst, but you do have to paly it out, and an Outburst lasts until the end of the scene. The game provides a number of example Outbursts, though it notes that you can invent your own. (Indeed, it is part of chargen to invent or describe your character's Personal Outburst, more on that later.)
Compromise or Flee: You do something that breaks with your values, oaths or morals. You might bend your moral code or flee from danger. You lose 3 Honor, and until the end of the scene, you ignore one of your Interpersonal or Mental disadvantages, as you currently see the need to bend your morals. At the end of the scene, you lose Strife until your Strife is equal to half your Composure.
Expose a Weakness: Either via a physical tell or an ill-chosen word, you reveal one of your weaknesses. You choose a Disadvantage that you have not revealed this way this session; every other character in the scene learns about it. Until the end of the scene, however, you reduce the TN of Scheme checks you make. It is unclear how much. At the end of the scene, you lose Strife until your Strife is equal to half your Composure.
Become Enraged: You must challenge an antagonist in the scene to a duel, though it needn't be to the death, or attack them outright. You suffer the Enraged condition. (More on that later.) However, you may ignore one of your Mental or Physical disadvantages for the rest of the scene. At the end of the scene, you lose Strife until your Strife is equal to half your Composure.
Shut Down: You become withdrawn and quiet. You do not lose face, but cannot perform Attack or Scheme actions for the rest of the scene. However, the TN of any Scheme checks targeting you is increased by 1 for the same period. At the end of the scene, you lose Strife until it's equal to half your Composure.
Inappropriate Remark: You say something out of line or commit a shocking breach of etiquette. You lose 3 Glory. However, until the end of the sdcene, you ignore one of your Interpersonal or Mental disadvantages, as you have been pushed beyond what you usually tolerate. At the end of the scene, you lose Strife until it's equal to half your Composure.
You may notice that if you're in a combat scene, Become Enraged has few actual costs besides...becoming Enraged. This is intentional and even called out as such, that doing a rage-fueled attack in combat is intended to help vent Strife. However, the GM should encourage the player to have their character act increasingly risky or violent.
Further notes: At the end of every scene, you lose strife equal to your Water Ring. If you are in a conflict scene, you check your Strife at the beginning of each turn, and have your Outburst at the start of the turn, then proceed with your turn normally after resolving its effects. So if your Strife hits the level mid-turn, your Outburst will happen at the start of your next turn.
Now, Opportunities. These are how you add bonus effects to things. The most basic use is to add a narrative detail that comes up as you do the thing - new info that doesn't directly affect your success or failure, but which gives interesting new routes for the story to go. The player gets to suggest what such a detail might be, and the GM either approves it or gives an alternative option. Opportunities from Air rolls used this way should be able to be described as subtle, precise or cunning. Earth rolls, defensive thorough or reassuring. Fire, flashy, creative or inspiring. Water, intuitive, flexible or gregarious. Void, mystical, wise or instinctive.
We get a big chart. Any Opportunity can be spent in certain ways. One symbol will let you add in an exciting story detial that stems from your check but is unrelated to success or failure. One symbol can also let you determine the easiest way to do whatever you were trying, including the skill and approach that would have the lowest TN if used. (Handy, if you fail and someone else has a chance to try.) If you failed, you can spend a symbol to give the benefits of assistance to the next character to attempt a similar check. If you succeed, you can spend two symbols to do that.
On an Air-based roll, you can spend a symbol to observe an interesting detail about a character in the scene. The GM may allow you to use this to create a detail that did not previously exist for an NPC, such as an advantage or disadvantage they didn't have before. You may also spend one or more symbols to be extremely subtle about your action and attract minimal attention, with more symbols being more subtlety. You may spend symbols to learn the demeanor and current strife of characters in the scene, one for one. You may also spend double the normal amount of symbols to use a Water or Fire opportunity result.
On an Earth-based roll, you can spend a symbol to suddenly recall an important piece of info not directly related to your check. The GM may allow you to use this to reveal/retcon some small prep action you took earlier, such as bringing along a common item that'd be useful at the moment. You may spend one or more symbols to ensure you act extremely carefully, maintan your balance and keep safely away from sources of harm, with more symbols making your precautions more effective. You may spend symbols to allow other characters to remove 2 strife, at 1 symbol per character chosen. You may spend double the normal amount of symbols to use a Water or Fire opportunity result.
On a Fire-based roll, you may spend a symbol to notice something conspicuously missing or out of place that is nearby and not directly related to your check. The GM may allow you to create this absence - so you might notice that a missing pair of shoes means someone isn't home, making it safer to search their place, say, even if the GM hadn't decided on that. You may spend 1 or more symbols to do your action in a flashy way, drawing attention, with more symbols meaning you're more noticeable. You may spend symbols to make other characters gain 2 strife, at 1 symbol per character chosen. You may spend double the normal amount of symbols to use an Air or Earth opportunity result.
On a Water-based roll, you may spend a symbol to spot some interesting physical detail present in the environment that's not directly related to your check. The GM may allow you to use this to add a previously unnoticed piece of terrain or mundane object to the scene. You may spend 1 or more symbols to do your action more efficiently, saving time or materials. The more symbols, the more time or materials saved. You may spend 1 or more symbols to remove 2 of your own strife per symbol spent. You may spend double the normal amount of symbols to use an Air or Earth opportunity result.
On a Void-based roll, you may spend a symbol to gain some spirutal insight in to the nature of yourself or the universe. The GM may allow you to use this to reveal fact about your character that hasn't been established but which relates to the situation somehow. You may spend 1 or more symbols to somehow detect a sign of the supernatural around you via, say, a chill down the spine or a sudden silence or so on. More symbols means you get a more precise location of the supernatural thing or event. You may spend a symbol to name Air, Earth, Fire or Water, reducing the TN of your next check using the named Ring by 1. You may spend double the normal amount of symbols to use an opportunity result from any other Ring.
These are all examples - the book specifically notes that you can use them, or you can use them to inspire more novel uses of Opportunity symbols. The results you choose should be noted in your description of what happens - so if you use Earth to remove someone's Strife, tell how your actions give them emotional or physical support. Other specific mechanical uses of Opportunities can be unlocked by techniques you pick up.
So, now we're into the Rings mechanically. Your Ring is rated between 1 and 5, if you're a PC. (Supernatural beings can go outside that range.) Rank 1 means you're weak or deficient in the area, and should probably get help when attempting to do things in that manner. Rank 2 means you'er average. Rank 3 means you're above average, and people will notice when you use this kind of approach. Rank 4 means you're exceptional and impressive to others. Rank 5 means you're legendary - the best any human could be at that approach. Rank 6 or more is superhuman, possessed only by mystical beings like the Oracles or powerful oni.
Air is all about graceful cunning and precision. It is swift, nuanced and oblique, hard to pin down. When used for Artisan Skills, it allows you to Refine, to improve a work, hone its details, or strip away things that aren't necessary and detract from the work. When used for Scholar Skills, it allows you to Analyze, to focus on observation and understanding of detail, subtle nuance, implication and hidden meanings. When used for Social Skills, it allows you to Trick, being subtle and clever, convincing others, deceiving them either by lies or omission, imply secondary meanings or otherwise control what information others have. It needn't be malicious, but is always manipulative. When used for Martial Skills, it allows you to Feint, using precision and grace to control your own body, excelling or gaining advantage via positioning and timing rather than direct force. For Trade Skills, it allows you to Con, to gain something for nothing, to inflate your prices, to convince others to give you things or to steal.
Earth is the Ring of steady, thorough approaches. It is cautious, considerate and works to get results without taking risks or losses. It is tough physically, resilient mentally and reliable. When used for Artisan Skills, it allows you to Restore, to repair and perform upkeep, to return or preserve function, as well as to perform tasks such as archiving and storage. When used for Scholar Skills, it allows you to Recall, to remember and reproduce information. It cannot give you wild leaps of intuition or logic, but will let you recall what you know and what is proven. When used for Social Skills, it allows you to Reason, to convince others via rational arguments, get them to set aside emotion or make them recall their duty and responsibilities. It is also used to teach others, keep subordinates in line and maintain order. When used for Martial Skills, it allows you to Withstand, to endure. It lets you perform tasks by tenaciously keeping at them, cautiously avoiding exhaustion or problems. When used for Trade Skills, it allows you to Prepare, acquiring resources by physical toil. It also helps you to make proper inventories, manage goods and store them.
Fire is the Ring of ferocious, direct and inventive action. It is explosive and intense, getting results regardless of the cost. When used for Artisan Skills, it allows you to Invent, to draft and create something totally new from raw materials. When used for Scholar Skills, it lets you Theorize, using creative solutions and vigorous energy to solve problems in ways not considered before. IT also lets you extrapolate what might be true or might happen, connecting the dots and identifying absences. When used for Social Skills, it lets you Incite, engaging with someone's emotions and desires rather than logic, or getting others to act despite obvious problems or justified fears. When used for Martial Skills, it lets you Overwhelm, relying on bursts of power, speed or agility to solve a problem in one blow. It is always aggressive, fierce and adrenaline-laden. When used for Trade Skills, it lets you Innovate, developing new techniques or technologies, creating new products or services, or getting resources in new ways.
Water is the Ring of adaptability and perception. It is balanced and flexible, rarely committing all resources or overextending, but rarely underperforming. When used for Artisan Skills, it lets you Adapt, making a work function in new ways by changing or transforming it, translating it into new languages or mediums, or reducing it to components for a new piece. When used for Scholar Skills, it lets you Survey, gaining information about the environment and wide circumstance, identifying things within an area of expertise, detecting trends or figuring out how to use something practically. When used for Social Skills, it allows you to Charm, focusing on being friendly and building rapport with others, allowing you to give them new desires or make them feel emotions they wouldn't otherwise, discovering their existing desires, or winning their sympathy. When used for Martial Skills, it lets you Shift, making circumstances work in your favor and seeking the path of least resistance, redirecting a foe's energy rather than expending yout own. When used for Trade Skills, it lets you Exchange, giving one kind of labor or resources to gain another, getting items and services efficiently and at low cost.
Void is the Ring of transcendence of limitation, enlighenment and acceptance. When used for Artisan Skills, it allows you to Attune, understanding the purpose of a work, why it has shown up now, and if it has any supernatural qualities. When used for Scholar Skills, it allows you to Sense, gaining intuitive hunches about supernatural phenomena or future events. When used for Social Skills, it allows you to Enlighten, challenging the beleifs of others and making them reassess their decisions, desires or emotional states, or even mystical manipulations. When used for Martial Skills, it allows you to Sacrifice, acting instinctively to succeed regardless of the cost to yourself rather than opposing the enemy. When used for Trade Skills, it allows you to Subsist, making the most out of what you have without disturbing your surroundings or helping with living in harmony with the environment.
Next time: Honor and Glory
I GIVE MY LIFE, NOT FOR HONOR, BUT FOR YOU
Original SA post Legend of the Five Rings: I GIVE MY LIFE, NOT FOR HONOR, BUT FOR YOUBefore we get into the meat and potatoes of Honor and Glory, some brief notes. Skills run up to level 5 - anything over that is supernatural and superhuman, possessed only by kami, dragons, oni and so on. You cannot normally buy Advantages or Disadvantages with XP, but they can be assigned by narrative events or via certain rules - for example, you can get some physical Disadvantages by taking a critical hit. Also, there are derived attributes! Resilience is your HP bar, basically, and it's (Water Ring + Earth Ring)*2. Focus is your speed of reaction, used to help find initiative during conflicts and so on. It is (Fire Ring + Air Ring). Composure is your Strife meter's endpoint, as we recall. It is (Earth Ring + Fire Ring)*2. Vigilance is your general ability to spot threats, and will usually be used as the TN for someone to ambush, deceive, mislead or manipulate you when you're not actively on guard. It is (Air Ring + Water Ring)/2. Lastly, Void Points, which represent your force of will and innate luck. They are gained through struggle and adversity. You start each session with 1 Void Point, and can never have more than your Void Ring in Void Points. Any you don't use by the end of the session are gone, and you can't gain more if you're full up, so use 'em while you got 'em.
Void Points can be spent on a variety of effects. First, when assembling your dicepool, you can spend 1 Void Point to add an additional Ring die and have the option to keep an additional die. Second, when you suffer a crit, you can spend 1 Void Point to try to parry the attack and blunt some of the damage. Lastly, various techniques you can learn may require you to spend a Void to activate them. You can regain Void points in a variety of ways. Primarily, however, there's three. First, you regain them when you fail a check where one of your Adversity disadvantages was in effect. Second, you regain them when an Anxiety disadvantage causes you to suffer an Outburst. Third, if the GM conceals the TN of a check from the players, the one making the check gets a Void Point.
Now, Honor, Glory and Status. Honor is a measure of your PC's personal investment in Bushido and belief in its righteousness. Glory is how society views your PC and their reputation. Status is their social rank. All of them can range from 0 to 100. When an effect says to use your Honor, Glory or Status Rank, you use the tens digit - or, if you have 100, 10. You can gain or lose all three of these during play, though Status will change much less frequently than Glory or Honor. Some actions will require you to forfeit (read: lose) some of one of the traits, du to purposeful disregard for Bushido, your reputation or your political responsibilities. The GM will always inform you of how much you will lose before you perform the deed - you always have the chance to step back and not do the thing, or commit to it, even if that means the GM has to retcon a bit because they didn't get a chance to inform you. You can lose more than you actually have, but none of these can go below 0 - so you just hit 0 extra hard.
Sometimes, you will instead be asked to stake honor, glory or status. This means you have a risk. You might swear to do something, say, and have to stake some amount of honor or glory on it. If you do, the GM will note how much is staked and what condition will make you lose it. If you manage to avoid that condition, you keep it. If you fulfill those conditions somehow, by action, inaction or even bad luck, you lose the staked amount. Honor is primarily lost when you act in opposition to Bushido or lose faith in it, or when you fail to uphold an oath. Honor is usually gained when you act in accordance with Bushido at the cost of making your life harder. You do not gain Honor from acting honorably unless it introduces a new challenge to your life, comes at a cost, or requires some amount of personal sacrifice, even if it's not much. You have to have skin in the game.
Besides having an Honor value, you also have your Ninjo, or human feelings. Your Ninjo is a personal desire, ideal or crisis - the thing you want the GM to make the focus of tests of honor for your character, the thing that might be able to make you forsake your ideals and obligations. It can be broad or specific, but it should be something you will have to deal with during the campaign, and concrete enough that you have some idea how to pursue it even if the GM isn't throwing specific plot hooks at you. It is possible, over the course of play, that your Ninjo will evolve. If your PC ever reaches a moment of true clarity on their Ninjo, they can choose to discard it, fully embrace it or reinvent it. This should always be something that has a substantial impact on their worldview and view of Bushido. If, in doing this, the PC's faith in Bushido is strengthened, the GM should give them 5 to 10 Honor. If their faith in Bushido is weakened, they should instead lose that amount. They then work with the GM to define their new Ninjo. Whenever you wish to defy your Ninjo, you must take Strife equal to your Honor rank - or more, if you feel like it. It is always a major sacrifice on the character's part to ignore their Ninjo, and if their reasons are honorable, they may be eligible to gain Honor.
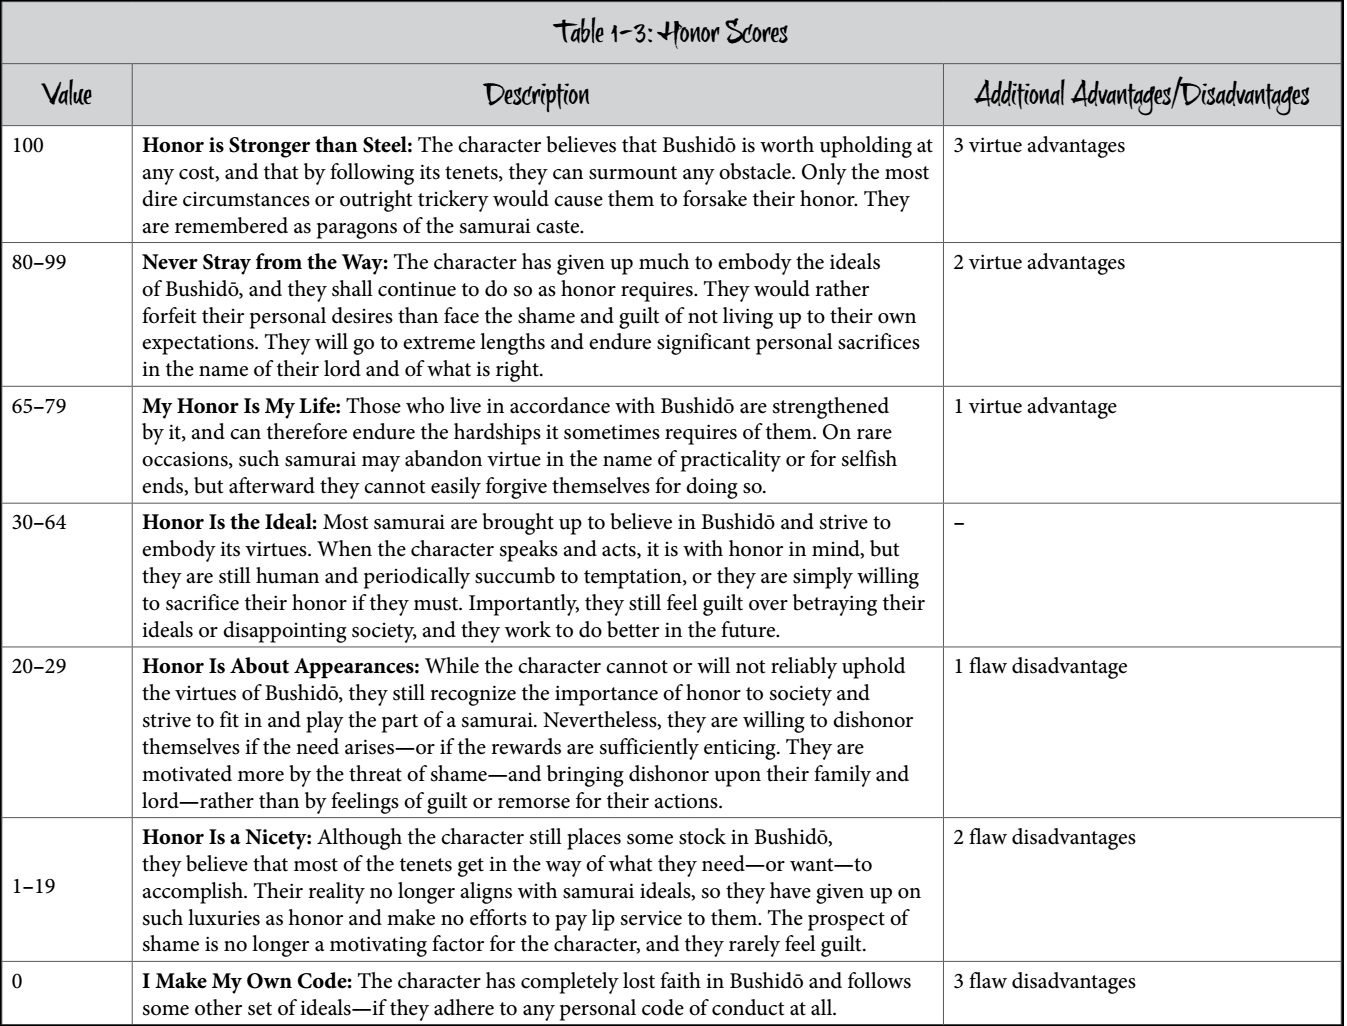
Example ninjo include: Create a secure future for/with the one you love. Become the best swordsman in the Empire. Protect someone(s) from a specific enemy. Develop a new invocation or special technique. Uncover lost secrets to defeat some specific ancient magic foe of your family. Discover your true parentage. That kind of thing. When your Honor is high enough, you get free Advantages (which must have the Virtue tag), and low enough you get free Disadvantages (which must have the Flaw tag).
Glory is primarily lost when you openly show a lack of faith in Bushido or willingly allow your reputation to take a hit, or when you make a boast and fail to back it up. Glory is gained when you get public acclaim, do great things or work to spread your fame. Besides your Glory vlaue, you have your Giri, or sworn duty. Your Giri is the way you serve your lord, and should be a theme or issue you want to see come up for your PC. When you select your Giri, it should in some way naturally oppose your Ninjo, because samurai fiction is all about the conflict between feelings and duty. Your Giri will usually be something your clan daimyo has ordered you to do. This can be broad or specific, but should always be attainable within the campaign and, again, specific enough that you know how to pursue it even when the GM isn't throwing plot hooks at you. Like Ninjo, your Giri can change...but it'll usually do so based on your accomplishments or your lord's needs. IF you fully succeed in your task and are recognized for it, you should be rewarded with 5-10 Glory and a new Giri, determined jointly by the player and the GM. If you feel you have definitively failed or decide to abandon your Giri, you must lose a GM-determined amount of Glory - at least 5-10, but potentially much more. If your daimyo accepts your failure or honors your request for new duty, then again, you and the GM work together to make a new Giri. If you have no lord to serve as a result of your action, your new Giri is 'Find a new lord to serve.'
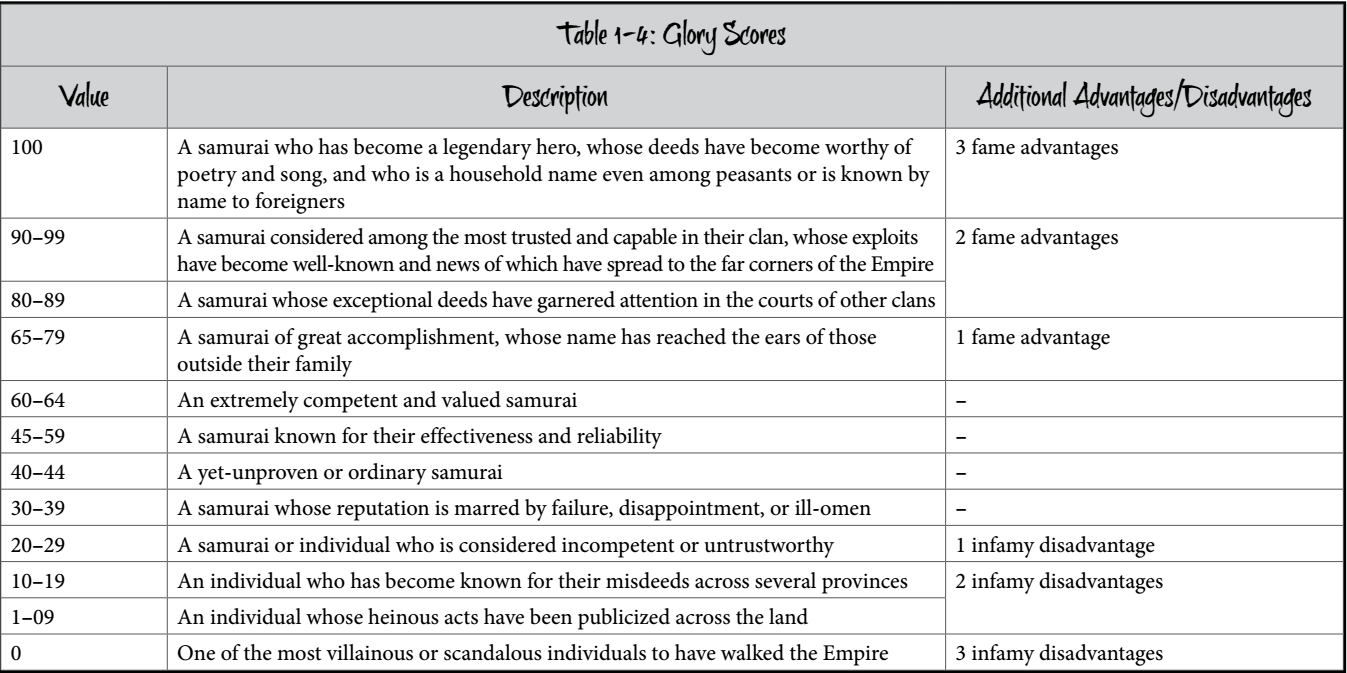
If you pass up the chance to pursue your Giri, you gain Strife equal to your Glory rank. The GM may also ask you to lose some Glory (if your lord would ifnd out) or stake Glory on the success of whatever you decided to do instead of obeying orders. As with Honor, getting Glory high enough gets you advantages (which must be subtype Fame) and low enough means disadvantages (subtype Infamy). Example Giri include: Restore the reputation/fortunes of your teacher's dojo. Protect someone chosen by your lord, even to the death. Capture a particular place for your clan. Keep a specific secret of your lord from becoming public. Attend to the needs of a particular kami or other spiritual creature. Kill multiple specific members of an enemy group. Kill a specific, extremely well-guarded enemy.
Status, meanwhile, reflects your social standing. It changes rarely and is mostly used to compare your social standing to other people, so you know what etiquette to use with them. PCs will almost never lose Status unless they renounce positions, get fired from service or become known to be tainted by the Shadowlands. Status is mainly gained via the granting of titles; players do not begin the game with any, but earn them through deeds and narrative. Titles rules are not in the beta. It should be noted that while burakumin are status 0, they can never raise that by any means - even geisha. Foreigners similarly can never raise their formal status, but can become quite influential due to trade agreements with groups like the Tortoise Clan or other groups specifically allowed to trade with them.

Note: at no point, even Honor or Glory 0, do you leave play. It used to be, in older editions, that Honor 0 meant you had to commit seppuku, generally, or otherwise become an unplayable NPC. This is no longer the case. I really appreciate that change.
So, let's talk chargen. Character creation has shifted over to a mostly lifepath-style system, reminiscent to me of Mouse Guard or similar. So, first, we have our starting stats. You have 1 in every Ring and 0 in every skill. During chargen, you cannot have a Ring go over 3. If you would, you instead shift one point to another Ring. Likewise, you can't have a skill over 3. If you would, you instead shift a point to a different skill.
Question 1: What clan does your character belong to?
Crab Clan: You get +1 Earth and +1 Fitness. You have base 30 Status. The Crab Clan lives at the southern border, standing guard on the Kaiu Wall around the Shadowlands, where the forces of Jigoku lie. The Crab Clan are rowdy by Rokugani standards, often rude and generally quite pragmatic. They have no patience for weakness of any kind, as any weakness could bring disaster to the entire group. You cannot, after all, expect honor or peace from goblins and demons. All Crab Clan characters have:
- General awareness of politics in Crab lands and the ability to name major family heads and other Crab leaders, along with their general political positions and allegiances.
- The ability to identify common Shadowlands creatures, such as goblins, ogres or zombies, and how to defeat them.
- Knowledge of stories and songs about heroes who faced great evils, such as oni, though they probably have not personally encountered any.
- The signs of the Shadowlands Taint in its advanced stages.
Crane Clan: +1 Air, +1 Culture. Base 35 Status. The Crane Clan, known as the Left Hand of the Emperor, descend from the Kami Doji, sister to Hantei, the first Emperor, and her resolution to bring order to the world of mortals. They claim she invented writing, politics, economics and art. Her most devoted followers were the ancestors of the modern Crane, and since then, they have become both the poets and the poetry, as they seek mastery in all they do. For them, politics and culture are fundamentally linked and indistinguishable, so they treat grace, refinement and cultural knowledge not only as virtues but as weapons. Failure to achieve excellence in the clan means you are doomed to obscurity and shame. All Crane Clan characters have:
- General awareness of politics in Crane lands and the ability to name major family heads and other Crane leaders, along with their general political positions and allegiances.
- Knowledge of the general state of political affairs between all clans.
- Knowledge of proper etiquette and protocal in the Imperial Capital.
- Working knowledge of the high arts and their historic masters, or at least those who were Crane.
Dragon Clan: +1 Fire, +1 Meditation. Base 30 Status. The Dragon Clan are strange and mysterious, focusing more on the search for enlightenment than most samurai, in emulation of the Kami Togashi. They have a reputation for eccentricity, and it is their duty to watch over and record what the Empire does. They rarely get involved as actively as other clans, and no one tends to know why they do intervene when they do. They are often guided by their founder's prophetic foresight, but even they do not always know what Togashi actually saw, only what was written. They are highly diverse in their pursuits, but all believe in the betterment of the self and, by bettering the self, bettering the Empire as a whole. Their leaving of their northern mountains is usually an effort to experience the Empire and see its history in the making. All Dragon Clan characters have:
- General awareness of politics in Dragon lands and the ability to name major family heads and other Dragon leaders, along with their general political positions and allegiances.
- Knowledge about monastic life and tradition, at least more than other clans, due to interaction with the Togashi Order.
- Knowledge of how to properly prepare mountain plants and animals as food.
- A working understanding of many physical phenomena of nature that others dismiss as boring or beneath their station.
Lion Clan: +1 Water, +1 Tactics. Base 35 Status. The Lion Clan are the ones that set the standard for how a warrior should be. They have the best armies in the Empire, and the best tacticians. They are known as the Right Hand of the Emperor for their military heritage, sworn to protect the Emperor as his personal guard and army. They are nearly fearless, with the threat of death only making them bolder, for honorable combat is the best way to die. They believe in striking first for victory, and will do anything the Empire asks of them. Their nature is war, and the Kami Akodo made them to enforce Hantei's will absolutely. Their entire culture is about glory and martial excellence, and the clan is a poor place for the gentle, as all of its members are expected to be warriors in some capacity, willing to die with a smile. Even those who are not true warriors often speak of their deeds in martial terms. All Lion Clan characters have:
- General awareness of politics in Lion lands and the ability to name major family heads and other Lion leaders, along with their general political positions and allegiances.
- Knowledge of military history, especially as it applies to their ancestors.
- The ability to identify and know the purpose of all Rokugani weaponry, even if they don't always personally know how to use them especially well.
- Knowledge of most common military maneuvers, engagements and tactics.
Phoenix Clan: +1 Void, +1 Theology. Base 30 Status. The Phoenix are a clan of contradictions - great power and great restraint, great intellect and great humility, self-sacrifice and rebirth. Thus, they are the most mystical clan, keepers of the Tao of Shinsei and the soul of the Empire. They mediate between the world of men and the spirit realms, calling on the power of the kami for immense magical ability. However, while they wield terrifying power, they know that even the purest and simplest wish can have horrific consequences if the wish brings the elements out of balance. Others often consider them too hesitant in use of their power, but few can question their dedication to peace and harmony. They value the Tao of Shinsei and balance more than other clans do, seeking harmony in the world and themselves. Their restraint born of the knowledge of the consequences of what they can do, however, is often taken as cowardice or passivity. All Phoenix Clan characters have:
- General awareness of politics in Phoenix lands and the ability to name major family heads and other Phoenix leaders, along with their general political positions and allegiances.
- Familiarity with the religious practices of Rokugan, from the rites of the priesthoods to the invocations of shugenja to the Tao of Shinsei, and even of the traditions predating the founding Kami, such as the Isawa elementalists or the Yobanjin animists.
- Knowledge of the names of the most significant kami in Phoenix lands, and possibly even some personal interactions with them.
- Knowledge of the names and locations of all major shrines.
Scorpion Clan: +1 Air, +1 Skulduggery. Base 35 Status. The follows of the Kami Bayushi follow a dark path, watching the Empire for threats from within rather than enemies without. The Code of Bushido, they know, tie the hands of the Crane and Lion - so they, the Emperor's Underhand, can reach the places others cannot. To combat liars, thieves and traitors, they would lie, cheat and steal, wielding blackmail, sabotage, even poison - dirtying their own hands, that others might be pure. However, despite their reputation, there are no samurai more loyal than Scorpions. Trust is hard-earned among them, and once given, they never break it. Betrayal is punished quickly, and the souls of traitors are bound forever in horrific limbo in the Traitor's Grove. This fierce loyalty, however, is only small consolation given the danger of their jobs ever since Bayushi's single vow: I will be your villain, Hantei. They are united by their solemn vow to preserve life with murder and to let others be honorable by staining themselves. Most Scorpions find one ideal they can uphold or one personal bond that can keep them sane and human, though some just vanish into their masks and become the horrible villains others see them as. All Scorpion Clan characters have:
- General awareness of politics in Scorpion lands and the ability to name major family heads and other Scorpion leaders, along with their general political positions and allegiances.
- Knowledge of the general state of political affairs between all clans.
- Awareness of the most substantial criminal cartels in the Empire, particularly where their interests overlap with or conflict with the Scorpion Clan.
- Knowledge of the general state of the court in the Imperial Capital.
Unicorn Clan: +1 Water, +1 Survival. Base 30 Status. A thousand years ago, the Ki-Rin Clan left Rokugan to find enemies beyond its borders. It was a dangerous journey, and it changed the clan utterly, from their combat to their magic to their philosophy. To survive, they adapted. Now, they have returned - the Clan of the Wind, still, but not the Unicorn. They still revere the Kami Shinjo, but are very different than most of the Empire. They value new things and flexibility in a way others don't. They tend to be very receptive to new ideas and cultural elements without fearing loss of their own culture, which they have somehow preserved consistently over centuries of travel. They are ambitious, however, and the more aggressive members of the clan often push out those who are lacking in drive. All Unicorn Clan characters have:
- General awareness of politics in Unicorn lands and the ability to name major family heads and other Unicorn leaders, along with their general political positions and allegiances.
- Knowledge of many basic facts of life in foreign lands, especially the Burning Sands and Ivory Kingdoms, even if they haven't been there themselves.
- Knowledge of at least some words in numerous foreign languages, such as Mekhem, Ivindi, Banatu and Portuga, and possible fluency in one of these or an even stranger tongue.
- Knowledge of the basics of mounted combat tactics and the proper handling and care of horses.
Next time: More chargen
The Makings of A Sam
Original SA post Legend of the Five Rings: The Makings of A SamSo, having picked a clan, our lifepath journey continues with: 2. What family does your character belong to? Even within a clan, the different families provide variety.
Crab
Hida Family: +1 Earth Ring, +1 Command, +1 Tactics. Base Glory 44. The Hida stand eternal guard on the Shadowlands to keep the Empire safe from Jigoku's armies. They descend from the Kami Hida, and tend to be large, strong, tough and impatient with weakness. They are pragmatic thanks to their harsh duties and have little time for the polite fictions of courtly life. They are often rather bitter about the condescension others show, mocking their manners and dress - especially given the costs they pay to keep those courtiers safe.
Hiruma Family: +1 Air Ring, +1 Skulduggery, +1 Survival. Base Glory 39. The Hiruma are the scouts of the Crab, warning of attacks and raids from beyond the Wall. Their warning allows the Crab to respond quickly, but because of the danger, they rotate constantly between service beyond the Wall and within the Empire, where they work as scouts, messengers and yojimbo. They tend to be slender and quick, relying on speed over raw physicality.
Kaiu Family: +1 Fire Ring, +1 Smithing, +1 Labor. Base Glory 40. The Kaiu are builders - of the Wall, yes, but also of the arms and armor of those who guard it. They are also responsible for the network of roads in Crab lands that allow them to move across the Wall so quickly, and the siege engines they use against the forces of the Shadowlands, and the fortresses spread across Crab holdings. There's not a lot of problems they don't try to solve with engineering.
Kuni Family: +1 Earth Ring, +1 Survival, +1 Theology. Base Glory 40. The Kuni are the most feared of all shugenja families, rooting out corruption in the Crab and the Empire. They will use any means they have to burn it out, and evne the Hida can rarely stomach all their methods. They are even willing to study, observe and dissect Shadowlands monsters, despite the risks this places their souls in.
Yasuki Family: +1 Water Ring, +1 Commerce, +1 Design. Base Glory 39. The Yasuki are talkative, small people who do not fit most Crab stereotypes, due to being a former Crane family that broke away in the third century; the Crane still haven't forgiven the Crab for that, quite. The Yasuki were the first true masters of mercantile industry, and they see to it that the Crab armies remain fed, equipped and strong, even if that means shady deals every so often. Their trade network crosses the entire Empire, and they could show up anywhere.
Crane
Asahina Family: +1 Water Ring, +1 Aesthetics, +1 Theology. Base Glory 40. The Asahina seek harmony and peace, and their pacifism and compassion set them apart even from other Crane. They use art and prayer to try and heal the world, spreaidng peace throughout the Empire. They know that peace requires sacrifice, of course - and it's a sacrifice they will happily make, if it means a better Empire.
Daidoji Family: +1 Earth Ring, +1 Fitness, +1 Tactics. Base Glory 40. The Daidoji are the practical, hardworking military core of the Crane. They are dedicated to service and are often underappreciated, despite the Iron Crane units, the yojimbo and the Daidoji Trading Council that all work to support the rest of the clan. They are selfless in service, and will do whatever must be done to protect the Crane.
Doji Family: +1 Air Ring, +1 Courtesy, +1 Design. (That's the Courtesy skill, not the virtue. ...names!!!) Base Glory 44. The Doji descend from the Kami Doji, and they are the embodiments of the arts and culture of the court. No major court event is complete without the Doji there, spreading art, friendshop and...well, usually gifts, but the Crane have been in a bit of trouble lately. Their communication network is unrivaled in terms of rumor and news of court, and few can afford to offend them easily.
Kakita Family: +1 Fire Ring, +1 Aesthetics, +1 Meditation. Base Glory 44. The Kakita, unlike the Doji, tend to pick a single skill and attempt to master it entirely, rather than merely being good at many. Their focus is unrivaled, and while they are as graceful and pretty as the Doji, they tend to be more athletic. They are known for producing some of the best duelists in the Empire.
Dragon
Agasha Family: +1 Fire Ring, +1 Medicine, +1 Smithing. Base Glory 40. The Agasha were founded by a pacifist, but are now militant. Once they were mystics, but now they combine that with solid practicality. They are practitioners of alchemy, metallurgy and medicine, mixing practical chemistry with mystical spirit-calling. It's unique as an approach, and occasionally it explodes on them horrifically, but they find they often learn more from their failures than their successes.
Kitsuki Family: +1 Air Ring, +1 Government, +1 Sentiment. Base Glory 44. The Kitsuki are the courtiers of the Dragon, but are quite unusual for courtiers. They are well-known for their perception, and their unique investigative techniques which rely on forensic evidence rather than testimony. They are a rather small family that often become magistrates as well as courtiers. In either role, they have a knack for seeking out truth.
Mirumoto Family: +1 Water Ring, +1 Fitness, +1 Tactics. Base Glory 44. The Mirumoto are most famous for their unique two-sword fighting style, niten, but they are also managers of the clan, working to allow the Togashi monks to pursue enlightenment in peace. They are surprisingly practical as a result, and happy to help their peasants. They are the largest of the Dragon families, and are the ones usually thought of as the face of the clan, as they are the most common outside Dragon lands.
Togashi Order: +1 Earth Ring, +1 Fitness, +1 Theology. Base Glory 45. The Togashi are followers of the Kami Togashi, and are more a monastic order than a family. They welcome anyone willing to embrace their beliefs and challenges - which begin with actually finding their mountain monasteries. The monks and nuns of the Togashi wander the Empire, telling koans and practicing martial arts, adorned by mystic and beautiful tattoos.
Lion
Akodo Family: +1 Earth Ring, +1 Command, +1 Government. Base Glory 44. The Akodo are masters of strategy and tactics, embodying the discipline of the Lion. They are warrior-scholars, studying war and battle in total, with no part of it too small to study. It is a common saying that no army led by an Akodo has ever known defeat, and they try to keep it as true as they can.
Ikoma Family: +1 Air Ring, +1 Composition, +1 Performance. Base Glory 40. The Ikoma are the best storytellers in the Empire, using their work to extol the virtues of Bushido and by extension the Lions. They are the Empire's greatest historians as well, despite that being the offical role of the Dragons - at least when it comes to warfare and personal legends. They are also the most expressive Lions, permitted to show emotion more openly than most samurai.
Kitsu Family: +1 Void Ring, +1 Survival, +1 Theology. Base Glory 40. The Kitsu descend from spiritual beings, and as a result, some of their number can speak to spirits. They are extremely traditional and conservative even by Lion standards, and even those without the gift of spirit speech answer to their ancestors, keeping genealogies and tending to the many tombs and shrines of the honored dead.
Matsu Family: +1 Fire Ring, +1 Command, +1 Fitness. Base Glory 44. The Matsu are the brave heart of the Lion and the largest of all families in the entire Empire. They form the core of the Lion armies, and descend from one of the best samurai in the early empire. In her honor, they maintain many matriarchal traditions and exclusively female military units. They are the harsh militarists, and the basis for most Lion stereotypes, due to their fiery, unrelenting and fiercely honorable nature.
Phoenix
Asako Family: +1 Air Ring, +1 Culture, +1 Theology. Base Glory 40. The Asako are quiet, scholarly types who leave the Isawa to run the clan. The Asako focus on wisdom even more than knowledge, and their work is usually designed to advance their spiritual path as well as the clan's agenda. They are the clan's courtiers, and are beloved across the empire as court scholars and tutors.
Isawa Family: +1 Fire Ring, +1 Meditation, +1 Theology. Base Glory 44. The Elemental Masters of the Council of Five are the rulers of the Phoenix, and almost always, they are Isawa. The family is one of the eldest shugenja families in the Empire, and they've had centuries to learn to call on the spirits. Some think them arrogant, but at heart, they are pious and dutiful in their devotion to balance and harmony.
Shiba Family: +1 Water Ring, +1 Courtesyt, +1 Tactics. Base Glory 40. The Shiba descend from a Kami and provide the clan's champion, but they have long been servants of the Isawa rather than masters. They focus largely on keeping the clan safe - and their great weapon in doing so is diplomacy, not force. They are expected to be scholars as well as warriors, and tend to understand the shugenja more than most bushi families do.
Scorpion
Bayushi Family: +1 Fire Ring, +1 Design, +1 Courtesy. Base Glory 44. The Bayushi are charming, ruthless and vicious, working hard to appear to be just as villainous as their legends claim they are. They tend to the sinister, favoring blackmail, poison and seduction as their tools, but always working to avoid becoming true villains. As long as they achieve a stable and prosperous Empire, however, the ends justify the means.
Shosuro Family: +1 Air Ring, +1 Performance, +1 Courtesy. Base Glory 40. The Shosuro are known to outsiders largely as excellent actors and performers. Most of the Empire fails to realize how true that is, however - they are the best of the Scorpion spies, masters of disguise. They are good entertainers, but their skills are just as useful towards darker ends.
Soshi Family: +1 Air Ring, +1 Design, +1 Theology. Base Glory 40. The Soshi tend to be overlooked, and prefer it that way. They are subtle manipulators, using rumor and whispers rather than more obvious tactics. However, their preference for waiting for the perfect moment tends to make them overly cautious and prone to overplanning.
Yogo Family: +1 Earth Ring, +1 Composition, +1 Theology. Base Glory 39. The Yogo are cursed - every one of them will betray the one they love most. They try to ignore the curse by focusing on their work and duty over all else. They've studied prayers and wards, constantly looking for ways to break their curse, and as a result have mastered many techniques to identify and fight evil magic. They are extremely diligent and almost terminally unappreciated.
Unicorn
Ide Family: +1 Water Ring, +1 Commerce, +1 Courtesy. Base Glory 40. The Ide are the Unicorn most frequently seen outside their lands, as they are the diplomats, couriers and merchants of the clan. They are thoroughly Unicorn, but tend to have learned how to blend their unique traditions and customs with those of the Empire, working to prove that, yes, the Unicorn are actually part of it. They tend to be calm, competent and friendly, looking to make allies across and sometimes beyond the Empire.
Iuchi Family: +1 Air Ring, +1 Fitness, +1 Theology. Base Glory 40. The Iuchi are priests, mostly, who provide most of the clan's shugenja. Their practices often date back to the time the Unicorn spent traveling foreign lands, and they're used to fighting alongside the clan's warriors. They practice sorcery known as meishodo, which uses talismans and names to manipulate spirits, a practice unknown elsewhere. They tend to be more open to exploring new methods and paths than more traditional groups.
Moto Family: +1 Fire Ring, +1 Command, +1 Finesse. Base Glory 40. The Moto are often seen as the least civilized Unicorns - stocky, heavily bearded and armed strangely by Rokugani standards. They have little use for the softer parts of the Empire - they are warriors born, always seeking battle, and they embrace the harsh life of the frontiers. Their heritage and culture are often questioned by more traditionalist samurai, but their skill and bravery are not.
Shinjo Family: +1 Water Ring, +1 Fitness, +1 Government. Base Glory 44. The heart of the Unicorn, they are the descendants of explorers that followed the Kami Shinjo beyond the Empire. Their love of discovery is not gone, and they enjoy travel a lot. They lead the Unicorn, working to keep the clan together and in service to the Empire. They are master equestrians and scouts, and while they prefer peace by far, they do not flinch from war.
Utaku Family: +1 Earth Ring, +1 Fitness, +1 Tactics. Base Glory 44. The Utaku have embraced Bushido far more than any other Unicorn family - and that's saying something. Their elite battle maidens, the shiotome, are embodiments of bushido, and not even the Lion would question their honor. They are strictly matriarchal, with the women riding to war and the men serving as infantry or stablehands and househusbands - unusual even among the Unicorn. They are the best heavy cavalry and horse breeders in the Empire.
From there, we get 3. What is your character's role and school? Not all of the schools to be featured in the final core rules are presented in the beta, however. As for role - well, you have bushi (warriors), courtiers (politicians), shugenja (priest-wizards), monks (enlightened mystics, pretty much just the Togashi here, but many samurai become monks when they retire), and ninja (never admitted openly, of course, but assassins and spies, largely found among the Scorpion). Every school fits one of the roles; the role has no mechanical effect, but gives a general sense of what duties the samurai in the school are expected to perform. Every school has access to special techniques - katas, shuji, rituals, invocations, kiho...we'll get into what those actually do later. They're your cool powers.
Crab schools tend to be highly practical and often train their students to expect to die - and so to bring out the best they can against the death that will come.
Hida Defender (Bushi): Base Honor 40. The school of fortitude, courage and protection. They do not face honorable foes, so they cannot afford to act as if it's a fair fight. They specialize in killing monsters and have developed a fighting style that allows them to do so well. +1 Earth Ring, +1 Water Ring, +1 to five of Fitness, Martial Arts [Melee], Martial Arts [Ranged], Martial Arts [Unarmed], Meditation, Survival or Tactics. They can learn Kata, Rituals and Shuji, and begin the game with the Katas Lord Hida's Grip and one of Striking as Earth or Striking as Water. Their school ability is Way of the Crab. They ignore the Cumbersome quality of armor they wear, and once per scene before making a check to resist a crit, they may reduce the severity of the cirt by (Physical Resistance of armor + School Rank), to a minimum of 0.
Kuni Purifier (Shugenja): Base Honor 35. The Kuni Purifiers master prayers and power to deny the darkness, specializing in using earth kami powers to banish evil. They work to understand the nature of the Shadowlands threat, and as a result, a not insignificant number fall to corruption. They paint hteir faces with stylized Kabuki-esque patterns to protect their souls form the Taint and tend to be rather paranoid. +1 Fire Ring, +1 Water Ring, +1 to three of Martial Arts [Melee], Medicine, Sentiment, Skulduggery, Survival and Theology. They can learn Invocations, Katas and Rituals. They begin play with the Invocations Armor of Earth and Jade STrike, one of the Katas STriking as Earth or Striking as Fire, and the Rituals Commune with the Soirits and Threshold Barrier. Their school ability is Gaze into Shadow. When they make a check targeting a being they know to either have the Shadowlands Creature ability or the Shadowlands Taint disadvantage, they may choose up to (School Rank) kept dice showing Strife symbols and alter them to any face with a Success symbol on it.
Crane schools are generally focused on teaching proper decorum, regardless of what else they teach. Many tend to see the Crane as priggish or haughty as a result, but they all have at least a basic appreciation for the arts.
Doji Diplomat (Courtier): Base Honor 50. The masters of court games and favors, the leading edge of fashion and culture. They are rarely unkind - they don't need to be. They just have to be silent and snub you. Their networks of favors and gifts let them play easily in the social nets of the Empire. +1 Air Ring, +1 Water Ring, +1 to five of Aesthetics, Composition, Courtesy, Culture, Design, Government and Martial Arts [Ranged]. They can learn Kata, Shuji and Rituals. They begin play with one shuji from among Cadence, Shallow Waters or Whispers of Court, and the shuji Lady Doji's Decree. Their school ability is Speaking in Silence. Once per scene, when making a check to persuade or influence someone, they may add (School Rank) kept Ring dice to their roll which show an Opportunity symbol.
Kakita Duelist (Bushi): Base Honor 50. They focus on striking only once, mastering the single perfect iaijutsu strike. This, they believe, is the pinnacle of martial skill. Other skills are not neglected, but they aren't focused on, either, at the Kakita Dueling Academy. Some critique their singlemindedness, but they tend to be the best duelists in the Empire. +1 Earth Ring, +1 Air Ring, +1 to five of Design, Courtesy, Fitness, Martial Arts [Melee], Meditation, Sentiment and Smithing. They can learn Kata, Shuji and Rituals. They begin with the Iaijutsu kata and one shuji - either Shallow Waters or Weight of Duty. Their school ability is Way of the Crane. When they inflict a crit, they may increase or decrease its severity by up to (School Rank).
Dragon Schools tend to be pretty eclectic, focusing on individuality and enlightenment through skill or knowledge.
Kitsuki Investigator (Courtier): Base Honor 45. They're a pretty recent school, formed after Agasha Kitsuki saved the Mirumoto daimyo's life via forensic evidence. They use observation, experimentation and logic to find the truth, which is very abnormal for the Rokugani judiciary, which relies on testimony entirely. They find that truth and justice usually align, which can bother those in power, but they don't care. They love to work as magistrates as well as being courtiers. +1 Air Ring, +1 Water Ring, +1 to five of Culture, Government, Martial Arts [Melee], Medicine, Sentiment, Skulduggery and Survival. They can learn Kata, Shuji and Rituals. They begin with one kata from among Striking as Air or Striking as Water, and the shuji Shallow Waters. Their school ability is Kitsuki's Method. When making a check to investigate, they may consider their Skill to be equal to (School Rank) if it's lower. If it's higher, they instead add one kept Ring die showing an Opportunity symbol.
Togashi Tattooed Order (Monk): Base Honor 40. The Togashi Order will accept anyone, if they can prove themselves worthy at a monastery. They focus on muscular training, the Tao of Shinsei, and wandering the land to seek enlightenment. They are known for their mystic tattoos, and only their deepest ise zumi initiates learn that the power of the tattoos is that they are mixed with the blood of the Kami Togashi. +1 Earth Ring, +1 Void Ring, +1 to four of Fitness, Martial Arts [Melee], Martial Arts [Unarmed], Meditation, Survival and Theology. They can learn Kiho, Rituals and Shuji. They begin the game with the shuji Lord Togashi's Insight and three Kiho from among Earth Fist, Earth Needs No Eyes, Flame Fist, Chi Protection or Water Fist. Their unique ability os Blood of the Kami. They get (School Rank) tattoos, which each correspond to a skill - Fitness is Mountain, Survival is River, Skulduggery is Cloud, Command is Volcano, Sentiment is Bat, Martial Arts [Unarmed] is Tiger, Meditation is Lotus and Medicine is Vine. When performing a check for any skill they have a tat for, they add one rolled Ring die showing an Opportunity symbol.
Lion Schools focus on warfare, and every student learns to fight - it's good for the soul. Even for the non-warriors.
Akodo Commander (Bushi): Base Honor 50. The Akodo War College teaches control - of the field, of the flow, of the self. They study Leadership, a text written by the Kami Akodo himself, and are trained both to fight and to be leaders, treating war almost as a game of go. They strike without hesitation, because thought and action must be one, as they minimize losses while bringing victory. +1 Earth Ring, +1 Water Ring, +1 to five of Command, Fitness, Government, Martial Arts [Melee], Martial Arts [Unarmed], Meditation and Tactics. They can learn Kata, Shuji and Rituals. They get kata from among Striking as Earth and Striking as Water, and the shuji Lord Akodo's Roar. Their school ability is Way of the Lion. When they succeed at an Attack or Support action check during a skirmish or mass battle, they remove up to (School Rank) Strife from themselves and, if they do, add that many bonus successes to the check. (I assume you need to have the Strife to remove it.)
Ikoma Bard (Courtier): Base Honor 45. The Ikoma Bards are historians, storytellers and living monuments to the heroes of the past. They don't just preserve knowledge, they share it widely. They are rarely frontlines combatants, but instead fight the battle of words, remembering glorious deeds and teaching of battles past. They also support other Lions in seizing glory regardless of danger, letting them know that no hero will die forgotten. +1 Water Ring, +1 Fire Ring, +1 to five of Composition, Courtesy, Culture, Martial Arts [Ranged], Performance, Sentiment and Tactics. They can learn Kata, Shuji and Rituals. They begin with the kata Warrior's Resolve and one shuji from Fanning the Flames or Tributaries of Trade. Their school ability is Heart of the Lion. When they perform a check with a Social skill targeting one or more characters, they may gain up to (School Rank) Strife to remove that amount from the targets, divided as they choose. They may do the same to remove up to (School Rank) Strife from themselves to give to their targets, the same way.
Phoenix Schools are all about theology and reverence for the Tao and the spirits.
Isawa Elementalist (Shugenja: Base Honor 40. These guys are the undisputed masters of the spirits, seeking knowledge for centuries to better understand the kami, the Fortunes and the elements. They have great power, but their knowledge of the price of that power means they are reluctant to use it save in times of need, for fear of upsetting the natural balance. +1 Fire Ring, +1 Water Ring, +1 to three of Composition, Courtesy, Medicine, Meditaiton, Performance and Theology. They can learn Invocations, Shuji and Rituals. They begin with three invocations from Extinguish, Grasp of Earth, Path to Inner Peace or Tempest of Air, and the rituals Commune with the Spirits and Divination. Their school ability is One with the Elements. Once per scene, when making a check to activate an invocation technique, before assembling their dicepool they may reduce the check's TN by (School Rank).
Shiba Guardian (Bushi): Base Honor 45. They are the sworn protectors of the Isawa, working as bodyguards. They are both scholar and warrior, and prefer to avoid combat when possible - though they are quite good at it, despite not liking it, due to their long practice in moving in harmony with the elements. +1 Earth Ring, +1 Water Ring, +1 to five of Courtesy, Fitness, Martial Arts [Melee], Meditation, Survival, Tactics and Theology. They begin with the kata Lord Shiba's Selflessness and one kata from Striking as Earth or Striking as Water, and can learn Kata, Shuji and Rituals. Their school ability is Way of the Phoenix. Once per scene, when a character at range 0-3 makes a check, they may negate up to (School Rank) Stress symbols.
Scorpion Schools are very practical and often very good at lying and spotting lies.
Bayushi Manipulator (Courtier): Base Honor 35. Practiced deceivers and tempters, masters of finding and exploiting weaknesses. They are the shadow to the Doji's light, and no court is truly complete without them. They accept their role as villains, and in doing so, ensure that no real villains actually show up. +1 Air Ring, +1 Fire Ring, +1 to five of Courtesy, Command, Design, Martial Arts [Unarmed], Performance, Sentiment and Skulduggery. They can leanr Kata, Shuji and Rituals, and begin play with the shuji Lord Bayushi's Whispers, and one of Cadence or Rustling Leaves. Their school ability is Weakness Is My Strength. When they exploit a target's disadvantage as part of a Scheme action, they may reroll up to (School Rank) additional dice.
Shosuro Infiltrator (Ninja): Base Honor 30. They are actors, acrobats and masters of surprise and disruption, sowing chaos and vanishing into the dark. They are often used not just to perform actual missions, but to be distractions that disguise the actual mission, faking (and failing at) ninja assassinations to disguise what was actually going on...or performing ninja assassinations. Well, shinobi assassinations. There are no ninja. Shinobi are hella illegal, of course. +1 Air Ring, +1 Fire Ring, +1 to five of Courtesy, Fitness, Games, Performance, Martial Arts [Melee], Martial Arts [Unarmed] and Skulduggery. They can learn Kata, Rituals and Shuji. They begin with the kata Soaring Slice and one shuji from either Whispers of Court or Sensational Distraction. Their school ability is The Path of Shadows. When performing an Attack action against a target unaware of their presence or who is Incapacitated or Unconscious, they increase their weapon's base damage and deadliness by (School Rank).
Unicorn schools all teach how to ride and travel easily, but are otherwise quite innovative and quick to borrow working methods from other cultures.
Iuchi Meishodo Master (Shugenja): Base Honor 40. The Unicorn have learned much of magic from outside the Empire, and their focus is the making of magical talismans. While the Meishodo Masters are priests, they prefer to explore the world rather than lock themselves away in a library or temple, and their magic is unique, wielding foreign words of power to bind spirits into talismans that others can use as well. +1 Earth Ring, +1 Water Ring, +1 to three of Aesthetics, Design, Martial Arts [Melee], Meditation, Survival and Theology. They can learn Invocations, Shuji and Rituals. They begin with two invocations from Grasp of Earth, Jurojin's Balm or Rushing Wave, the ritual Commune with the Spirits, and one shuji from either Weight of Duty or Well of Desire. Their school ability is The Way of Names. As a downtime activity, they can make a TN 2 Deisgn check using any ring to bind a spirit to a vessel and make a meishodo talisman for one invocation of the corresponding element that they know. While they hold the talisman in their possession, the TN to activate that invocation is reduced by 1. They can give the talisman to another shugenja, allowing them to use the invocation even if they don't know it and reducing the TN to activate it by 1, but the talisman ceases to work after (School Rank) uses. They may have up to (School Rank) talismans at once, but only one per invocation.
Shinjo Outrider (Bushi): Base Honor 40. These are the core of the Unicorn forces, focusing on speed and flexibility. They learn reconnaissance and horsemanship, and no one is more mobile than they are. They prefer the cavalry bow to melee combat, and are very accurate with it. They also learn to live off the land and exploit terrain. +1 Earth Ring, +1 Fire Ring, +1 to five of Commerce, Fitness, Martial Arts [Melee], Martial Arts [Ranged], Medicine, Survival and Tactics. They can learn Kata, Shuji and Rituals. They begin the game with one kata from either Striking as Fire or Striking as Water, and the shuji Lady Shinjo's Speed. Their school ability is Born in the Saddle. Once per scene, before rolling dice, they may declare how they are directing their horse to help them and how the horse should be helpful to reduce the TN of their check by (School Rank). The horse must, obviously, be present.
Once your school is picked, you get 4. How does your character stand out within their school? There's always ways for students to excel in different areas. You choose one of the following:
- Creativity, passion or drive. +1 Fire Ring. You are recognized for your inventive ideas, sincere love of craft or intense drive to succeed. Your energy and enthusiasm inspire fellow students and galvanize your rivals to do their best, too.
- Grace, eloquence or empathy. +1 Air Ring. You stand out for your finesse, social refinement or sensitivity to others' feelings. Your work may appear effortless, but in truth your innate attention to detail makes you work as hard as anyone, or harder.
- Adaptability, friendliness or awareness. +1 Water Ring. Your willingness to roll with situations, your gregariousness or your understanding of the environment stands out. You tend not to get stuck in mental ruts like most people, and when you do, you have ways to get out of them.
- Thoroughness, patience or calm. +1 Earth Ring. You are stoic and bear your challenges without complaint. Your teachers may rely on you as an assistant, and your peers probably see you as a source of wisdom and stability.
- Self-awareness, insight or mysticism. +1 Void Ring. All arts are, in some way, a study of the universe, the self and the ties between them. You are better at seeing things this way than most, and may seem to have a supernatural sense of things, acting based on hunches and insight.
Once we know that, we ask: 5. What is your character's duty to their lord? This is where you define your Giri. Bushi tend to be bodyguards, soldiers, magistrates, executioners or generals. Courtiers tend to be artisans, performers, guides, diplomats, magistrates, seneschals or spymasters. Shugenja tend to be priests, researchers, librarians, warrior-priests, shrine keepers or spiritual advisors, but rarely might be guards, artisans or magistrates. Monks who no longer belong to a Clan tend to serve their order rather than a lord, serving as priests, temple caretakers, charity workers, librarians, teachers or pilgrims. Monks that still belong to a Clan usually have similar duties to shugenja. Ninja serve as assassins or infiltrators, but usually have some kind of cover guise. A ninja's giri is almost always secret, and the player should also decide what their officially stated giri is as well as their true one. When doing this, you also work with the GM to decide who your lord is and what they're like. You might work for a clan magistrate, a city governor, a provincial daimyo or even a family daimyo. You may even have two lords, such as if you are an Emerald Magistrate - the Emerald Champion and your clan lord. The GM may or may not choose to ask you to make a second giri if this is the case.
6. What does your character long for? This is where you define your Ninjo. This is the challenge you set to make your character confront the ideals and cost of Bushido. 'Be an honorable samurai' or 'obey my lord' are inappropriate - but maybe 'punish samurai who abuse their power by dishonoring themselves' or 'win my lord's love' are good, since they provide room for conflict.
7. What is your character's opinion of their clan? Do they embrace all of the clan's ideals and goals? Do they conflict with the traditional views of the clan or their policies? You pick one of the following:
- You believe firmly in clan precepts and seek to uphold them when possible. Gain +5 Glory.
- You have a fundamental disagreement with clan beliefs, policies or practices,a nd you've defied them in the past. If Crab, get +1 Aesthetics or Design. If Crane, get +1 Commerce. If Dragon, get +1 Seafaring. If Lion, get +1 Skulduggery. If Phoenix, get +1 Tactics. If Scorpion, get +1 Labor. If Unicorn, get +1 Culture.
8. What does your character think of Bushido? Samurai are meant to venerate the code, but some clans and families care more about some tenets than others, and some samurai reject bushido entirely. Do you agree with your clan? Do you differ on certain points or even reject parts of bushido? Why? Pick one of the following:
- You believe strongly in the orthodoxy of bushido. Gain +10 Honor.
- You diverge from some or all common beliefs on how samurai should behave honorably. You have done things that many would see as unbefitting a samurai or at least very different. Get +1 to one of Commerce, Labor, Medicine, Seafaring, Skulduggery or Survival.
Next time: Advantages and disadvantages in chargen.
Now I Have The Advantage
Original SA post Legend of the Five Rings: Now I Have The AdvantageOur next set of questions! 9. What is your character's greatest accomplishment so far? You get to decide what your big achievement to date is - winning a tournament, creating a great work of art, killing some powerful animal on a hunt, leading a negotiation for a successful diplomatic marriage, whatever. You probably have some kind of notable strength, ability or quality that helped you do this thing, though your character may not attribute their success to this trait. You also choose one Distinction advantage at this stage, ideally one that helped you achieve your great feat or which you developed as a result of it. More on those in a bit. If none on the list appeal to you, you absolutely can work with your GM to make one up.
10. What holds your character back most in life? There's no such thing as a perfect samurai - everyone has challenges that hold them back somehow. Bad temper, naivete, an enemy, a family curse...all kinds of problems. You select one Adversity disadvantage for your character. Again, more on those in a bit.
11. What activity makes your character feel at peace? This could be sake, a hobby, a favorite possession or even a person. Just figure out what makes your character happy and calm, and why. Then you choose a Passion advantage related to your interest or hobby.
12. What concern, fear, or foible troubles your character the most? Samurai are expected to be in control, sure, but everyone is afraid of or angry at something. What is your character's fear or trigger, and why? Pick an Anxiety disadvantage related to this.
13. Who has your character learned the most from during their life? This might be a sensei, a fellow student, a parent, a lord, a spouse, a younger sibling, a dead loved one, a rival. In the relationships part of your sheet, write down their name, then pick one:
- An advantage related to your character's mentor and their relationship.
- A disadvantage related to your character's mentor and their relationship, and +1 to a skill you developed as a result.
14. What detail do others find most striking about your character? Some unusual look, fashion or mannerism, say. This has no mechanical weight, but you can write it down in your Notes section.
15. How does your character react to stressful situations? What emotions do they tend to show, and why? Describe some noteworthy physical response and write in your Personal Outburst section. When you have an Outburst, you also do this. Also select what Outburst is most common for your character. You may even work with the GM to custom-design an Outburst, mixing matching the narrative and mechanical effects, reflavoring or even creating one entirely new, as long as it's on par with the others.
16. What are your character's preexisting relationships with other clans, families, organizations, and traditions? Figure out what groups are important in your life, good or bad, if you have any problems with other clans, or any strong fondnesses. Record anything you feel is noteworthy in your Relationships section. This has no mechanical weight.
17. How would your character's parents describe them? Parental devotion is expected in Rokugan, but not experienced as much in practice - for every dutiful child that meets the ideal, there are samurai who do not get along with their parents or who only pay lip service. Figure out your relationship with your character's parents or immediate family (and if they're still alive), what your childhood was like. Record it in your Relationships section. This has no mechanical weight.
18. Who was your character named to honor? It's common for Rokugani names to honor a recent or noteworthy ancestor, whether by taking their name or just a syllable or two from it. Figure out whose name you share and how you feel about the person you were named for, as well as if they died or are still alive. Then, roll 1d10 twice, and compare the results to the Heritage chart. You get to pick which of the two results you like better.
- 1 - Famous Deed. One of your ancestors won a great victory for the clan or Empire and was rewarded with an item of incredibly quality. Get +3 Glory and roll 1d10 to find out what your new belonging is. On a 1-3, the heirloom is a weapon. On a 4-6, it's armor. On a 7-8, it's some other item. On a 9, it's a horse or other animal. On a 10, it's a boat or estate. You choose one Item Quality for it, and the GM chooses another. (More on Item Qualities later.)
- 2 - Glorious Sacrifice. One of your ancestors died nobly in battle, and one of their signature items was lost with them or shortly after. Get +5 Honor and +5 Glory, and roll 1d10 as above. You choose one Item Quality for the heirloom and the GM chooses another. You do not know where the heirloom is, but could reclaim it later in the game.
- 3 - Wondrous Work. One of your ancestors produced something of great beauty, and others expect you to live up to this legacy. Gain +5 Glory and roll 1d10. On a 1-3, you get +1 Aesthetics. On a 4-6, +1 Composition. On a 7-8, +1 Design. On a 9-10, +1 Smithing.
- 4 - Dynasty Builder. One of your ancestors was vital to the rise of a powerful lord, using cunning and good advice to aid them. You have heard many times how important power wielded subtly is. Get -3 Glory and roll 1d10. On a 1-3, you get +1 Command. On a 4-6, +1 Courtesy. On a 7-8, +1 Games. On a 9-10, +1 Performance.
- 5 - Discovery. One of your ancestors made a great discovery, invented something important or found an ancient secret. You have a rudimentary grasp of what they found, due to family lore. Gain +3 Glory and roll 1d10. On a 1-3, you get +1 Culture. On a 4-5, +1 Sentiment. On a 6-7, +1 Government. On an 8-9, +1 Medicine. On a 10, +1 Theology.
- 6 - Ruthless Victor. One of your ancestors defeated a rival, destroying their forces by cunning or power. You have learned the value of brute force. You get -5 Honor and roll 1d10. On a 1-3, you get +1 Fitness. On a 4-5, +1 Martial Arts [Melee]. On a 5-6, +1 Martial Arts [Ranged]. On a 7-8, +1 Martial Arts [Unarmed]. On a 9, +1 Tactics. On a 10, +1 Meditation.
- 7 - Elevated for Service. One of your ancestors was a ji-samurai or commoner who served so well that they were elevated to Great Clan status by marriage or daimyo's mandate. You learned the basics of the skills they were best at. Get -3 Glory and +3 Honor, and roll 1d10. On a 1-2, you get +1 Commerce. On a 3-4, +1 Labor. On a 5-6, +1 Medicine. On a 7-8, +1 Seafaring. On a 9, +1 Skulduggery. On a 10, +1 Survival.
- 8 - Stolen Knowledge. One of your ancestors learned a secret of some other school and secretly passed it down the family line. Now, you know it. You get -5 Honor and roll 1d10. On a 1-3, you know a kata. On a 4-6, a shuji. On a 7, a ritual. On an 8, an invocation. On a 9, a kiho. On a 10, a maho spell. Select one technique of that type which is rank 1. You know that technique and can use it even if your school would not normally allow you to.
- 9 - Imperial Heritage. You are descended from the Imperial line, if distantly. You get +10 Status and the Blessed Lineage advantage, on top of the normal amount of advantages you'd be able to have.
- 10 - Outsider. You are named not for an ancestor but someone else. You may be an adopted orphan with no knowledge of your ancestors, or you may be named for an outsider that did a great service to the clan, or your parents were trying to send you a message. You get -3 Glory. You may choose two rings and reduce one of them by 1 to raise the other by 1. If you do not do this, instead choose one item of Rarity 6 or less and add it to your starting kit.
19. What is your character's personal name? Feel free to pick a name! There's a list of Japanese names to give ideas, along with their meanings. The game notes that most people will address you by family name rather than personal name, however, except for close associates. This has no mechanical weight.
20. How should your character die? What is your ideal for your character's death? Will they achieve virtue and move on to Yomi, joining the ancestors, or will their soul be too impure and forced to reincarnate again? This has no mechanical weight.
Now, XP! The game gives a general guideline - 2 XP per hour of play. XP can be spent to increase Rings or Skills, or to gain new techniques. The GM can allow you to buy Advantages or get rid of Disadvantages, but that's entirely discretionary and has no listed cost. Rings are (3*new value) XP, Skills are (2*new value) XP, and Techniques are 2 XP (if they only give you new Opportunity options) or 3 XP (if they give you a new action). Techniques often have prerequisites you must meet as well, such as being of a certain school rank or above. The only time you can ignore prerequisites is if it's on your School's advancement chart. What's the advancement chart?
To rank up, you have to spend a certain amount of XP at each rank on a preset list of things, different for each school and at each rank. The Hida Defender, for example, must spend 16 XP to reach rank 2, and that XP must be spent on some combination of: Martial Skills, Command, Medicine, Survival, Rank 1 Katas, Rushing Avalanche Style, Honest Assessment or Rings. Rushing Avalanche Style is normally a School Rank 2 kata, but Hida Defenders can learn it at Rank 1 because it's on their school advancement chart. XP spent on stuff not on your current advancement chart does not help you rank up. I'm okay with that, but feel it should give you some minor benefit on top of 'now you have what you spent XP on', to reward you for expanding your horizons beyond the school-mandated stuff. Reaching Rank 2 is always 16 XP, rank 3 is 20, rank 4 is 24, rank 5 is 32, and the pinnacle, rank 6, is 48. Once you hit Rank 6, you also get your school's capstone ability.
Capstones
Hida Defender: The Mountain Does Not Fall. At the start of your turn, you may spend 1 Void Point. If you do, add your Void Ring to your Resilience and Composure, and ignore all disadvantages, conditions, terrain, and negative effects of techniques or abilities you are currently suffering. If you would die while this is active, you do not die until the effect ends. This lasts until the end of your next turn.
Kuni Purifier: Purge the Darkness. Once per session, you may spend 1 Void Point to use an invocation against all the wicked in your sight. Instead of the usual number of targets, your next invocation instead targets every being in range that you know has the Shadowlands Taint disadvantage or Shadowlands Creature ability.
Doji Diplomat: The Lady's Grace. Once per scene, you may spend 1 Void Point to reduce your Strife to 0. Every friendly character in the scene may remove (Your Honor Rank/2) Strife, as well.
Kakita Duelist: Strike with No Thought. Once per scene, as an Attack action, you may make a Martial Arts [Melee]/Void check targeting one character in range 2-4 using a sheathed katana or wakizashi. The TN is their Vigilance. You immediately move to range 1 of them. If you hit, you automatically cause a crit with severity equal to your weapon's Deadliness plus your bonus successes. You may spend Opportunity symbols on this check to cause characters in range 0-2 of your target to become Dazed and Disoriented, at the cost of 1 symbol per character so affected.
Kitsuki Investigator: Eyes Betray the Heart. Once per scene, when performing a skill check to investigate, you may spend Opportunity symbols to reserve one unkept die per symbol spent. The next time you perform a check to interact with the person or thing you were investigating, you may add any number of those reserved dice as kept dice. Any reserved dice you do not use this way are discarded after the check.
Togashi Tattooed Order: Blood of the Dragon. As a Support action, you may choose one of your tattoos and empower it until the end of the scene. Each tattoo can only be empowered once per session. When performing checks to which an empowered tattoo applies, you add two rolled Ring dice showing any faces you choose, instead of one rolled Ring die showing 1 Opportunity symbol.
Akodo Commander: Akodo's Final Lesson. Once per round, when you fail a check during a skirmish or mass battle, you may spend 1 Void Point. If you do, you may attempt the check again, but the TN is now 2.
Ikoma Bard: Lion's Pride. Once per session as a Support action, you may attempt to convince everyone in the area of the glorious reputation of one character in the scene, embellishing the truth as needed, by making a TN 5 Performance/Fire check targeting one character. The TN is 6 to target yourself, and 4 if you target another Lion. If you succeed, the TN of all the character's Social skill checks is reduced by 3 until the end of the scene, and the TN of all other checks by 1.
Isawa Elementalist: Master of Elements. When another character performs an Air, Earth, Water or Fire invocation, you may spend 1 Void Point to instantly recognize the kami they are invoking and its abilities. You increase your Supernatural Protection against the technique by (Theology) and you may use the technique even if you don't know it. These both last until the end of the scene.
Shiba Guardian: Stand of Honor. You may spend 1 Void Point to perform this action, targeting each enemy in the scene. Until the start of your next turn, when an enemy moves in range of your readied weapon, you may immediately make a TN 3 Martial Arts [Melee] check using the Ring associated with your stance. If you succeed, the target takes physical damage equal to your weapon's base Damage plus your bonus successes and becomes Immobilized.
Bayushi Manipulator: Little Truths. When you perform a check targeting another character to which one of your advantages or disadvantages applies, you may select another advantage or disadvantage that shares a type with it. Unless the target has clear evidence to the contrary, they believe you have the selected advantage or disadvantage rather than the one you actually do. If they attempt to seize or exploit this false advantage or disadvantage, their check automatically fails with a shortfall of 3, they suffer 3 Strife and become Disoriented.
Shosuro Infiltrator: The Final Silence. As an Attack action, you may make a TN 4 Martial Arts [Unarmed]/Air check targeting any number of minion NPCs at range 0-4. If you succeed during a narrative scene, you silently kill all of them over a few minutes. If you succeed during a conflict scene, at the end of each of your turns you may silently kill one of these targets at range 0-2, in addition to any other actions you take.
Iuchi Meishodo Master: The Spirits Unbound. At the end of your turn, you may spend 1 or more Void Points to unleash the powers within that many of your talismans, sacrificing them to free the spirits within. You may immediately perform each of the invocations for which those talismans were made, reducing the TN by 3.
Shinjo Outrider: I Will Always Return. Once per session, you may call out to your steed. At the beginning of the next round, your horse arrives, regardless of any barriers that might normally have prevented it from reaching you. If your steed has recently died, its spirit possesses the nearest horse to you and shows up anyway.
Now, advantages and disadvantages! Every advantage has several Types - basically, keywords to describe what kind it is. Physical, mental, interpersonal, spiritual, injury, curse... that kind of thing. Types have no mechanical implication by default but can be referenced by other effects. There are four categories of Advantage/Disadvantage. Distinctions are your natural aptitudes, and cancel out Adversities. All Distinctions have both a unique narrative effect and a standardized mechanical effect. Passions are your interests, hobbies and so on. They cancel out Anxieties. Likewise, they have both a narrative and mechanical effect. Adversities are the factors in your life that make your duties harder, whatever they are. They cancel out Distinctions, and they too have narrative and mechanical effect. Anxieties, same deal, but they're your fears, hatreds and that kind of thing.
Distinctions can only be earned via narrative or by gaining appropriate levels of Honor, Glory or Status. They can never be purchased with XP. You have no limit on how many you can have, however. Passions are usually set in stone, but the GM may allow you to gain a new one for 3 XP. However, you can never have more than 3 Passions by any means. However, the GM may allow you to swap one out for another or lose one due to narrative events. Adversities can be gained in play via suffering Crits, the Afflicted condition or various other sources, and there's no limit on how many you can have. Anxieties are almost never gained after chargen, but if you really want a new one, the GM may allow you to take it; there is no cost, as Anxieties have limited benefit to you besides potentially providing Void Points. You may never have more than three Anxieties, much like Passions.
So how do you use them? Well, any of them will have a narrative effect you can call on whenever it's relevant, and when we look at the examples they've already made, we'll discuss those. Also, they can make it so you don't have to make checks for certain things - a character whose Passion is Sake should never have to make a roll to identify trivia about a bottle of sake, because...well, that's their hobby. A blind character never has to make a check to avert their eyes from a bright flash. Of course, sometimes you'll need to make checks others won't - perhaps to resist looking into something you have a Passion for, or to face something you're afraid of. At times, an Advantage may even function as a Disadvantage. If an Advantage would be a logical vulnerability in a situation, the GM may invert it to force you to use it as a Disadvantage of the corresponding type for a check, instead. If this happens, you get a Void Point.
Likewise, if you know a target's Advantage that would logically be a weakness you could take advantage of, you may seize the advantage, spending 1 Void Point to apply it as an advantage to your check. You can also leverage a Disadvantage you have the same way, spending 1 Void Point to apply it as a corresponding Advantage to your check if you can find a way that Disadvantage would be useful to you. And you can exploit someone else's Disadvantage by spending 1 Void Point to use it as a corresponding Advantage on your check. The list of examples that will come below is not complete - there's a sidebar noting that some setting-specific ones have been held back for the core book, but also that you can just make up new ones if you want to. Every Advantage and Disadvantage also has an associated Ring, which will mostly be the Ring of checks they might apply to mechanically.
Example Distinctions - not all of the list, just ones I think are neat or illustrative.
Ally [Character's Name] (Water) - Type: Interpersonal. You have a powerful alliance with an NPC. As a narrative effect, they will help you in any way that won't damage their reputation - they'll share knowledge via letter or meeting, they'll arrange introductions for you, etc. Mechanically, on any check that would benefit from your close relationship with them, you may reroll up to two dice. For example, reading their emotions or requisitioning items from them.
Ambidexterity (Air) - Type: Physical. You can use both hands equally well. Narratively, you will be able to easily compensate if you lose a hand. Mechanically, when making a check that might benefit from your equal skill in both hands, you can reroll up to two dice. For example, a Martial Arts [Melee]/Air check to strike with a left-hand weapon unexpectedly, or a Skulduggery/Air check to pick a pocket.
Blissful Betrothal (Water) - Type: Interpersonal. You and your fiance or spouse are happy together and would get married even without political concerns. Narratively, your spouse will perform duties in your name, such as caring for family or attending events, when you are busy, will advise you and will help you as best they can within their areas of expertise. Mechanically, when making a check that might benefit from your good relationship, you may reroll up to two dice. For example, persuading their family members.
Famously Wealthy (Water) - Type: Fame, Interpersonal. Your family is known for vast wealth. Narratively, people have heard of how rich you are and will always believe it unless shown evidence to the contrary. Mechanically, when making a check that you can leverage your reputation for wealth on, like buying goods on credit or winning people over, you may reroll up to two dice.
Seasoned (Void) - Type: Mental, Interpersonal. You've been a samurai for a while and seen some shit. Narratively, you are older and more worldly than the other PCs, and while you are not more skilled, you may refluff your XP spending as 'revealing' skills you had held back to avoid overshadowing them. You have experience with many cultures and organizations, and know how to behave almost anywhere, plus you know lots of other old people all over the place. Mechanically, when performing a check for which your hard-earned wisdom is an advantage, such as a Courtesy check to dispense wisdom or a Theology check to know what a spirit might like, you may reroll up to two dice.
Example Passions
Animal Bond (Earth) - Type: Interpersonal, Mental. You have an animal buddy! Narratively, pick one mundane animal with silhouette of 0 or 1. It follows you around everywhere and helps you out if fed and cajoled. If your starting kit gives you an animal, it can be your companion even if it's too big normally to qualify. Mechanically, after performing a check to interact with your buddy, remove 3 Strife.
Enlightenment (Void) - Type: Spiritual. You are devoted to the Tao of Shinsei. Narratively, you feel no attachment to worldly things and cannot be tempted by material wealth or the promise of power. Mechanically, after performing a check to detach yourself from material concerns, remove 3 Strife.
Provocation (Fire) - Type: Interpersonal. You enjoy quips and verbal barbs. Narratively, you can always find a button to push in another person, though you won't know if they'll take it playfully or be gravely insulted. Mechanically, after performing a check to get a rise out of someone, you remove 3 Strife.
Wordplay (air) - Type: Interpersonal, Mental. You love puns, double meanings and clever turns of phrase, especially in poetry. Narratively, you can always identify rhetorical and literary patterns in the works you read or listen to. Mechanically, after performing a check to interpret or create a play on words, remove 3 Strife.
Example Adversities
Blindness (Water) - Type: Physical, Scar. You can't see. Narratively, you cannot observe anything only perceptible by sight. Mechanically, when making a check for which sight cannot easily be replaced by another sense or senses, you must choose and reroll 2 dice showing Success or Explosive Success symbols. If you fail the check, gain 1 Void Point. Note: while ranged combat against a moving target is called out as counting, melee combat is not. Go on, be Zatoichi.
Haunting (Void) - Type: Interpersonal, Spiritual. A ghost or spirit is haunting you. Narratively, it has an agenda and will interfere with you at bad times. Mechanically, when you make a check to defy the will of the spirit, you must choose and reroll 2 dice showing Success or Explosive Success symbols. If you fail the check, gain 1 Void Point.
Momoku (Void) - Type: Spiritual. You are disconnected from the Void. Narratively, you can't perceive supernatural presences, even when they are readily evident to everyone else, though you can still detect obvious effects on the physical world. Mechanically, when you make a check to understand or appeal to otherworldly powers, you must choose and reroll 2 dice showing Success or Explosive Success symbols. If you fail the check, gain 1 Void Point.
Shadowlands Taint (Earth) - Type: Curse, Physical, Spiritual. Your will and body are tainted. Narratively, you cannot feel physical sensation easily and will rise as a zombie when you die, pursuing your last goal with bestial and inhuman purpose, then turning on anyone nearby. Mechanically, when you make a check relying on physical sensitivity, you must choose and reroll 2 dice showing Success or Explosive Success symbols. If you fail the check, gain 1 Void Point.
Shadowlands Taint (Fire) - Type: Curse, Mental, Spiritual. Your mind and intellect are tainted. Narratively, you can instinctively identify Shadowlands creatures and their abilities, as well as how to turn them towards destructive ends, and are you are drawn inexorably to forbidden power. Mechanically, when you make a check to foresee possible negative outcomes of your own actions, you must choose and reroll 2 dice showing Success or Explosive Success symbols. If you fail the check, gain 1 Void Point. (Yes, there's one of these for each Ring.)
Example Anxieties
Battle Trauma (Fire) - Type: Mental, Physical. You have PTSD. Narratively, you become tense or shaky at the start of duels, skirmishes or mass battles. You may act normally, but everyone can tell you're deeply unsettled. Mechanically, after performing a check related to battle, suffer 3 Strife. If this makes you have an Outburst, gain 1 Void Point.
Delusions of Grandeur (Void) - Type: Mental, Interpersonal. You are certain you're destined for greatness, no matter what. Narratively, when presented the chance to advance your own glory, you must take it. Mechanically, after performing a check that forces you to face your humble place in the universe, suffer 3 Strife. If this makes you have an Outburst, gain 1 Void Point.
Meekness (Fire) - Type: Interpersonal. You are very shy. Narratively, you can't interrupt people of higher status and find it hard to assert yourself over anyone, even those of lower status. Mechanically, after performing a check to stand out or get what you need, suffer 3 Strife. If this makes you have an Outburst, gain 1 Void Point.
Perfectionism (Water) - Type: Physical, Mental. You cannot accept anything less than perfection from yourself. Narratively, you can't help but try to improve any work you spot a flaw in, even if that means informing someone of higher status that they've made an error. Mechanically, after performing a check in which you must interact with an imperfect or unfinished work, suffer 3 Strife. If this makes you have an Outburst, gain 1 Void Point.
Next time: Skills.
Skilling It
Original SA post Legend of the Five Rings: Skilling ItSkills are broken into five categories. Artisan Skills are for making things; generally, for samurai, making them artistically, as common goods are produced by the peasantry. When a samurai makes something, it is usually a one-off and a work of art, sometimes a magical one. These skills are also used to understand art. Martial Skills are for fighting, both personally and in war, and otherwise using your physical prowess. Scholar Skills are used to gain information about people, the world and society, as well as identifying things, observing the area and so on. Social Skills are used for negotiations and influence on all levels of society, affecting the emotions and thoughts of others. Trade Skills are largely the realm of the lower classes, and most samurai look down on their use, but they are extremely practical. Some learn to use them away from the eyes of others, or just bear with the scorn they may earn, in order to gather resources and do useful work.
Also, a note - with the GM's permission, you may use a Ring in a way more suited to a different skill group, if that's appropriate for the check you're making, such as using a normally Scholarly approach with an Artisan Skill in order to recall knowledge on, say, metallurgy. Investigation is one of the more common activities that will do this, typically using Scholar methods with a wide variety of potential skills. The GM is allowed to expand the number of skills, as well, by adding subskills - so you'd have points in Aesthetics [Ikebana], say, or Martial Arts [Melee] [Swords]. I don't think that's a good idea; stay simple. The game only suggests it if your campaign is going to focus pretty much entirely on one area and so will need to differentiate skills in that area.
Artisan Skills are the noblest of Rokugani pursuits. They may sometimes have little actual utility in daily life, but the arts are extremely useful in earning social acclaim and influence, and poetry can be as useful in the court as an army.
The Earth Ring, if you'll call, is the Restore approach, using cautious, well-considered work to repair and maintain art. You might use it to repair a damaged work, perform maintenance on a work, or store and transport a work safely.
The Water Ring is the Adapt approach, reframing, dividing, combining or transforming creations in all kinds of ways. You might use it to break a piece down to its raw materials, to modify a work to do something different or to figure out other ways a work could function.
The Fire Ring is the Invent approach, calling on passion and energy to make something new. You might use it to make a new piece from raw materials, draft plans for a new work, create a new technique or tool to help you, or brainstorm new ideas for pieces.
The Air Ring is the Refine approach, using careful addition, manipulation or removal of detail to improve a work and enhance it without altering its fundamental nature. You might use it to improve the function of a piece, or to add a subtle message or nuance.
The Void Ring is the Attune approach, understanding yourself and the world through the lens of art. You might use it to try and understand your own emotions by studying an art piece, to spiritually center yourself around a work, to imbue an item with supernatural powers or to awaken the supernatural properties of an object.
Artisan Skills have a number of Opportunity spends available to them that aren't available on general rolls. They are:
You may handle more items. For each Opportunity symbol spent on an Artisan Skill roll this way, you may create or affect one additional piece.
You may learn something of value about the piece, reducing the TN of your next Artisan skill check to interact with it by 1 per symbol spent this way.
On an Earth check, you may spend an Opportunity symbol to give the item you are repairing or maintaining the Durable Quality.
On a Fire check, you may spend an Opportunity symbol to give the item you are inventing either the Resplendent or the Subtle Quality.
On a Water check, you may spend an Opportunity symbol to add or remove the Cumbersome or Razor-Edged Quality from the item you are adapted.
On an Air check, you may spend an Opportunity symbol to increase a numerical value of the item you are working on by 1, such as Damage, Physical Resistance, Supernatural Resistance, Rarity or so on. You may only do this once per item.
On a Void check, you may spend Opportunity symbols, 1 for 1, to reduce the TN of your next check to use the item this scene.
The skills are:
Aesthetics, used to create non-utilitarian visual art. This covers bonsai, ikebana, origami, painting and rock gardening. These are all very useful arts to understand in court, as they are highly fashionable.
Composition, used to create literature. Just about all samurai can read and write, but it takes skill to be good at writing or to analyze literature. This skill also covers calligraphy.
Design, used to create and assess the quality of clothing. It also covers knowledge of fashion and the messages you can send with clothes.
Smithing, used to create and maintain arms and armor - both ceremonial and practical. This does cover bows even though they aren't metal, and also covers crossbows. BTW those are a thing now.
Social Skills are all about interpersonal interactions and your comfort and ability with others. While obviously useful in court, they are also useful in other fields - commanding troops, say, or provoking foes. And, of course, dealing with people outside of court.
The Earth Ring is the Reason approach, using rational, thoughtful debate and obligation. You might use it to convince someone to listen to reason over emotion, to soothe emotions, to comfort someone, to instill discipline, to get someone to wait and not act rashly or to get someone to uphold an oath despite personal desires.
The Water Ring is the Charm approach, relying on fostering positive emotions, sympathy and understanding. You might use it to get someone to like you, to build a rapport, to offer sympathies, to get someone to desire something or to win sympathy.
The Fire Ring is the Incite approach, persuading by passionate pleas or new ideas. It can get people to fall in line with your ideas, but it isn't subtle and can put you outside propriety if used carelessly, or can go too far in the passions it creates. You might use it to rouse someone's emotions (positively or negatively), to get attention, to persuade someone to follow emotion over reason, to get someone to ignore potential consequences, or to get someone to prioritize their desires over their responsibilities.
The Air Ring is the Trick approach, using subtle control to lie, persuade and draw out faults. It isn't always untruthful, but is always manipulative - devil's advocating, subtle suggestion, misdirection. You might use it to get someone to believe something untrue, partially true or technically true, to obscure a truth, to deflect attention, to convey an idea in a deniable way, or to imply something without openly saying it.
The Void Ring is the Enlighten approach, getting others to evaluate wider situations and existence. It can even get them question fundamental truths or force them to recall their ideals. You might use it to challenge deeply held beliefs, to force someone to question their moral or philosophical convictions, to cause someone to remember something they forgot or want to forget or to shock someone from a stupor (mundane or magical).
Social Skills also have their own unique Opportunity spends:
You may handle more people. For each Opportunity symbol spent, your action can affect an additional person.
On an Earth check, you may spend an Opportunity symbol to choose another character in the scene and increase the TN of their next Social check targeting you by 1.
On an Earth check, you may spend two Opportunity symbols to learn the Composure value of another character.
On a Fire check, you may spend an Opportunity symbol to choose another character in the scene and give them 1 Strife, but reduce the TN of their next check this scene by 1.
On a Fire check, you may spend two Opportunity symbols to learn if another character's Glory is higher or lower than yours.
On a Water check, you may spend an Opportunity symbol to choose another character in the scene and reduce your next non-Water Social check targeting them this scene by 1.
On a Water check, you may spend two Opportunity symbols to learn if another character's Status is higher or lower than yours.
On an Air check, you may spend Opportunity symbols to choose another character in the scene and name one skill per symbol spent to learn their ranks in the chosen skills.
On an Air check, you may spend two Opportunity symbols to learn if another character's Honor is higher or lower than yours.
On a Void check, you may spend an Opporunity symbol to choose another character in the scene and learn if they are conflicted about their objective this scene.
The skills are:
Command, used to instill order both in court and in the field. It is primarily used with subordinates rather than peers, as it's mostly about telling people what to do, getting them to obey or reprimanding.
Courtesy, an essential skill for influencing the opinions of others, persuading them or winning arguments without giving offense. It also involves speaking High Rokugani, which is a formal dialect of the common language.
Games, used to provide an outlet for rivalries in court, and to maintain and develop relationships outside the strict confines of station via shared hobbies. It can be both winning games and knowing when a loss would be more useful socially, as well as using games to achieve social goals or learning more about your opponent.
Performance, used to entertain others with performative arts, such as song or dance or storytelling. It can also use those performances to influence others' opinions or beliefs.
Scholar Skills are about acquiring, recalling or using information you have learned.
The Earth Ring is the Recall approach, used to thoroughly establish fundamentals and build from them, expanding on a topic with facts, but it can't be used for anything totally novel or unfamiliar as a result. You might use it to remember information, memorize things, create detailed timelines on a topic, or bring to mind details of something you witnessed.
The Water Ring is the Survey approach, used to gather information from the environment directly, identifying the things around you and extrapolating, but rarely able to provide more than surface-level information. You might use it to identify what you're observing, to orient yourself in an environment, to narrow a search down to a smaller area, to look for physical cues around you related to a topic, or to perceive lurking threats.
The Fire Ring is the Theorize approach, used to imagine the possible and deal with the unprecedented or unforeseen as well as deal with limited evidence. However, its reckless conjecture can sometimes lead to incorrect conclusions. You might use it to connect the dots between seemingly unrelated information, to come up with an explanation for a physical phenomenon or unexplained event, to brainstorm possible solutions, to come up with a list of potential outcomes of an event, or to spot if something is conspicuously missing from the area.
The Air Ring is the Analyze approach, used to focus on uncovering or understanding details. It lets you find what is hidden, focus on the minute or learn traits of people or objects, as well as infer subtle meanings based on what people say, have or do. You might use it to study the details of an idea or object, to learn a particular trait of a subject, to infer things about someone from their appearance or statements, to find an object you know is hidden somewhere, to search a small area in detail, or to untangle an apparent contradiction.
The Void Ring is the Sense approach, used to look beyond the worldly to better understand supernatural phenomena or the future yet to be. It handles intuitive hunches and the judging of probability of events, as well. You might use it to rely on your instincts and hunches for info, to understand the spiritual ramifications of an idea, to predict the likelihood of a particular outcome, or to sense a supernatural presence or influence nearby.
Scholar Skill Opportunity spends:
You may spend Opportunity symbols to provide an insight that reduces the TN of the next friendly character's check this scene by 1 per symbol spent.
On an Earth check, you may spend an Opportunity symbol to thoroughly review a topic mentally and see if there's any information left to be gained from it or not.
On a Fire check, you may spend an Opportunity symbol to have a flash of insight and realize something nobody else has considered about a related (or unrelated) topic.
On a Water check, you may spend an Opportunity symbol to notice a seemingly unrelated lead in the environment that offers an avenue to pursue.
On an Air check, you may spend an Opportunity symbol to discern a fact of interest about someone to whom the check pertains.
On a Void check, you may spend an Opportunity symbol to know if the current angle of inquiry is worthwhile or not.
Skills:
Culture, used to understand the Empire's customs, traditions and trends, as well as the etiquette for any situation that might come up or the current fashions in various courts.
Government, used to understand political machinations, logistics and Rokugani legal systems.
Medicine, used to understand and care for the human body and its functions. It will also frequently be used with Artisan approaches to care for people.
Sentiment, used to understand psychology and the emotions of others, to spot how people feel and to tell if they're lying - and why. (There's a sidebar on how to do that, actually, and it's mostly used if you are actively suspicious. Your passive defense is Vigilance.)
Theology, used to understand religious philosophy, doctrine and practice, the lore of the kami, Fortunes and the Tao, and religious history. It also covers related fields like astronomy, metaphysics and mystical sciences, and is used for shugenja invocations.
Martial Skills are for battle. Of course, not all samurai are warriors in practice - some practice these martial skills to achieve self-mastery, and that's totally valid.
The Earth Ring is the Withstand approach, focusing on firm defense, solid fundamentals and reliable tactics, often requiring considerable time to avoid risk, and it is generally quite predictable, often relying on setting up in a safe position and waiting to strike. You might use it to tank a hardship head-on, to move slowly and carefully, to wear a foe down, to lift and carry heavy objects, or to use a technique requiring great endurance.
The Water Ring is the Shift approach, focusing on avoiding a foe's strengths and striking their weakness, allowing them to control things until they overextend and then capitalizing on that. It avoids wasting energy, but it means you need to be able to wait until the foe does, in fact, overextend, while still having the force to capitalize on that. You might use it to redirect force rather than stopping it, to move by the most expedient path, to use your foe's energy against them, to slide through tight spaces or crowds, or to use a technique requiring great flexibility.
The Fire Ring is the Overwhelm approach, abandoning caution to strick with direct force. It is swift and terrible, but has no regard for consequences. It often is used to inspire confusion or panic, or to apply unrelenting pressure...but any gap in its attack leaves it highly vulnerable. You might use it to meet force with force, to move rapidly and recklessly, to break things with brute might, to force a foe to meet you head-on, to use a technique requiring great power, or to terrify a foe with aggression.
The Air Ring is the Feint approach, using agility and cunning to create openings and exploit them. It moves gracefully, taking advantage of positioning and unexpected angles, flanking and feinting to open defenses. However, it is risky because of its flourishes and elegance, which can distract from actual victory or fall to force. You might use it to evade force, to move precisely and subtly, to slip past defenses, to land safely and acrobatically, or to use a technique requiring great grace.
The Void Ring is the Sacrifice approach, acting unpredictably but without preparation. It can startle a foe certain of their ability, making them reconsider their actions, but is often an all-or-nothing gamble that trusts safety to the universe. You might use it to accept incoming force to create an opportunity, to act unpredictably, to move without care for your own life, to intentionally take a risk to sow doubt in the enemy, to perform a technique requiring you center yourself in the universe, or to leave the outcome of an attack to fate.
Martial Skill Opportunity spends:
You may spend Opportunity symbols, one for one, to sheathe readied weapons.
On an Earth check, you may spend an Opportunity symbol to complete a task as safely as possible, taking only minimum harm. In a conflict, you instead ignore the effects of Difficult terrain until the end of your next turn.
On a Fire check, you may spend Opportunity symbols to complete a task faster and more vigorously. In a conflict, you instead increase you Initiative by 1 per symbol spent.
On a Water check, you may spend Opportunity symbols to move fluidly and quickly. In a skirmish, you instead move 1 additional range band per symbol spent this way, before or after completing your action.
On an Air check, you may spend an Opportunity symbol to perform a task with extreme precision or to hit a specific part of the target. In a conflict, if your attack causes a crit that applies a condition or disadvantage, you choose which condition or disadvantage.
On a Void check, you spend an Opportunity symbol to put mind over matter and try to perform a feat despite all odds. In a conflict, ignore the effects of one condition you are suffering until the end of your next turn.
Skills:
Fitness, the ability to perform physical feats and move gracefully. It handles running, leaping, lifting heavy things, long marches, swimming, sneaking and so on. It also helps you resist harm in battle, resist Shadowlands taint and recover from disease or poison.
Martial Arts [Melee], the ability to fight with melee weapons. It fights with melee weapons or shows off with them.
Martial Arts [Ranged], the ability to fight with ranged weapons. That covers thrown weapons and projectile weapons.
Martial Arts [Unarmed], the ability to fight using your body as your weapon, plus also some improvised weapons.
Meditation, the ability to fight battles with your own mind, process your emotions, recover control when shocked and resist confusion and supernatural influence.
Tactics, the ability to lead in battle, both from the front and back, and to understand the flow of battle and how to seize opportunity in battle. Command motivates soldiers, Tactics manages obedient troops and commands them in battle, and Government handles logistics outside combat.
Trade Skills are used to...well, survive, primarily among the lower classes. Samurai are expected not to focus on them too much, but they are too useful to fully ignore. Whenever you want to use a Trade Skill in front of a character with higher Status in an improper context, you must stake Glory equal to your Glory Rank. If the higher Status character does not criticize you before you complete the task, you're fine. If they do, you lose the Glory.
The Earth Ring is the Produce approach, doing what you need to do to get a foundation for living, like making infrastructure, maintaining equipment, planting or harvesting crops, mass-producing common goods or keeping records. You might use it to harvest resources, mass-produce items related to your trade, repair or maintain trade equipment, build and repair foundations or basic structures, or create records of your work.
The Water Ring is the Exchange approach, finding things and acquiring them, whether they are objects or customers. It's all about trading one resource for another. You might use it to buy items at their best price, barter goods and services for other goods and services, or track down specific items at a market.
The Fire Ring is the Innovate approach, using creativity and drive to make work easier, make new things or find new solutions. You might use it to invent a novel product or service, develop a new tool for your trade, find new uses or applications for a product or service, or expand to new markets.
The Air Ring is the Con approach, understanding value better than others and exploiting that advantage to get stuff for nothing. It manipulates perception of value, steals, bribes and smuggles. You might use it to sell products for more than their common price, to pick pockets, to falsify documentation, to offer bribes deniably, or to disguise shipments of contraband.
The Void Ring is the Subsist approach, focusing on finding existing resources and using only as much as needed. It is commonly used by ascetics or those surviving in the wilderness. You might use it to live in harmony with nature without changing it, to instinctively know what changes will occur in your environment, or to know if an action will help you survive.
Trade Skill Opportunity spends:
You may spend Opportunity symbols, one for one, to reduce any Glory you have to stake to perform a Trade skill in an inappropriate context, to a minimum of 0.
On an Earth check, you may spend an Opportunity symbol to double the amount of work you can complete in a given time when producing.
On a Fire check, you may spend an Opportunity symbol to choose a skill and have a flash of insight which reduces the TN of your next check with that skill this session by 1.
On a Water check, you may spend an Opportunity symbol to, when buying an item or service, identify something you could trade for it rather than use money.
On an Air check, you may spend Opportunity symbols to, when selling an item, increase the price the buyer will pay by 10% per symbol spent, to a maximum of an additional 50%.
On a Void check, you may spend an Opportunity symbol to reduce the supplies or time used to complete the task by half.
Skills:
Commerce, the skill of buying and selling goods for a profit, operating a business and so on.
Labor, the skill of performing manual tasks, such as farming, construction or ditch-digging.
Seafaring, the skill of knowing about and sailing on the ocean, sea trade, making boats and predicting the weather.
Skulduggery, the skill of securing locations against the law, doing crimes, spycraft, organizing criminal ventures, blending with crowds, erasing evidence and finding fences.
Survival, the skill of wilderness survival, hunting, fishing, gathering plants and prospecting.
Next time: Special techniques.
My Kung Fu
Original SA post Legend of the Five Rings: My Kung FuTechniques are your cool powers. They come in several categories. Kata are special combat techniques, primarily used by bushi and other dedicated fighters, though some courtiers learn them in case of battle. Kiho are spiritual techniques in which one aligns one's ki to the inner cosmos, acting in harmony with the world and so tapping into limitless potential, often to kick someone's ass. They are primarily used by monks and other spiritual seekers, and also have elemental alignments. Invocations are prayers and entreaties to spirits and kami for support, and are carefully and closely guarded by shugenja families. They are primarily used by shugenja and those with strong ties to them, and they also have elemental alignments. Maho are evil spells made from dark pacts with wicked spirits, practiced only by maho-tsukai. Rituals are religious ceremonies performed by spiritualists, often ceremonial and lengthy and with the aim of producing a more esoteric effect than the more immediate invocations of the shugenja. They are often practiced by monks, priests and other religious figures. Shoji are verbal and social techniques designed for clear communication, social settings, motivation of allies and manipulation of rivals. They are mostly learned by courtiers, but many bushi, monk or shugenja schools also teach a few to help navigate the politics of battle. They also have elemental alignments.
All techniques have at least one name; they may have more than one, based on who's using them. They cost either 2 or 3 XP each, and may have other prerequsites - typically, a requires School Rank. However, a character can learn a technique without meeting those if it's, say, on their advancement chart, and as long as you know a technique, you can use it even if you don't meet the prereqs. Techniques will specify how and when they can be used, and what kind of check, if any, they will require, as well as who they can target and at what range. Many also give you new options to spend Opportunity symbols on.
Kata are divided up only by school rank. All have a prereq that your School Rank must be equal to or greater than the kata's rank. Rank 1 kata are:
Iaijutsu, a draw and cut in a single motion. You make an Attack action using a sheathed Razor-Edged weapon with a TN 2 Martial Arts [Melee] check, targeting one character at range 1-2. You instantly draw and ready the weapon in a one-handed grip. If you succeed, you do physical damage equal to the weapon's Deadliness plus bonus successes. For one Opportunity symbol, you may draw and ready an additional sheathed Razor-Edged weapon. For two Opportunity symbols, you may sheath one readied weapon after performing the attack. XP Cost: 3.
Soaring Slice, a special weapon-throwing maneuver. As an attack action using a readied weapon in a one-handed grip, you make a TN 2 Martial Arts check with the appropriate skill for the weapon, targeting one character at range 2-3. You throw your weapon at the target and, if you hit, you do physical damage equal to the weapon's base Damage plus bonus successes. So basically, anything is a thrown weapon for you now. You may spend Opportunity symbols to increase the maximum range of this technique by 1 per symbol spent. You may spend 1 Opportunity symbol to reduce the TN of the next Attack action against the target before the end of your next turn by 1. XP Cost: 3.
Striking as Air, a technique that matches your movements to the foe to make you harder to hit. When making a Martial Arts [Melee, Ranged or Unarmed]/Air check, you may spend Opportunity symbols to, one for one, increase the TN of the first Attack check targeting you before the beginning of your next turn. XP Cost: 2.
Striking as Earth, a technique to hunker down and deflect harm better with armor. When you make a Martial Arts [Melee, Ranged or Unarmed]/Earth check, you may spend Opportunity symbols to, one for one, increase the Physical Resistance of your armor until the beginning of your next turn. XP Cost: 2.
Striking as Fire, a technique to force errors and so make your hits more deadly. When making a Martial Arts [Melee, Ranged or Unarmed]/Fire check, you may spend Opportunity symbols to, one for one, increase the severity of the next crit your target suffers until the end of your next turn. XP Cost: 2.
Striking as Water, a technique to bypass enemy armor and find or make vulnerability. When making a Martial Arts [Melee, Ranged or Unarmed]/Water check, you may spend Opportunity symbols to reduce your target's Physical Resistance by 2 per symbol spent until the end of your next turn.
Warrior's Resolve, a technique to gather pain within your body and conquer it, so that you may do your duty when others would die. Once per scene, you may spend 1 Void Point to recover from Incapacitation, healing until you only have wounds equal to (Resilience-Honor Rank). XP Cost: 3.
Rank 2 kata:
Crescent Moon Style, a technique to easily switch between defense and attack. When you perform the Center or Guard actions, you may spend one Opportunity symbol on this. If you do, until the start of your next turn, after a character in range 1-2 performs an Attack action targeting you or another character you are guarding, you may perform a Strike action targeting the attacker. XP Cost: 2.
Iron Forest Style, a spear technique to control spacing. When you make a Martial Arts [Melee] check using a spear, naginata or other polearm, you may spend one Opportunity symbol to cause one of your targets to become Pinned until the beginning of your next turn. If, while Pinned, they try to get closer to you, they must make a Fitness check (TN 4, 2 with Air or 5 with Water), on which they suffer physical damage equal to the Strife symbols on their check. If they fail the check, they can't move closer. XP Cost: 2.
Lord Hida's Grasp, a technique for fighting giant monsters. Prereq: Crab Clan. As an Attack action, you may make a Fitness/Void check targeting a character with silhouette 3 or larger at range 0-1, with TN equal to the character's silhouette. If you succeed, the target is Immobilized, and you count as granting assistance to anyone who performs an Attack action against it. For one Opportunity symbol, your target must resist with a Fitness check or be Prone, with TN equal to your School Rank. (Silhouette is basically a size stat; human adults are silhouette 2.) XP Cost: 3.
Lord Shiba's Selflessness, a technique to protect others at the cost of yourself. Prereq: Phoenix Clan. Once per session, as a Support action using one readied weapon, you can make a Tactics/Void check at TN 2, targeting any number of friendly characters in range of your weapon. If you succeed, other characters cannot select your targets as the target of Attack or Scheme actions if they can select you instead. If an action has multiple targets, you must be the first chosen. This lasts for (School Rank) rounds. For one Opportunity symbol on a success, you may increase the TN of Attack and Scheme actions targeting you by 1 for (School Rank) rounds. XP Cost: 3.
Open Hand Style, an unarmed technique to control your foe's actions. When you make a Martial Arts [Unarmed] check, you may spend Opportunity symbols to make a number of targets of your action equal to the symbols spent immediately shift into the stance fo your choice and become Immobilized. Targets of silhouette 3 or larger resist with a TN 3 Fitness check and ignore this if they succeed. XP Cost: 2.
Pelting Hail Style, a massed fire technique for ranged weapons. When you make a Martial Arts [Ranged] check, you may spend Opportunity symbols to choose a number of other characters in range 0-2 of your target equal to the symbols spent. Each of these characters takes Strife equal to your weapon's base Damage. XP Cost: 2.
Rushing Avalanche Style is a reckless heavy weapons technique. When you make a Martial Arts [Melee] check using a tetsubo, maul or staff, you may spend one Opportunity in either of two ways. If you fail but have a shortfall of two or fewer successes, you can spend one Opportunity symbol to cause your target to take (School Rank) physical damage. If you succeed and your target is Prone, you may spend one Opportunity to increase your damage dealt by (School Rank*2). XP Cost: 2.
Spinning Blades Style is a dual wielding technique. When you make a Martial Arts [Melee or Unarmed] check, if you have you have a second readied weapon you didn't use for the attack, you may spend two Opportunity symbols to use that second weapon against a target of your action, dealing physical damage equal to its base Damage. If that target is Dazed, they take an additional (School Rank) damage. XP Cost: 2.
Veiled Menace Style is an assassination technique. When you make a Martial Arts [Melee or Unarmed] check using a weapon in a one-handed grip, you may spend Opportunity symbols in the following way. If you succeed, choose one unaware or Disoriented target of your action. That target takes a crit with severity equal to your weapon's Deadliness plus 1 per symbol spent after the first. XP Cost: 2.
Rank 3 kata:
Battle in the Mind is a predictive evaluation technique. When you make an Assessment check for a duel using your Void Ring, you can spend Opportunity symbols in two new ways. First, you can spend one symbol to make your opponent name a Ring, forcing them to select that Ring as their stance for the first turn of the duel. Second, you can spend two or more symbols to choose a technique category. The opponent must reveal one known technique of that category per symbol spent. XP Cost: 2.
Crimson Leaves Strike is a disarming technique. As an Attack action, you make a TN 4 Martial Arts/Earth check using the appropriate skill for one of your readied weapons, targeting one character in range of that weapon. If you succeed, the target takes (1+bonus successeS) physical damage, and you get to choose one of their readied weapons. They must resist with a Fitness check (TN 4, 5 with Air, 2 with Water) or lose control of the weapon, which goes 3 range bands in a direction of your choice. For one Opportunity symbol, you may take control the weapon instead. XP Cost: 3.
Flowing Water Strike is an anti-armor attack technique. As an Attack and Movement action, you may make a TN 3 Martial Arts/Water check using the appropriate skill for one of your readied weapons, targeting one character at range 0-2. If you succeed, the target is Bleeding. They must also make a Fitness check (TN 4, Earth 2, Fire 5) or take physical damage equal to your weapon's base Damage, which ignores Physical Resistance. For one Opportunity symbol, you may remove Dazed, Disoriented, Immobilized or Prone from yourself. XP Cost: 3.
Heartpiercing Strike is a killing blow technique. As an Attack and Movement action, you may make a TN 4 Martial Arts/Fire check using the appropriate skill for one of your readied weapons, targeting one character in that weapon's range. If you succeed, your target automatically suffers a crit with severity equal to your weapon's Deadliness plus bonus successes. The Fitness TN to resist this crit is 3 (Water 1, Air 4) instead of the normal TN. You may spend Opportunity symbols to increase that TN, one for one. XP Cost: 3.
Rank 4 kata:
Crashing Wave Style is a wounding technique. When you make a Martial Arts [Melee, Ranged or Unarmed]/Water check, you may spend Opportunity symbols to cause one target of your action to resist with a Fitness check (TN 3, Earth 2, Fire 4) or become Bleeding. The TN goes up by 1 per symbol spent this way. (Presumably after the first that forces the check, but it doesn't say that.) XP Cost: 2.
Disappearing World Style is a stunning technique. When you make a Martial Arts [Melee, Ranged or Unarmed]/Fire check, you may spend Opportunity symbols to cause one target of your action to resist with a Fitness check (TN 3, Air 4, Water 2) or become Dazed. The TN goes up by 1 per symbol spent this way. (Same as above.) XP Cost: 2.
Iron in the Mountains Style is a knockdown technique. When you make a Martial Arts [Melee, Ranged or Unarmed]/Earth check, you may spend Opportunity symbols to cause one target of your action to resist with a Fitness check (TN 3, Air 2, Water 4) or become Prone. The TN goes up by 1 per symbol spent this way. (Same as above.) XP Cost: 2.
Rank 5 kata:
Striking as Void is a formless technique. When you make a Martial Arts [Melee, Ranged or Unarmed]/Void check, you may spend Opportunity symbols in two new ways. First, you can spend one symbol to immediately switch to a different stance of your choice. Second, if you fail, you may spend an Opportunity symbol to immediately perform another action. The new action must be one you haven't performed this turn, and you can only activate this Opportunity once per round.
Kiho are divided by element. All of them have an associated check to get an immediate benefit, and an ongoing benefit. If the check succeeds, they get the immediate effect, but regardless of success or failure, they get the ongoing kiho effect. A kiho remains active until you activate a different kiho; you can only have one kiho active at a time, and you can't reactivate one that's already active. All Kiho have XP Cost: 3. Earth Kiho:
Earth Needs No Eyes lets you feel the movements of the Earth. Prereq: School Rank 1. As a Support action, you may activate this and make a TN 3 Meditation/Earth check. If you succeed, you instantly become aware of all living beings and objects touching the ground within (Earth Ring+Bonus Successes) range bands. (Note: Range 6 is 'as far as the eye can see.') While the kiho is active, you may use the vibrations of the Earth to 'see' (Earth Ring) range bands in all directions simultaneously, and you add your Earth Ring to your Vigilance.
Earthen Fist forms a stone gauntlet around your fists. Prereq: School Rank 1. As an Attack action, you may activate this and make a TN 3 Martial Arts [Unarmed]/Earth check targeting a character at range 0-1. If you hit, you do (Earth Ring) physical damage and your target must make a Fitness check (TN 3, Air 2, Water 4) or become Prone. While this is active, the base Damage of your unarmed kick and punch profiles is increased by (Earth Ring), and when you successfully Attack with a punch or kick against Prone targets, you may spend 1 Void Point to double your bonus successes on the Attack check.
Grasp the Earth Dragon armors you in orbiting stone or stone skin. Prereq: School Rank 3. As a Support action, you may activate this and make a TN 5 Meditation/Earth check. If you succeed, until the start of your next turn you reduce all physical damage you suffer to 1. While this is active, you count as wearing armor with Physical Resistance of (Earth Ring). You cannot benefit from other armor while this is active.
Way of the Earthquake lets you stomp an earthquake into existence. Prereq: School Rank 2. As an Attack action, you may activate this and make a TN 4 Martial Arts [Unarmed]/Earth check targeting all characters in range 0-1. If you succeed, they take (Earth Ring) physical damage and become Prone. While this is active, after you perform an Attack or Support action, you may spend 1 Void Point. If you do, all other characters in range 0-2 must resist with Fitness (TN 3, Air 2, Water 4) or become Prone.
Air kiho:
Air Fist surrounds your fists with roaring winds. Prereq: School Rank 1. As an Attack action, you may activate this and make a TN 3 Martial Arts [Unarmed]/Air check targeting one character at range 0-(Air Ring). If you succeed, you deal (Air Ring) physical damage and push them 1 range band away from you. While this is active, the maximum range of your unarmed punches and kicks is your Air Ring, and after you Attack with a punch or kick, you may spend 1 Void Point. If you do, your target must make a Fitness check (TN 3, Earth 4, Fire 1) or be pushed away from you 2 range bands.
Riding the Clouds lets you move on a small tornado, air current or cloud. Prereq: School Rank 2. As a Movement action, you may activate this and make a TN 4 Meditation/Air check. If you succeed, you may immediately move (1+bonus successes) range bands, and may do so vertically, and ignore the negative effects of terrain while you do. While this is active, when you move 1 or more range bands, you may move an additional range band, and may do so vertically, and you ignore the negative effects of terrain.
The Great Silence silences the air around you. Prereq: School Rank 1. As a Scheme and Support action, you may activate this and make a TN 3 Command/Air check. If you succeed, characters at range 0-4 produce no noise and can't hear. Invocations and maho cannot be used in this area, either. This lasts until the start of your next turn. While this is active, the TN of any Scheme actions targeting you is increased by (Air Ring).
Way of the Willow lets you sense incoming attacks and evade them, gathering their energy. Prereq: School Rank 3. As a Support action, you may activate this and make a TN 5 Martial Arts [Unarmed]/Air check. If you succeed, the TN of Attack actions targeting you is increased by (Martial Arts [Unarmed]) until the start of your next turn. While this is active, when you are targeted by an Attack action, you may spend 1 Void Point to increase the TN of the check by (Martial Arts [Unarmed]).
Fire kiho:
Breaking Blow lets you explode objects with a strike. Prereq: School Rank 1. As an Attack action, you may activate this and make a TN 3 Martial Arts [Unarmed]/Fire check targeting a character in range 0-1. If you succeed, they take (Fire Ring) physical damage and you choose one worn piece of armor or readied weapon they have. It becomes Damaged. The GM may allow you to use this to instead shatter doors, rocks, trees or other objects. While this is active, when you hit with Martial Arts [Unarmed], you may spend 1 Void Point to choose one of their worn pieces of armor or readied weapons and give it Damaged.
Channel the Fire Dragon lets you breathe fire. Prereq: School Rank 2. As an Attack action, you may activate this and make a TN 4 Martial Arts [Unarmed]/Fire check targeting a character in range 0-2. If you succeed, they must resist with Fitness (TN 3, Air 4, Water 2) or become Burning. Flammable objects in the area ignite. While this is active, you automatically pass all checks to resist extreme weather, with (Fire Ring) bonus successes, and have Resistance 3 against supernatural and physical fire, including Fire invocations and kiho.
Flame Fist makes your fists trail fire. Prereq: School Rank 1. As an Attack action, you may activate this and make a TN 3 Martial Arts [Unarmed]/Fire check targeting a character at range 0-1. If you succeed, they take (Fire Ring) physical damage and must make a Fitness check (TN 3, Air 4, Water 1) or become Dazed. While this is active, the Deadliness of your unarmed punch and kick profiles is increased by (Fire Ring), and when you Attack a Dazed target with a punch or kick, you may spend 1 Void Point to deal (Fire Ring) extra damage.
Way of the Falling Star lets you punch fireworks. Prereq: School Rank 3. As an Attack action, you may activate this and make a TN 5 Martial Arts [Unarmed]/Fire check targeting a character in range 0-2. If you succeed, the target takes (Fire Ring) supernatural damage and is Burning. Flammable objects in the area ignite. While this is active, when you perform an Attack action, you may spend 1 Void Point. If you do, each Burning or Dazed target suffers a crit with severity (Fire Ring+weapon Deadliness).
Water kiho:
Freezing the Lifeblood lets you cause muscle spasms via ki. Prereq: School Rank 2. As an Attack action, you may activate this and make a TN 4 Martial Arts [Unarmed]/Water check targeting a character at range 0-1. If you succeed, your target takes (Water Ring) supernatural damage and is Immobilized. While this is active, after you hit with a Martial Arts [Unarmed] check, you may spend 1 void Point to make your target Immobilized and force them to make a Fitness check (TN 3, Earth 2, Fire 4) or become Bleeding.
Ki Protection lets you heal with a touch. Prereq: School Rank 1. As a Support action, you may activate this and make a TN 3 Medicine/Water check targeting a character at range 0-1. If you succeed, they heal (Water Ring) wounds and you may remove Bleeding, Injured Body Part or Dying from them. You cannot affect any target more than once this way per scene. While this is active, after you perform any action, you may spend 1 Void Point to heal yourself or a character within range 0-1 of (Water Ring) wounds.
Ride the Water Dragon deflects magic. Prereq: School Rank 3. As a Support action, you may activate this and make a TN 5 Meditation/Water check. If you succeed, remove any conditions and persistent effects on you from supernatural sources, such as invocations, maho or kiho (besides this one, assumably). While this is active, increase the TN of invocations, maho and kiho targeting you by (Water Ring), and the GM may allow you to pass through some supernatural barriers or wards without triggering them.
Water Fist makes your ki ripple as water from your blows. Prereq: School Rank 1. As an Attack action, you may activate this and make a TN 3 Martial Arts [Unarmed]/Water check targeting a character within (Water Ring) range bands that shares a contact surface with you. If you succeed, deal (Water Ring) physical damage. While this is active, your unarmed attacks ignore up to (Water Ring*2) Physical Resistance, and you may spend 1 Void Point to perform an unarmed strike with a punch or kick indirectly via any solid surface the target is touching, treating them as Range 0 for any Attack action using your punches or kicks, as long as you both share a contact surface such as a wall, floor or body of water.
Void kiho:
Death Touch lets you deal massive damage with a touch. Prereq: School Rank 4. As an Attack action, you may activate this and make a TN 5 Martial Arts [Unarmed]/Void check targeting a character at range 0-1. If you succeed, you deal (Void Ring+bonus successes) supernatural damage. While this is active, when performing a successful Attack action, you may spend 1 Void Point to make one target suffer a crit with severity equal to their current Strife.
Still the Elements lets you repel magic. Prereq: School Rank 3. As a Support action, you may activate this and make a TN 4 Meditation/Void check targeting all characters at range 0-1. If you succeed, characters at range 0-1 cannot perform checks to activate invocations, maho and kiho for (Void Ring) rounds. While this is active, when you are targeted by a check for an invocation, maho or kiho, you may spend 1 Void Point to choose up to (Meditation) kept dice on the check and turn them to blank faces.
Touch the Void Dragon lets you see all possible futures of your actions. Prereq: School Rank 5. As a Support check, you may activate this and make a TN 6 Meditation/Void check. If you succeed, you gain 1 Void Point. You cannot gain more than 1 Void Point this way per scene. While this is active, you may spend Opportunities from Void checks as if they were from a check of any element.
Way of the Edgeless Blade lets you channel killing ki through anything. Prereq: School Rank 5. As an Attack action, you may activate this and make a TN 6 Martial Arts [Unarmed]/Void check (which can be with an improvised weapon) targeting up to three characters at range 0-2. If you succeed, each target takes (Void Ring+Meditation+bonus successes) supernatural damage. While this is active, the base Damage and Deadliness of any unarmed profile, improvised weapon or staff you wield are increased by (Meditation+Void Ring).
Next time: Spellsofmagic.rokugan
Call Down The Thunders
Original SA post Legend of the Five Rings: Call Down The ThundersInvocations are shugenja techniques that call upon the kami to do a service. The kami are not given to helping out when not truly needed; as a result, outside of Conflict scenes or other life-and-death struggles, a shugenja can attempt a given invocation only once per scene. Further, the kami may choose not to answer if you use an invocation outside its proper context, such as trying to use Jade Strike to make money. They're not stupid. The act of performing an invocation can be altered slightly by Channeling, attempting to tap into some of the energy of one invocation to fuel another. When making an invocation check, after you choose your Kept dice, you may choose to Channel any number of them, reserving them and not counting them towards the check. On your next turn, if you perform another invocation of the same element, you may choose to tap the channeled dice. For each Ring die tapped, you do not roll one of the Ring dice you normally would, and the same for Skill dice. Instead, you simply place the channeled dice in the end result, as if you had rolled them, with whatever face they had when you channeled them. During a Conflict, you can channel as many times in a row as you want; outside of Conflict, you may channel only once, and it doubles the time required to perform the invocation. If you do anything besides cast an invocation that would use your channeled dice, you lose them, and if you become Dazed or Unconscious, you lose them.
If you generate 3 or more Strife symbols on an invocation check, you also suffer spiritual backlash. For Fire invocations, the invocation now targets all characters in range rather than the normal target. For Earth invocations, you cannot use that invocation again until the end of the scene. For Water invocations, you can't do any more Water invocations until you do an invocation with another element. For Air invocations, each original target may choose one other character in range to also be targeted.
Invocations can be prepared ahead of time; you can only have one prepared invocation at a time, however. This is a downtime action requiring appropriate ingredients, and works like activating an invocation, but with a different Skill (Composition, to prepare a ward, or Medicine, for a potion). To make a ward you also need 1 bu worth of blessed paper and a calligraphy set, and to activate it, you affix the ward to a surface and write a condition on it, specifying when the power is released. When the condition is fulfilled, the invocation activates at its current location. For potions, you need a blessed glass bottle and 1 bu of alchemical supplies. The invocation affects anyone that drinks it, or you can throw it at a person or area with a Martial Arts [Ranged] check, which makes it activate on that target or point.
Performing a material offering as part of your invocation is very helpful, as the kami appreciate this show of devotion. If you make an appropriate offering, you count as having a Distinction (above and beyond any you already have) for the check, and the offering is consumed. Air spirits like incense, feathers or flowers, earth spirits like soil, salt, rocks from sacred places or seeds, water spirits like coins, seashells, precious materials, seaweed or sake, fire spirits like kindling, paper, ash or small flammable objects, Fortunes like texts, food, origami or art, and ancestral spirits like food, incense, sake or other drinks. Lastly, a shugenja or other character that knows at least one invocation can, once per scene, try to make an offering to the kami to get them to perform an invocation they don't know. This offering must both be suitable for the spirit involved and must have some value to the character - generally, it should at least be significantly inconvenient to replace, and the best results come from unique things. If the GM decides the kami is satisfied, the character may perform the unknown technique once, but the TN is increased by 1, plus 1 per School Rank they are below the normal prerequisite. They may channel, but they can't cast the invocation a second time this way, so it's probably a bad idea. Lastly, all invocations cost 3 XP to learn.
Air invocations (i'm skipping the rules text because holy shit these are long and there's a ton of them):
Blessed Wind lets you knock aside projectiles.
By the Light of the Moon lets you reveal what is hidden.
Call upon the Wind lets you fly.
Cloak of Night turns things invisible.
Grasp of the Air Dragon throws people around, either helpfully or as an attack.
Essence of Air turns you into mist.
Know the Mind lets you read and alter memories. You must forfeit 3 Honor to do this without permission, on top of any other potential losses the GM assigns.
Mask of Wind makes you appear as someone else. You must, as a note, forfeit 1 Honor to knowingly impersonate someone of higher Status, on top of any other losses the GM assigns.
Rise, Air summons an air kami.
Summon Fog calls forth a fog shield.
Tempest of Air fires off an air blast at everyone nearby.
Token of Memory conjures an illusion, which can optionally be made solid.
Wrath of Kaze-no-Kami calls down a tornado, or possibly a hurricane.
Earth invocations:
Armor of Earth lets you turn rocks into a suit of armor for yourself.
Bind the Shadow lets you stun and lock down a Shadowlands critter or Tainted person.
Courage of Seven Thunders lets you boost Composure ratings.
Earthquake causes a magic earthquake.
Earth Becomes Sky makes the ground explode under someone.
Embrace of Kenro-Ji-Jin lets you stick to earth surfaces like a spider or optionally swim through earth.
Essence of Jade blesses an area you sprinkle with jade dust, removing any Shadowlands taint and possibly blessing it further.
Grasp of Earth makes the ground attack someone.
Jade Strike does crits at Shadowlands beasts or Tainted people.
Jurojin's Balm helps resist poison, disease and drunkenness.
Power of the Earth Dragon increases Resilience ratings.
Rise, Earth summons an earth kami.
Stagnation slows time down, which mostly makes it harder to move distances.
Symbol of Earth makes a sacred symbol that damages Shadowlands critters.
Tetsubo of Earth makes a big stone tetsubo that causes knockdown.
Tomb of Jade turns a Shadowlands beast or Tainted person into jade, weakening and imprisoning them, though if you break the statue they can sometimes escape.
Fire invocations:
Armor of Radiance makes a suit of armor glow and get super hot (but not harm the wearer).
Biting Steel empowers a weapon to do more damage.
Breath of the Fire Dragon lets you breathe fire.
Extinguish puts out fires.
Fires of Purity gives someone a fire aura.
Fury of Osano-Wo calls down a bolt of lightning.
Haze of Battle gives Strife and makes the target Enraged.
Katana of Fire gives you a katana made of fire.
Ravenous Swarms summons little flying sparks that set things on fire and boost your attacks.
Rise, Flame summons a fire kami.
The Fires from Within shoots fireballs.
The Fires that Cleanse makes a wave of fire that dazes and hurts people.
The Soul's Blade summons a katana or naginata made of lightning that ignores armor of all kinds.
Wall of Fire makes a wall of fire.
Wings of the Phoenix lets you fly on wings of fire, setting the ground on fire below you.
Water invocations:
Bo of Water lets you summon a staff made of water that turns into other weapons.
Dance of Seasons lets you freeze, thaw and evaporate water very quickly. (But explicitly not water inside people's bodies because the kami think that's gross and ugly.)
Dominion of Suitengu lets you scry via bodies of water.
Ever-Changing Waves lets you turn into animals.
Hands of the Tides lets you swap people's locations.
Heart of the Water Dragon heals people slowly and lets them resist supernatural damage.
Inari's Blessing summons food.
Path to Inner Peace heals people.
Reflections of P'an Ku tells you information about objects or people.
Rise, Water summons a water kami.
Stride the Waves lets you travel safely on water currents.
Strike the Tsunami lets you fire a torrent of water at people.
Suitengu's Embrace hurts and/or drowns people.
Sympathetic Energies lets you extend invocation effects to others after the casting.
The Rushing Wave lets you ride around on a torrent of water.
Rituals are religious ceremonies, and they aren't secrets. Priests and caretakers all over Rokugan perform them all the time. They do, however, call on the kami to do magical things, just subtler miracles. They are performed during downtime, and other scenes only at GM discretion. They, likewise, will pretty much always be 3 XP because they give you a new action to do. Rituals:
Cleansing Rite lets you sanctify people to drive out unholy power, removing Afflicted conditions or Defiled terrain (but not Shadowlands Taint once it's set in).
Commune with the Spirits ask the kami or other local spirits for power. This can let you either detect magic and spiritual presences, learn something the local spirits know about the area, or receive a small gift in the form of an element - you might get rain or find a stream, you might get a gust of wind, you might find arable ground or a big rock. (Obviously, you get to pick which benefit, so it's always theoretically useful.)
Divination lets you foretell the future, which mostly means that either you or the GM or both pick a skill category for your target and declare that the next time that skill category is used this session, they add a Kept die with Strife+Opportunity showing.
Threshold Barrier wards a doorway to make it invisible or repulsive to a specific kind of being - spirits/ghosts, living Shadowlands critters/the Tainted, corporeal undead, wild animals, or humans.
Next time: Shuji.
Yelling For Peace
Original SA post Legend of the Five Rings: Yelling For PeaceShuji are social techniques. They are usable in debates, duels and skirmishes by default, with other types of Conflict allowing them as common sense and the GM permit. By default, shuji are able to affect anyone close enough to hear and understand you, which in most cases will be range 0-4 but might be less during, say, a battle or a storm. Shuji cannot be used to target groups via writing, but a well-targeted letter to a specific person may be able to have a shuji technique used through it at the GM's discretion, though it generally will only work on its intended recipient.
Air Shuji tend to be indirect, focusing on subtle traps for others, working via details and controlling the scope of conversation.
Artisan's Appraisal allows you to look at an art piece and learn about its maker. Prereq: School Rank 2. When assessing an object or performance with an Artisan Skill/Air, Performance/Air or Games/Air check, you may spend Opportunities in new ways. You may spend one Opportunity symbol to choose a Ring, learning the creator or performer's value in that Ring and all non-Curse Advantages and Disadvantages attached to it. If the creator or performer is an NPC, you may spend one Opportunity symbol to learn their Disposition. Cost: 2 XP.
Bend with the Storm allows you to lure someone into believing you have a weakness you don't. Prereq: School Rank 5. When you make a Social Skill/Air check targeting another character, you may spend one Opportunity symbol to choose an Advantage or Disadvantage. The target believes you have that, without you having to say so directly or expend much effort, and believes that you don't know you've given this away. If you do anything that would call this into question, they may make a Sentiment check (TN 5, Fire 3, Earth 6) to notice that the Advantage or Disadvantage isn't real. This lasts until they get incontrovertible evidence or manage to succeed on the resistance check. XP Cost: 2.
Cadence lets you communicate wordlessly. Prereq: School Rank 1. When you make a Social Skill/Air check, you may spend Opportunities in new ways. You may spend one Opportunity symbol to convey a secret message that alters or has nothing to do with what you say outwardly to one character obvserving you who also knows this technique. You may spend two Opportunity symbols to do the same to one character observing you who does not know this technique. XP Cost: 2.
Feigned Opening lets you fake weakness martially. Prereq: School Rank 2. As a Movement and Scheme action, you may make a Performance/Air check targeting one character in the scene who is observing you, with TN of their Vigilance. This can only be used in Skirmish or Mass Battle Conflicts. If you succeed, reduce the TN of the next Attack check against the target (or their cohort, in Mass Battle) by (1+bonus successes) until the end of your next turn. You may spend Opportunity symbols to choose additional targets, 1 for 1, with Vigilance lower than or equal to the original target. In mass battle, you may spend Opportunity symbols to increase the TN of Attack checks targeting your cohort, 1 for 1. (I assume for the same duration as above.) XP Cost: 3.
Rustling of Leaves lets you spread rumors anonymously. Prereq: School Rank 1. When you make a Social Skill/Air check to create or propagate a rumopr, you may spend Opportunity symbols to increase the TN of any check to trace the rumor back to you by 2 per symbol spent. XP Cost: 2.
The Wind Blows Both Ways lets you help or hurt someone's fame. Prereq: School Rank 3. When you make a Courtesy/Air or Performance/Air check targeting another character, you may spend Opportunity symbols in new ways. You may spend Opportunity symbols so that the next time the target receives a Glory boost this scene, they gain additional Glory equal to the symbols spent. You may spend Opportunity symbols so that the next time the target forfeits or stakes Glory in this scene, they must forfeit or stake additional Glory equal to the symbols spent. XP Cost: 2.
Whispers of Court lets you quickly and easily spread a rumor. Prereq: School Rank 1. As a Scheme action, you may make a Courtesy/Air check targeting each character in the scene, with TN equal to the lowest Vigilance among them. If you succeed, you create a rumor that everyone in the scene hears, and those with Vigilance less than your bonus successes even give some credence to. If spreading a rumor is your social objective in a Debate, you score (Air Ring+bonus successes) rhetorical points. You may spend one Opportunity symbol to learn one other rumor spreading in the current scene. XP Cost: 3.
Wolf's Proposal lets you make others perceive you as more or less honorable than you really are. Prereq: School Rank 4. As a Scheme action, you may make a Courtesy/Air or Performance/Air check targeting any number of characters in the scene, with TN equal to the highest Vigilance among them. If you succeed, each target behaves as if your Honor is 10 higher or lower than its actual value, plus or minus another 10 per bonus success, to a max of 100 or minimum of 0. Anyone can resist with a Sentiment check (TN 4, Fire 2, Earth 5) to determine your actual Honor. This lasts until the end of the scene. For one Opportunity symbol, you may learn if the Honor of one other character in the scene is higher than your actual Honor value. XP Cost: 3.
Earth Shuji are all about building others up with support, expectation and pressure. They are often quite direct and blunt.
Ancestry Unearthed lets you know stuff about people's families. Prereq: School Rank 1. When you make a Scholar Skill/Earth or Social Skill/Earth check targeting a character, you may spend Opportunities in new ways. You may spend one Opportunity symbol to know one sworn oath the character's family took in the past, and if they broke it or bent it. You may spend two Opportunity symbols to know one secret of the character's family they'd prefer forgotten and perhaps have worked to bury. You may spend three Opportunity symbols to know something even the character does not know about their ancestry. XP Cost: 2.
Civility Foremost lets you protect people with your honor. Prereq: School Rank 2. As a Scheme action, you may make a Command/Earth or Courtesy/Earth check targeting one character, with TN equal to their Vigilance. You claim protection for an individual of your choice as you do. If you succeed, the target must forfeit (Earth Ring+bonus successes) Honor and take equal Strife to perform an Attack or Scheme action targeting your chosen character. This lasts until the end of the scene or until the target performs an ATtack or Scheme action. You may spend Opportunity symbols to choose additional targets, one for one, who have Vigilance lower than or equal to the first's. XP Cost: 3.
Honest Assessment lets you help someone avoid a weakness. Prereq: School Rank 1. As a Support Action, you may make a TN 2 Courtesy/Earth check to appraise the weaknesses of a character. If you succeed, choose one of their known Disadvantages. They ignore that Disadvantage until the end of the scene. You may spend Opportunity symbols, one for one, to choose additional Disadvantages. You may spend two Opportunity symbols to reduce the TN of the target's next skill check using the Ring the Disadvantage is attached to by 2. XP Cost: 2. (I think that's a typo and should be 3.)
Pillar of Calm lets you deescalate conflicts. Prereq: School Rank 4. As a Scheme and Support action, you may make a Command/Earth check targeting a number of characters up to (Earth Ring*School Rank), with TN equal to the highest Strife among them. If you succeed while targeting all the leaders involved in the conflict, you may de-escalate it one level - Mass Battle to Skirmish, Skirmish to Duel, Duel to Debate. You may spend 2 or more Opportunity symbols to deescalate by an additional level per 2 symbols spent. XP Cost: 3.
Stonewall Tactics lets you sealion people. Prereq: School Rank 1. When making a Social Skill/Earth or Martial Skill/Earth check targeting a character, you may spend Opportunity symbols to increase the TN of any check the target makes that does not target you, 1 for 1. This effect lasts until the beginning of your next turn. XP Cost: 3. (I think that's a typo again.)
Touchstone of Courage lets you prevent panic. Prereq: School Rank 3. As a Support action, you can make a TN 4 Command/Earth check targeting any number of characers, or your cohort in mass battle. If you succeed in a Debate, Duel or Skirmish, each target adds (EArth Ring) to their Composure until the end of the scene. If you succeed in a Mass Battle, your army's Discipline is increased by (Earth Ring+bonus successes) until the end of the scene. You may spend two Opportunities during a Debate, Duel or Skirmish to alos remove (Earth Ring) Strife from each target. You may spend two Opportunities during a Mass Battle to remove (Earth Ring) Panic. XP Cost: 3.
The Immoveable Hand of Peace lets you stop fights. Prereq: School Rank 5. Once per session as a Scheme action during a Duel or Skirmish, you may make a TN 5 Command/Earth check targeting everyone in the scene. If you succeed, the scene becomes a Debate betweem you and the other principal players for (1+bonus successes) Rounds. If you have not achieved a peaceful resolution by then, it returns to its previous state. You may spend one Opportunity symbol to perform this action during a Mass Battle or other non-Debate form of Conflict. XP Cost: 3.
The Weight oF Duty lets you learn about the duties of others. Prereq: School Rank 1. When you make a Social Skill/Earth check targeting a character, you may spend Opportunities in new ways. You may spend 1 Opportunity symbol to learn one way the target fears failing as a samurai. You may spend 2 Opportunity symbols to learn the target's Giri. XP Cost: 2.
Fire Shuji are about provocation of emotional responses quickly.
Bravado[/o] lets you fake being more or less famous. Prereq: School Rank 4. As a Scheme action, you may make a Games/Fire or Performance/Fire check targeting any number of characters in the scene, with TN equal to the highest Vigilance among them. If you succeed, each target behaves as if your Glory was 10 higher or lower than its actual value, plus or minus 10 per bonus success, to a max of 100 and minimum of 0. If you do anything that'd call your Glory into question, anyone can resist with a Sentiment check (TN 4, Air 2, Water 3) to determine your actual Glory. This lasts until the end of the scene. You may spend one Opportunity symbol to learn if the Glory of one other character in the scene is higher than your actual Glory. XP Cost: 3.
Dazzling Performance lets you draw attention. Prereq: School Rank 3. When making an Artisan Skill/Fire, Games/Fire or Performance/Fire check, you may spend one Opportunity symbol to increase the amount of Glory you receive the next time you receive Glory this scene by 1. If a character of higher STatus is present, increase it by 1 per symbol spent, instead, and you can spend multiple symbols. XP Cost: 2.
Fanning the Flames lets you confuse and anger people. Prereq: School Rank 2. When making a Social Skill/Fire check targeting one or more characters, you may spend Opportunities in new ways. You may spend Opportunity symbols to make one target Dazed per symbol spent. You may spend 2 or more Opportunity symbols to make one target Enraged per two symbols spent. XP Cost: 2.
Lightning Raid lets you inspire others to greater speed. Prereq: School Rank 2. Once per scene, as an Attack and Movement action, you may make a TN 3 Command/Fire check targeting any number of characters in the scene, or one cohort in Mass Battle. If you succeed during a Skirmish, each target increases their Inititive by (Fire Ring+bonus successes) at the start of the next round. If you succeed during a Mass Battle, one enemy leader's cohort suffers (Fire Ring+bonus successes) Panic. During a skirmish, you may spend one Opportunity symbol to immediately perform a Strike action. During a Mass Battle, you may spend one Opportunity symbol to immediately perform an Assault action against the chosen enemy cohort's leader. XP Cost: 3.
Rallying Cry lets you energize people in battle. Prereq: School Rank 3. As a Support action, you may make a TN 2 Command/Fire or Performance/Fire check targeting any number of characters in the scene or one cohort in a Mass Battle. If you succeed. each target adds a kept Ring die showing Opportunity/Strife, presumably to their next checks but it actually doesn't say. This lasts until the end of your next turn. In a Skirmish, you may spend Opportunity symbols to have each enemy in the scene suffer 1 Strife per symbol spent. In a Mass Battle, you may spend Opportunity symbols to have the enemy army suffer 1 Panic per symbol spent. XP Cost: 3.
Sear the Wound lets you make someone feel really insecure. Prereq: School Rank 5. When making a Social Skill/Fire check targeting one or more characters, you spend Opportunities to choose one known Disadvantage of one of your targets per symbol spent. That Disadvantage applies all of the target's checks until the end of the scene. XP Cost: 2.
Sensational Distraction lets you distract people. Prereq: School Rank 1. When making a Social Skill/Fire check targeting one or more characters, you may spend Opportunity symbols. When interacting with other characters, the target treasure their Vigilance as 1 lower per symbol spent, and when interacting with you, 1 higher per symbol spent. This lasts until the end of the scene. XP Cost: 2.
Stirring the Embers lets you give someone a pep talk. Prereq: School Rank 1. When making a Social Skill/Fire check targeting one or more characters, you may spend Opportunities to choose a target and one of their known Advantages per symbol spent. Until the end of that scene, when that advantage applies, the target may reroll up to three dice rather than up to two. XP Cost: 2.
[]i]Truth Burns Through Lies lets you figure out how you'd need to test a statement. Prereq: School Rank 1. When making a Scholar Skill/Fire check to assess a character's story, you may spend an Opportunity symbol to know if there is a single statement upon which the story hinges, what it is, and what you'd need to to verify or disprove it. XP Cost: 2.
Water shuji are all about emotional ploys and bribery.
All in Jest lets you laugh off missteps as a joke. Prereq: School Rank 1. When making a Commerce/Water, Courtesy/Water or Performance/Water check, you may spend Opportunity symbols to regain 1 Honor that you forfeited as part of this check per symbol spent this way to say something rude or appeal to the targets base desires. XP Cost: 2.
Bouyant Arrival lets you interupt people or leave without giving offense. Prereq: School Rank 5. As a Scheme action, you may make a Courtesy/Water check targeting up to (Water Ring) characters, with tN equal to the Vigilance of the highest Status among them. If you succeed, you may enter or leave the conversation gracefully and need not forfeit Honor or Glory to interrupt or suddenly depart, no matter what the Status of those involved. XP Cost: 3.
Ebb and Flow lets you invert Advantages and Disadvantages. Prereq: School Rank 3. As a Scheme or Support action, you may make a Courtesy/Water, Command/Water or Games/Water check targeting one character, with TN of their Vigilance. If you succeed on a Scheme, choose one of their known Advantages. For the rest of the scene, whenever it applies, it is a Disadvantage. If you succeed on a Support, do the same, but choose a Disadvantage, and it's an Advantage for the rest of the scene. XP Cost: 3. You may spend one Opportunity symbol to pick one additional Advantage or Disadvantage and apply the effect to it, too. You may spend Opportunity symbols to choose additional targets, 1 for 1, whose Vigilance is lower than or equal to the first's. XP Cost: 3.
Regal Bearing lets you fake being important. Prereq: School Rank 4. As a Scheme action, you may make a Command/Water or Performance/Water check targeting any number of characters in the scene, with TN equal to the highest Vigilance among them. If you succeed, each target treats your Status as being 10 higher or lower, plus or minus 10 per bonus success, to a max of 100 and a minimum of 0. If you do anything that might call your Status into question, anyone may resist with a Sentiment check (TN 4, EArth 2, Fire 5) to determine your actual Status. This lasts until the end of the scene. You may spend one Opportunity symbol to learn if the Status of one other character in the scene is higher than your actual Status. XP Cost: 3.
Shallow Waters lets you learn what people want. Prereq: School Rank 1. When you make a Social Skill/Water check targeting a character, you may spend Opportunities in new ways. You may spend one Opportunity symbol to learn one material item or worldly experience the target desires. You may spend 2 Opportunity symbols to learn the target's Ninjo. XP Cost: 2.
Slippery Manevuers lets you move people around. Prereq: School Rank 2. As a Movement and Support action, you may make a TN 2 Command/Water check targeting any number of friendly characters in the scene or your cohort during a Mass Battle. This can only be used in Skirmish or Mass Battle. If you succeed in a Skirmish, pick a piece of terrain you can see. Each target may immediately move 1 range band toward it, and Attack checks targeting any of your targets in the terrain treat the terrain as Obscuring. This lasts until the end of the scene. If you succeed in a Mass Battle, pick a piece of terrain or fortification. You and your cohort may immediately move to occupy it if it's unoccupied. Attack checks targeting you and your cohort while inside the terrain treat it as Obscuring. This lasts until the end of the scene. You may spend an Opportunity symbol to make the Obscuring effect on the chosen terrain increase TNs by 2 instead of 1 for the scene. XP Cost: 3.
Tributaries of Trade lets you get items. Prereq: School Rank 2. As a Schem and Support action, you may make a TN 1 Commerce/Water check to reveal an item you procured earlier, retroactively. Narratively, you got it last time you had the chance, you just only revealed it now. If you succeed, you produce an item with Rarity less than or requal to (1+bonus successes), though you must still pay for it. You may spend Opportunities to reduce its cost by 25% per symbol spent, to a minimum of 25% of the original price. XP Cost: 3.
Well of Desire lets you safely give bribes. Prereq: School Rank 1. When you make a Courtesy/Water check to present a gift to a target, you may spend an Opportunity symbol to force the target to have to forfeit (Water Ring) Glory to refuse your Gift. If it's something they desire, they must also take (Rarity) Strife to refuse it. If they accept the gift, reduce the TN of your next Social check targeting them by (Rarity). XP Cost: 2.
Void Shuji are about understanding inner mysteries.
All Arts are One lets you rapidly learn new things. Prereq: School Rank 3. As a Support action, you may make a TN 4 Martial Skill/Void, Games/Void or Performance/Void check to rapidly absorb a new activity covered by that skill. If you succeed, you immediately intuit how to use a new weapon, play a new game or perform a new instrument, song, dance or so on. You get no TN increases from it being totally new. You may spend one Opportunity symbol to choose a Ring and reduce the TN of your next check using that Ring by 1 until the end of your next turn, or the end of the scene in a narrative scene. XP Cost: 3.
A Samurai's Fate lets you keep people alive for a while. Prereq: School Rank 4. As an action, you may make a TN 5 Command/Void check targeting any number of characters, or your cohort during a Mass Battle. If you succeed during a Skirmish, each target ignores any crits with severity lower than (Void Ring+bonus successes) until the end of the scene, at which point they all take effect. If you succeed during a Mass Battle, your army gains the Fearless Army quality until the end of the scene. (This lets it remove Panic equal to your Glory Rank at the end of each round.) XP Cost: 3.
Courtier's Resolve lets you maintain composure. Prereq: School RAnk 1. Once per scene, as a Support action, you may sepnd 1 Void point to heal Strife until your total Strife is equal to (Composure-Honor Rank). XP Cost: 3.
Lady Doji's Decree lets you be super pretty and serene. Prereqs: Crane Clan, School Rank 2. Once per session, as an action, you may make a Courtesy/Void check targeting up to (School Rank) characters, with TN equal to the Vigilance of the one with highest Status. If you succeed, your targets cannot perform Attack actions targeting you for (1+bonus successes) rounds or until you perform an Attack action. You may spend Opportunity symbols to choose one additional target per symbol with Status lower than the first. You may spend two Opportunity symbols to also prevent Scheme actions targeting you. XP Cost: 3.
Lady Shinjo's Speed lets you travel super fast. Prereqs: Unicorn Clan, School Rank 2. As a downtime activity, if you have a steed available, you may make a TN 2 Survival/Void check to reach a destination. If you succeed, you arrive in half the time it would normally take, and up to one character can ride with you. You may spend an Opportunity symbol to lead up to (School Rank) willing characters with mounts of their own. XP Cost: 3.
Lord Akodo's Roar lets you scare people. Prereqs: Lion Clan, School Rank 2. Once per session, as an action, you can make a TN 1 Command/Void check targeting each hostile character within (School Rank) range bands. If you succeed, they are all Dazed. You may spend two or more Opportunity symbols to allow one other friendly character at range 0-3 per two symbols spent to immediately make a Strike action targeting a Dazed character. XP Cost: 3.
Lord Bayushi's Whisper lets you discover informants. PRereqs: Scorpion Clan, SChool Rank 2. Once per session, during a narrative scene or downtime, you may make a TN 2 Skulduggery/Void check to find an informant. If you succeed, reveal one informant that can tell you about a topic of your choice. You may spend an Opportunity symbol, if you succeed, to name a Skill. The informant has (School Rank) ranks in that skill and can make checks with it to help you until the end of the scene. XP Cost: 3.
Lord Togashi's Insight lets you receive visions from Togashi. Prereqs: Dragon Clan, School Rank 2. Once per session, as an action, you may make a TN 2 Meditation/Void check. If you succeed, you get a brief vision or hear Togashi's voice giving you a hint about how to proceed. This hint will not be a full answer, but should be helpful. You may spend an Opportunity symbol to reduce the TN of your first check to overcome the problem facing you by (School Rank). XP Cost: 3.
Rouse the Soul lets you heal minds. Prereq: School Rank 5. When making a Social Skill/Void or Theology/Void check targeting one or more characters, you may spend Opportunities to remove one of Afflicted, Enraged, Fatigued, Intoxicated or Unconscious from one target per symbol spent. Yes, you can talk the drunk out of them. XP Cost: 2.
Next time: Maho
Mahoromatic
Original SA post Legend of the Five Rings: MahoromaticMaho is evil magic - both the type and the name of the spells, like invocations. While invocations are granted by mercurial but ultimately benevolent kami, the spells of maho are granted by kansen - evil spirits, Jigoku's kami or corrupted kami. They care only for destruction, despair and blood. Those who wield maho are called maho-tsukai, and are despised by all right-thinking people. The Empire hunts them, but they are unfortunately often quite subtle and hard to spot. Unlike invocations, maho are often indirect and staggered. They start with subtle curses, and only then can the kansen act in more unpleasant ways. It can be done quickly in battle, but more often it is not, and is done slowly and subtly. Only those with the Shadowlands Taint disadvantage can buy maho, but anyone with it can, as long as they have a source of evil lore. Unlike invocations, maho always require some form of sacrifice - usually blood, but evil acts can work. Small amounts of blood will satisfy, but the greatest powers are drawn forth by human sacrifice or deep and horrific breaking of your personal code. If you perform an exceptional sacrifice, you count as having a Distinction Advantage on the maho check.
Like invocations, maho can also suffer backlash. If you get 3 or more Strife symbols on a maho check, you take a crit with severity equal to double the number of your Shadowlands Taint Disadvantages, then gain a Shadowlands Taint Disadvantage for a Ring that didn't have it already. Also like invocations, you may beg the kansen for a maho you don't know, once per scene. You have to kill a person or cross a previously inviolable moral line to do it, however. The kansen are generous in one sense, though - while you only get one shot at the maho, its TN is not increased. Maho always cost 3 XP.
Incite Haunting lays the basic curse. Prereq: School Rank 1. As an Attack and Scheme action, you may make a Theology check targeting a character or corpse at range 0-1, with a Ring of your choice and TN of their Vigilance, or 1 for a corpse. If you succeed, the target gets the Afflicted condition for the Ring you used, and you get the Shadowlands Taint Disadvantage for the Ring you used if you didn't already have it. If you fail with a shortfall of two or more, your target notices what you were doing. You may spend Opportunity symbols to increase the maximum range of this technique by one range band per symbol spent. You may spend Opportunity symbols to target additional characters or corpses, 1 for 1.
Grip of Anguish calls down sickness and agony. Prereq: School Rank 1. As an Attack action, you may make a Theology/Water check targeting one Afflicted character at range 0-2, with TN of their Vigilance. If you succeed, they take (Water Ring+Tainted Rings) supernatural damage and Strife, and you get Shadowlands Taint (Water). You may spend Opportunity symbols to increase the maximum range of this technique by one range band per symbol spent. You may spend Opportunity symbols to target additional characters, 1 for 1. You may spend 1-3 Opportunity symbols to force a target to make a Fitness check (TN 3, Earth 1, Air 4) or suffer one of Dazed, Disoriented or Immobilized per symbol spent. You may spend 2 Opportunity symbols to force a target to make a Fitness check (TN 3, Earth 1, Air 4) or suffer one of Bleeding, Incapacitated or Injured Body Part.
Mark of Desecration raises zombies. Prereq: School Rank 1. As a Support action, you may make a TN 2 Theology/Earth check targeting up to (Earth Ring) Afflicted corpses at range 0-3. If you succeed, they all rise as Zombie Peasants and you get Shadowlands Taint (Earth). Even if you fail, an area of one range band around each target becomes Defiled terrain. You may spend Opportunity symbols to increase the maximum range of this technique by one range band per symbol spent. You may spend Opportunity symbols to target additional corpses, 1 for 1. You may spend Opportunity symbols to increase the zombies' Resilience by 1 per symbol spent. You may spend 2 Opportunity symbols to allow the zombies use your Skill ranks instead of their own.
Sinful Whispers makes people listen to you. Prereq: School Rank 1. As an Attack and Scheme action, you may make a Theology/Air check targeting an Afflicted character at range 0-4, with TN of their Vigilance. If you succeed, they must answer your questions honestly and do not find doing so remarkable for (Air Ring+Tainted Rings) rounds, and you get Shadowlands Taint (Air). You may spend 1 Opportunity symbol to make them not remember what you asked after. You may spend 3 Opportunity symbols to give them a simple order. They may resist, but for each scene in which they do, they take 2 Strife, and the next time they have an Outburst, they must attempt to fulfill the order. This lasts until they attempt to fulfill the order, succeed or fail.
Unholy Fervor blesses the Tainted. Prereq: School Rank 1. As a Support action, you may make a TN 2 Theology/Fire check targeting one Afflicted or Tainted character at range 0-3. If you succeed, until the end of the scene, the target treats any Curse and Shadowlands Taint Disadvantages as Advantages on any check where they apply instead, and you get Shadowlands Taint (Fire). You may spend Opportunity symbols to increase the maximum range of this technique by one range band per symbol spent. You may spend Opportunity symbols to target additional characters, 1 for 1. You may spend one Opportunity symbol to make all targets Enraged.
Now, some equipment stuff! Any time you want to buy stuff, you can spend a downtime action or action in a narrative scene at a market to do so, making a Commerce/Water check with TN of the item's Rarity to find it. If you do, you can then buy it for the listed price, try to get the merchant to go to your lord's representative for payment, or otherwise get the item. The GM may modify the TN based on where you are - Otosan Uchi and Ryoko Owari are big cities, so the TN might go down by 2 there, say. That said, your lord will usually give you any items you truly require. A bushi sent to war will usually get ashigaru armor, any weapons they favor and maybe a pony, say. Likewise for other tasks. If you feel you need something else, you can spend a downtime action or narrative action in a scene where you have access to your lord or their rep to make a Courtesy check (or other appropriate skill) and request an item. The TN is the item's Rarity minus your Glory rank, and success means your lord will come through for you, though it may take some time. Again, the GM can modify the TN.
In theory, samurai never pay for things - their lord will, as they are his retainers, and traditionalist samurai often see money as unclean or rude to carry. In practice, however, cash is very useful to have on hand. It can make your work for your lord easier if you have immediate compensation rather than an IOU, and peasants will generally be more cooperative if paid appropriately. Some people, like criminals or mercenaries, may not even accept your lord's IOU!
Now, weapons. Weapons have a number of stats. First, their Skill is the one you use to wield the weapon. Their Range is the distance at which you can effectively attack with the weapon, and is both a maximum and a minimum - if you get inside past a weapon's effective range, it's not very useful. It has a Damage, which is the base number of Wounds you deal when you hit with it. It has a Deadliness, the base severity of a crit with the weapon. It will list one or two Grips - how many hands you can wield it with, and any statistical changes associated with using one or two hands. You can switch between grips whenever you have a chance to ready a weapon. There will also be a list of Qualities, which modify how the weapon is used but don't apply to its basic statistics. Like all items, it will also have a Rarity and a price.
Some examples:
Katana: Skill: Martial Arts [Melee], Range 1, Damage 4, Deadliness 5, Grips: 1-Handed, 2-Handed (Deadliness +2), Qualities: Ceremonial, Razor-Edged. Rarity: 7. Price: 20 koku.
Jian: Skill: Martial Arts [Melee], Range 0-1, Damage 4, Deadliness 4, Grips: 1-Handed, 2-Handed (Deadliness +1), Rarity: 7, Price: 15 koku.
Jitte: Skill: Martial Arts [Melee], Range 0, Damage 1, Deadliness 2, Grips: 1-Handed, Qualities: Concealable, Snaring, Rarity: 5, Cost: 5 bu.
Tetsubo: Skill: Martial Arts [Melee], Range: 1, Damage 8, Deadliness 3, Grips: 2-Handed, Qualities: Cumbersome, Durable, Wargear, Rarity: 5, Cost: 20 koku.
Naginata: Skill: Martial Arts [Melee], Range 2, Damage 6, Deadliness 6, Grips: 2-Handed, Qualities: Cumbersome, Razor-Edged, Wargear, Rarity: 7, Cost: 10 koku.
Punch: Skill: Martial Arts [Unarmed], Range 0-1, Damage 1, Deadliness 2, Qualities: Snaring, Natural
Kick: Skill: Martial Arts [Unarmed], Range 1, Damage 3, Deadliness 2, Qualities: Natural
Bite: Skill: Martial Arts [Unarmed], Range 0, Damage 1, Deadliness 4, Qualities: Natural
Yumi: Skill: Martial Arts [Ranged], Range 2-5, Damage 5, Deadliness 3, Grips: 2-Handed, Rarity: 3, Cost: 20 koku.
Crossbow: Skill: Martial Arts [Ranged], Range 2-5, Damage 7, Deadliness 3, Grips: 2-Handed, Qualities: Wargear, Rarity: 7, Cost: 30 koku.
Improvised Weapon (Blunt): Skill: Martial Arts [Unarmed], Range 0-1, Damage 2, Deadliness 2, Grips: 1-Handed, 2-Handed (Damage +2), Qualities: Mundane, Rarity: 1
Improvised Weapon (Edged): Skill: Martial Arts [Unarmed], Range 0-1, Damage 1, Deadliness 3, Grips: 1-Handed, 2-Handed (Deadliness +2), Qualities: Mundane, Concealable, Razor-Edged, Rarity: 1
Armor has different stats. First, Physical Resistance, which directly reduces the wounds dealt by physical damage, to a minimum of 0. Second, Supernatural Resistance, which does the same for supernatural damage. Then it can have Qualities, and it has Rarity and Cost. You may only benefit from one set of armor at a time - even if you layer armor, you only mechanically get to count one layer of it. You also can only benefit from one effect that boosts the Resistance (physical or supernatural) of that armor at a time. If you'd have more than one, you choose which applies.
Some examples:
Sleeping Garb: Rarity 2, Cost: 1 koku.
Common Clothes: Physical Resistance 1, Qualities: Mundane, Rarity 1, Cost: 1 bu.
Sanctified Robes: Physical Resistance 1, Supernatural Resistance 3, Qualities: Ceremonial, Rarity: 5, Cost: 2 koku.
Inconspicuous Garb: Physical Resistance 1, Qualities: Mundane, Subtle, Rarity 3, Cost: 2 bu.
Ashigaru Armor: Physical Resistance 3, Qualities: Wargear, Rarity: 3, Cost: 5 koku.
Lacquered Armor: Physical Resistance 4, Qualities: Ceremonial, Wargear, Rarity: 6, Cost: 25 koku.
Plated Armor: Physical Resistance 5, Qualities: Cumbersome, Durable, Wargear, Rarity: 7, Cost: 40 koku.
So what do those Qualities mean? Well, they all have various rules effects!
Ceremonial: This item is indicative of identity and rank, and using the Ceremonial goods of others frequently is frowned on. To use another character's Ceremonial gear without permission, you must forfeit 1 Honor. While openly wearing Ceremonial gear, you reduce the TN of any check to convince others of your identity as the known holder of the item or their retainer or ally by 1.
Concealable: This item is easily hidden. Unless explicitly worn openly or readied for use, it is assumed to be hidden, and requires a TN 3 Design/Air or Smithing/Air check to notice it even exists, and at least 2 bonus successes to know what it is exactly. Concealable armor can be worn beneath loose-fitting clothes, but you still have to pick just one set of armor to be mechanically relevant. When a Concealable item would gain Cumbersome, it instead loses Concealable.
Cumbersome: This item is bulky or heavy. It cannot be concealed on your person by mundane means. The TN of any Movement action or other check to reposition yourself is increased by 1 per Cumbersome item you are carrying past the first. When a Cumbersome item would gain Concealable, it instead loses Cumbersome.
Damaged: This item is damaged. If a tool, all TNs of checks using it go up by 1. If a weapon, it gets -2 Damage and -2 Deadliness, to a minimum of 0. If armor, it reduces all Resistances it has by 2, to a minimum of 0. If a Damaged item would gain Damaged, it loses Damaged and gains Destroyed instead.
Destroyed: This item is unusable. It cannot be used as anything more than an improvised weapon or tool, and then only at the GM's whim.
Durable: This item is tough. When a Durable item would gain Damaged, it instead loses Durable.
Mundane: This item is unremarkable in daily life. You may carry it in most social circumstances without question, and anyone is allowed to wear it openly, though some may note you are armed.
Natural: This is part of your body. It always counts as being readied unless you are somehow bound.
Razor-Edged: This is a very sharp item. This Quality is required for some techniques. When you succeed at an Attack action with this item but the damage is reduced to 0 by Resistance, this item gains Damaged.
Resplendent: This is a very attention-grabbing item. While you are wearing one or more Resplendent items, any time you gain 1 or more Glory, you gain 1 additional Glory. When a Resplendent item would gain Subtle, it instead loses Resplendent.
Sacred: This item has purifying power, usually due to jade. When a Shadowlands beast or Tainted character attempts an Attack or Scheme action against you while you have at least one Sacred item, increase the TN by 1. When you would gain Afflicted, instead one of your Sacred items gains Damaged. Sacred weapons ignore all Resistances of Shadowlands beasts or Tainted characters. If a Sacred item would gain Unholy, it instead loses Sacred. If it was made of jade, the jade turns to pure water and drips off.
Snaring: This item is good at grabbing. Certain techniques require this Quality.
Subtle: This item doesn't stand out. The TN to gain information about the item or its wearer is increased by 1, and the GM may also apply this to checks to learn about the creator of the item's intention in creating it. When a Subtle item would gain Resplendent, it instead loses Subtle.
Unholy: This item is tainted. It may be made so by Shadowlands taint, or it may be made of obsidian, which absorbs negative emotion and power (which the Shadowlands and Fu Leng have in infinite amount). Whenever a character takes damage or a crit from an Unholy weapon, they become Afflicted for the Ring associated with their stance. At the end of any scene in which you use an Unholy item, you must make a TN 4 Meditation check with the Ring of your choice or become Afflicted for that Ring. When an Unholy item would become Sacred, it instead loses Unholy. If it was made of obsidian, the obsidian parts turn into blood and burn off in acrid smoke.
Wargear: This item is distinctly martial and inappropriate socially. Whenever your actions while wearing at least one Wargear item would cause Strife to a character (including you!) that character takes 1 additional Strife.
Some notes: Ammo is not tracked unless it's special. It is assumed anyone with a quiver has sufficient normal arrows. If they go especially long without a chance to refill reasonably, the GM may give them a Void Point to make their quiver run out at the end of the next scene they use it in. You do specifically track special arrows, such as fleshcutters or armor-piercers. You can refill an empty quiver by visiting anywhere you could get arrows from, or by making arrows with Survival and the proper supplies. You can also get poisons, which can be ingested for an effect or applied to a weapon to modify the weapon's stats until its next successful Attack. And, of course, the traveling pack makes its triumphant return, and so every character can, if they like, begin play with a dog.
Next time: Types of scene
Also, the best crafting systems are Ars Magica and Blades in the Dark.
Scene Change
Original SA post Legend of the Five Rings: Scene ChangeOne thing I was asked to bring up in regards to last post - the katana is, you will notice, no longer the be-all end-all weapon. Some earlier editions sold it as this, and it was indeed pretty much superior to any weapon that was not a tetsubo or a bow. Now, the katana is pretty much on par with other swords, you can specialize in just about any weapon and not feel like an idiot, and the main benefit of a katana is just about everyone has one free and it can double as identity verification.
The game notes that 'per session' abilities assume a 2-4 hour play session and that if you really wanted you could change up their reset timers based on that, as long as you tell your players. Anyway, scenes. There are three kinds: narrative, downtime and conflict. Narrative scenes are non-structured interactions with NPCs and the environment, generally with a narrow focus and taking place over a relatively short period of IC time. They are mostly about roleplaying, and turn order does not need to be tracked, nor does exact flow of time. If there's nothing else interesting left to say in a scene but still stuff to do, you can transition to downtime scenes. If order of action is suddenly important, you can transition to conflict scenes.
Downtime scenes tend to be low stakes dramatically, though potentially very important. Time is not regimented, but rather, the players and GM give short anecdotes of what is going on. A journey might last for weeks, but only have a few brief interesting events. Checks can be made, but order of actions is not important; if they are, you need a conflict scene. During a downtime scene, players should choose at least one Downtime Acivity to pursue. These are things like gathering supplies, gathering information, creating items and so on, though the GM may rule out actions that there isn't time to complete. Generally a PC can pursue one Downtime Activity for every two days of downtime, or maybe two if they go without sleep. For extremely long downtime, the GM may hand up a small amount of XP to represent time spent training.
Conflict scenes are when two or more characters are opposing each other over more than a brief period. The most common kinds are Intrigues/Debates (the game has been swapping between the two terms interchangeably throughout, without any real consistency), Duels, Skirmishes and Mass Battles, but it would be easily possible to use the conflict rules to also cover things like chase scenes or natural disasters. Conflicts can escalate up that four-step ladder if appropriate - someone draws a blade in a debate, others join in a duel to make it a skirmish, a skirmish draws in a larger armed force. When this happens, however, there is generally no time to reassess the scene, so you don't get the benefit of doing that. Sometimes there will be, such as if negotiations break down and everyone pulls back to prepare for the fight, however. And yes, escalation and de-escalation can skip stages.
Conflicts take place in structured time, with a turn order and a limit on what you can do each turn. Some will also track relative position of characters to each other. They also follow a set series of events. At the start of any conflict scene, you have Phase 1: Assess the Scene. During this phase, each participant gets to observe the area and the opponents to learn about them with an Assessment Check. You may choose to forego any assessments in order to remove 3 Strife instead. You may also have to determine Initiative, if the type of conflict calls for it. After that, there is Phase 2: Take Turns. This is the meat of it - everyone takes one turn each round, with the number of rounds and what you can do varying by conflict type. At the end, there is Phase 3: Resolution, in which the results of the conflict are made clear if they weren't already and any final effects resolve.
So, Phase 1. At the start of every conflict scene, as noted, you get to either lose 3 Strife or make an Assessment check. If the order is relevant, it goes in descending order of Honor, but it's usually not relevant. For Intrigue/Debate, it's a TN 1 Sentiment check, for Duels, TN 1 Meditation, for Skirmishes, TN 1 Tactics and for Mass Battle, TN 1 Command. You can use any Ring you want, but each Ring will give different info. A Fire assessment will tell you the immediate goal or objective of one other character in the scene. A Water assessment well tell you about one object, item or piece of terrain in the scene, complete with its narrative features and terrain qualities. An Earth assessment lets you select one known Disadvantage of a character in the scene and let the person who has it ignore it for the scene. An Air assessment will tell you the demeanor and current Wounds and Strife of one other character in the scene. A Void assessment will reveal if any powerful supernatural creatures or active kiho, invocations or maho are present, though not what they are or where. Lastly, your stance in the first round of conflict will always be the same as the Ring you used. Anyone that chose not to make a check starts in Void Stance.
As a note, Minion NPCs will rarely make Assessment checks unless the GM wants to randomize their initiative a bit. Adversary NPCs usually will, but might not if that'd be cumbersome to track or not make sense narratively.
For some conflicts, like duels or skirmishes, initiative is important. If you were prepared for the conflict, your initiative is (Focus+bonus Assessment successes). If you weren't, such is in an ambush, it's (Vigilance+bonus Assessment successes). Actions then happen in descending Initiative order.
In Phase 2, we move to turn-taking. Before anyone's turn, the round begins and any 'at the beginning of the round' triggers are resolved. After everyone gets a turn, 'at the end of the round' triggers resolve. Then, the GM either declares the conflict over or a new round begins. On your turn, any 'at the beginning of your turn' triggers resolve, and then you select your stance. (Assuming it wasn't set for you, as in the first round.) Every stance has an effect that applies during conflicts, no matter what. When you select your stance, you may ready or stow one item or weapon, and may set the grip you are wielding it with. You may also drop as many items as you want on the ground. Your action in a round must use the same Ring as your stance. If it can't, you can't do that action. In action conflicts, your stance reflects your primary means of repositioning and attacking; in social conflicts, it will generally reflect your tone and demeanor.
Earth Stance is rooted, firm, ready to endure what comes and waiting for the right moment. When other characters make Attack or Scheme actions targeting you, they cannot spend Opportunity symbols to inflict crits, conditions or persistent effects on you.
Water Stance is flexible, shifting and ready to react. After you make a check, you may remove 2 Strife, ready or stow an item, or move one range band.
Fire Stance is aggressive and all-out, with little defense. When you succeed on a check, you count as having one additional bonus success per Strife symbol in your Kept dice.
Air Stance is precise, graceful and mobile. The TN of Attack and Scheme actions targeting you goes up by 1.
Void Stance is formless, not committing to any specific tactic. You do not suffer Strife from Strife symbols.
In your turn, you can perform a single Action, with what you can do determined by the type of conflict. You may also move a distance before or after acting; some conflicts will use specific increments for movement. If your Action is focused around speech, you can say as much as the GM agrees is reasonable at the time. For any other action, you may always say up to five words - or six, if the final word is 'fool' or some other insult. Then your turn ends, and 'at the end of your turn' effects resolve. When you act, you first declare what you want to do. Then you make your check and resolve its effects, success or failure. Every action is one of four types - Attack (used to inflict harm), Scheme (used to influence, manipulate or control), Movement (used to reposition) or Support (used to help or protect). To Attack, you generally must be able to see and reach your target. To Scheme or Support, you generally must be able to communicate with your target. To do a Movement, you must generally be able to reach where you intend to go.
Intrigues/Debates are social engagements, used when a large group of people with several different goals are having a social exchange. For only two people, it's usually unneeded, though you might use some of the rules as the basis for handling one-on-one social convincing stuff. Likewise, when only one group has a concrete social objective, you probably don't need a full conflict - just do a narrative scene. Rather, this is for when there's multiple factions present, all trying to get something different, or for when you're running a trial or interrogation. Note that due to Ninjo and Giri, even apparently simple stuff can reach full Conflict status due to PCs having different goals, even if those goals aren't totally opposed.
During Phase 1 of a Debate, each participant names their Social Objective - the concrete goal they are working towards. Characters can share an objective, or have more than one objective. The players only have to share their objectives with the GM - they don't have to reveal them to each other. Likewise, they won't be told what Adversary NPC objectives are. (Minions rarely take part in these scenes.) You work towards these objectives by gathering rhetorical points. Each successful check gives (1+bonus successes) rhetorical points towards your cause, and they accumulate over the scene. Multiple characters working together can pool their results, and when trying to persuade a group, you target the member with highest Status. This is of course a total abstraction, and the GM may feel free to weight TNs based on RP factors such as coherence of argument if they choose. The most common objectives are:
Appeal to a Person or Group: You want to get someone to behave a certain way, like getting a lord to back you or swaying a judge. To do this, you must reach a set number of rhetorical points, chosen by the GM and revealed or hidden as the GM desires. Generally, this will be the target's Focus, modified up or down by stubbornness or other factors. At the end of any round where you get enough, the target either adopts your position or can no longer argue against it. If another character has gotten more rhetorical points, they convince the target instead; in a tie, the character with highest Status wins. Some Outbursts, either on your part or your target's, may make it impossible to complete this, as can you giving grave offense, or the target leaving before you get enough points.
Discern Someone's Qualities: You're trying to learn more about someone. When you get enough rhetorical points, you learn up to three of: their Social Objective, their Ninjo, their Giri, their Composure, their Resilience, one Advantage, one Disadvantage. You may not select the same option more than once. The only way to make this objective impossible is generally for the target to leave before you finish.
Discredit Someone: You are trying to make someone fuck themselves up. Rather than gathering rhetorical points, you are trying to give them Strife until they have an Outburst. If they have an Outburst while this objective is active, they must either forfeit (their Glory Rank) Glory or immediately leave the scene. Obviously, this isn't going to make them likely to do something for you, but it's very good for getting rid of people or embarrassing them. They may, however, become so upset they challenge you to a duel, or try to murder you. Obviously, if the target leaves before they blow up, you have failed.
Spread a Rumor: You're trying to get a rumor started. You must gather a set number of rhetorical points (typically based on the Vigilance of the highest Status character present), you succeed...but no two of your checks may target the same character, as the rumor must appear to have multiple sources to be credible. At the end of any round where you get enough points, the rumor becomes self-sustaining. Not everyone may believe it, but it is too reputable to ignore fully. However, if you fail two checks in a row to spread the rumor, you fail and cannot complete the objective this scene.
In a Debate, there is no Initiative. Characters still act sequentially - they just act in whatever order they like. If two characters want to act simultaneously, the one with higher Focus goes first, with a tie being resolved randomly as the GM desires. However, to preempt a character of higher Status in this way, you must forfeit 1 Honor, and may have narrative problems as a result. Also of note - stances in Debate have social cues associated. An Earth stance is deliberately closed off and protective. A Fire stance is forward and engaging, possibly to the point of rudeness, and shows you want something. A Water stance is relaxed and at ease. An Air stance is alert and attentive. A Void stance is self-confident but not aggressive.
The following Actions are available in Debates:
Assist: You offer someone an argument they might use, insight, or moral support. As a Support action, you grant assistance to one character.
Persuade: You try to foster or stop an idea, emotion or desire. As a Scheme action, you make a Social Skill check targeting one or more characters that can hear you. The TN is the highest Vigilance among them. If you use Command against a lower Status target, the TN goes down by 1 due to lordly confidence. If you use Courtesy against a higher Status target, the TN goes down by 1, due to deferential politeness. If you use Games, Performance or another non-Command, non-Courtesy skill against an equal-Status target, the TN goes down by 1, due to friendly diversion. If you succeed, you earn rhetorical points.
Use Skill: As an action, you make a skill check to do something you've described to the GM. If you succeed, you get narrative effects as discussed with the GM.
A Debate ends when all social objectives are either fulfilled or cannot be completed, or when the characters pursuing them let them drop for narrative reasons.
Next time: It's time to d-d-d-d-duel
Duel Masters
Original SA post Legend of the Five Rings: Duel MastersA Duel is a formal engagement between two people, almost always caused by one challenging another, who accepts. They are fought for all kinds of reasons - exhibition matches, to settle arguments, to kill over generational grudges. Typically speaking, the objective of the duel is agreed on at the start. There are three main objectives commonly used in Rokugani duels.
To First Strike is a duel to see who hits. At the end of each round, if a character succeeded on an Attack action that did 1 or more damage, the objective is complete and the duel ends.
To First Blood is a duel to see who gets hurt. At the end of each round, if either character is Incapacitated, the objective is complete and the duel ends.
The The Death is a duel to see who dies. At the end of each round, if a character killed the other or inflicting the Dying condition, the objective is complete and the duel ends.
You can, however, go into a duel with intent other than the agreed objective. This is not honorable, but it's hard to prove. To choose any objective but the agreed-on one, you must either forfeit (Honor Rank*2) Honor, or stake it on achieving your objective, if the GM agrees your objective is not inherently dishonorable, such as talking your foe down.
You may also, at any point after the Assessment check, end the duel prematurely by surrendering. There is no social stigma to doing so, but you lose, and most forfeit whatever was agreed on - Honor, Glory, or possibly even your life in a duel to the death. So why surrender? Well, it's a way to get out gracefully and unhurt in low stakes duels, or you might be making a political point, or you might think it'll get a better outcome in the long run than fighting and losing would - or even fighting and winning, maybe.
Duels are structured. At the start of each round, even the first, there is the Staredown. You may bid Strife to increase your Initiative. Each participant secretly chooses a number between 0 and their Composure, then simultaneously reveal them. Each suffers that much Strife and adds it to their Initiative this round only. Whoever has the higher Initiative at that point goes first. Duels last until the objective is achieved. During a duel, opponents start at range 2 from each other but are thereafter considered to be in range of all of their foe's attacks and techniques until the end of the duel, when they return to range 2.
The following actions are usable in a Duel:
Center: You carefully watch your foe and prepare to avoid them. As a Support action, make a TN 1 Martial Arts check using the appropriate skill, targeting one character, and secretly choose a Ring. If you succeed, the TN of the target's next Attack check targeting on you is increased by (2+bonus successes) until the start of your next turn, and when your opponent acts before your next turn, you may reveal the Ring you chose. If their check used it, they take 3 Strife.
Provoke: You try to draw out a reaction from your foe and get them to overcommit. As a Scheme action using one readied weapon, you may make a TN 3 Martial Arts check using the appropriate skill, targeting one character. If you succeed, the TN of your next Attack action targeting them is reduced by (1+bonus successes) until the end of your next turn.
Strike: You attack. As an Attack action using a readied weapon, you may make a TN 2 Martial Arts check using the appropriate skill, targeting one character in range of the weapon. If you succeed, you deal (Damage+bonus successes) physical damage. You may spend 2 Opportunity symbols to inflict a crit on the target with severity (Deadliness).
If your Strife goes over your Composure during a duel, your opponent immediately gets to make a Finishing Blow. This is an Attack action that interrupts whatever you were doing - including resolving your check, in which case it happens after Strife symbols are counted but before Opportunities are spent. You can even interrupt a Finishing Blow with a Finishing Blow. If the Finishing Blow succeeds, it causes a crit with severity (Deadliness+bonus successes)*2, and any other effects of the Attack action used also resolve as normal. If the Finishing Blow achieves the duel objective, the duel ends immediately, otherwise it picks up where it left off, right with the interrupted action. (The formula might be (Deadliness*2)+bonus successes. It's not totally clear.)
Once the duel ends, you begin resolution. Some duels are clear, with one samurai dead and the other unhurt, but most are messier, and so the duel's judges must declare a victor. (Duels always have judges standing by to score them.) Each side gains points based on how they did. First, whoever achieved the objective gets 3 points. Then, whoever struck first gets 3 points. Then you get points equal to the Wounds you dealt to the enemy, and points equal to the severity of the highest crit you dealt, after reductions. If you killed the enemy in a duel to the death, you get 14 points. If you suffered an Outburst, you lose 2 points. If you were seen to cheat, you automatically lose. Once points are counted, you compare them. If point scores are equal, there is no victor. If someone wins by 1, they are a narrow victor. By 2, they definitively won.By 3 or 4, the victory was absolute and they earn 1 Glory. If they win by 5 or more, it was no contest, and the winner earns (loser's Glory Rank) Glory. If you lose a duel to the death but somehow survive, you are expected to kill yourself. If you don't, you must forfeit 20 Honor and 30 Glory. This is rarely done, but it does happen.
Most duels are fought with katana, as this is the socially approved dueling weapon. However, the duelists may use any weapons they agree on. Archers often prefer bows, while the Unicorn are known to enjoy wrestling, and shugenja might even fight with magic, though that is exceptionally rare and considered to be rather rude. Certainly, it is generally expected that both duelists will use the same kind of weapon. Any appropriate skill may be used for the Assessment check if it's relevant to the duel, and any Attack action may be used to win, rather than just Martial Arts [Melee]. As a general rule, however, using any weapon but the agreed-upon ones causes you to lose (Honor Rank) Honor, and if the duel is public, also (Glory Rank) Glory.
Most shugenja schools forbid their members from dueling to the death, as shugenja are so rare and valuable. This stricture is not always obeyed. Monks spar often for practice, but rarely formally duel, as they see violence as rather unenlightened. However, some monks are more militant than others. Monk duels tend to be unarmed, but sometimes armed, usually with staves.
A Skirmish is a battle between a limited number of people, no more than a few dozen at most. They also tend to be far, far less formal than duels. Assessment is with Tactics, and characters act in Initiative order, with ties broken by lowest Honor and then ascending from there. Skirmishes can last as long as needed, but when one side is clearly losing they tend to retreat - the dishonor of doing so can be expunged, but death can't be. In Skirmishes, distance is measured in range bands. When you set your stance at the start of your turn, you may move up to two range bands. At the end of your turn, if you have not yet moved this turn, you may move one range band.
The following actions are usable in a Skirmish:
Assist: You offer someone else a plan, insight or moral support. As a Support action, you grant assistance to one character at range 0-2.
Challenge: You challenge a foe to single combat. As a Scheme action, you may make a TN 1 Command check targeting one character at range 0-5. You must stake 10 Honor and 5 Glory on the challenge, which you forfeit if you intentionally avoid fighting or sabotage your target's attempt to participate. If you succeed, the target must accept or decline. If they accept, they stake 10 Honor and 5 Glory, which they forfeit if they take any Attack or Scheme actions before the end of the round. At the end of the round, you and the target enter a Clash. If you win the Clash, all of their allies gain 3 Strife. If they decline, they forfeit (Command+bonus successes) Glory and you gain 1 Void Point. (More on Clashes later.)
Charge: You close distance. As a Movement action, you may make a TN 2 Fitness check. If you succeed, you may move (1+bonus successes) range bands, max 6. If you succeed, you may spend 2 Opportunity symbols to choose a target in range of one of your readied weapons. They take (Damage) physical damage.
Guard: You protect yourself or an ally. As a Support action using one readied weapon, you may make a TN 1 Tactics check targeting yourself or another character in range of that weapon. If you succeed, you are Guarding the target until the beginning of your next turn. Increase the TN of Attack checks against your Guarded target by (1+bonus successes).
Strike: You attack. As an Attack action using a readied weapon, you may make a TN 2 Martial Arts check using the appropriate skill, targeting one character in range of the weapon. If you succeed, you deal (Damage+bonus successes) physical damage. You may spend 2 Opportunity symbols to inflict a crit on the target with severity (Deadliness).
Use Skill: As an action, you make a skill check to do something you've described to the GM. If you succeed, you get narrative effects as discussed with the GM.
Wait: You wait. As a Support action, you may declare an action you will perform if a specific condition is met before the end of the round. When that event happens, you do that action, using the Ring matching your stance. If the condition is not met, you may perform one non-Wait action of your choice at the end of the round.
At this point the game explains silhouette and range bands. Silhouette ranges from 0 to 5, and you can't carry a combination of items with silhouette greater than your own without making checks. Silhouette 0 is handheld items, cats and small dogs. Silhouette 1 is children, Nezumi, large dogs, goblins and Zokujin. Silhouette 2 is adult humans, Ningyo and Kenku. Silhouette 3 is horses, Naga, Rakshasa and Trolls. Silhouette 4 is Ogres and elephants. Silhouette 5 is dragons.
There are seven range bands, and they're abstract. They also get wider as you go - Range 0 and 1 are close, Range 5 and 6 are not. Range 0 is Touch. You are no more than arm's length away, close enough to grapple. Socially, being that close is impolite most of the time. Range 1 is Sword, the optimal range for swordplay. About 1 to 2 meters, close enough for most interactions. Most skills with a manual aspect require you be at Range 0-1. Range 2 is Spear, the best range for polearms. About 3 to 4 meters. Range 3 is Throw, the optimal range for thrown weapons. About 5 to 10 meters. Range 4 is Bow, the optimal range for missile weapons. About 12 to 100 meters. This is about the edge of earshot for most people. Range 5 is Volley, the outer edge of missile weapon accuracy. About 100 to several hundred meters. This is about as far as most people can see and pick out any real detail. Range 6 is Sight, the maximum distance with which once can interact with a person-sized target, and even then minimally. This ranges from a few hundred meters to several kilometers. To move a distance of range 6 or larger, usually a narrative time journey is needed. Effects have both minimum and maximum range, usually - so if something is range 1-3, it can hit only in that range, and not range 0 or range 4+.
Fall damage works thusly: You make a Fitness check (TN 3, Air 1, Earth 5), and reduce the number of range bands you count as having fallen by (1+bonus successes). A Range 0 fall makes you Disoriented. A Range 1 fall is 4 physical damage and you're Disoriented. Range 2 is 8 physical damage and Disoriented. Range 3 is 12 physical damage and Unconscious. Range 4 is a severity 10 crit and Unconscious. Range 5 is a severity 12 crit and Unconscious. Range 6 is a severity 16 crit and Unconscious.
We also get a terrain explanation! Every terrain feature occupies a number of range bands around a particular point, determined by the GM. It could be just range 0, or much larger. In Mass Battles, terrain features affect the cohorts occupying them, and damage is dealt in the form of attrition instead. The following terrain qualities exist:
Dangerous: It's on fire or freezing cold or jagged rocks or whatever. Whenever a character performs a check while in Dangerous terrain, they take physical damage equal to their Strife symbols.
Defiled: It's tainted by evil. At the end of the scene, anyone that entered Defiled terrain must make a TN 2 Fitness or Meditation check. Failure means you get Afflicted on the Ring you used for the check.
Entangling: It's mud or briars or deep snow or so on. While in Entangling terrain, the TN for all checks to move and all Movement actions increases by 2.
Hallowed (Element): It's spiritually tied to an element. While in Hallowed terrain, the TN of Meditation and Theology checks using the aligned Ring are reduced by 1. Shadowlands critters and Tainted people increase the TN of their checks to resist the effects of Meditation or Theology checks of the aligned Ring by 2.
Imbalanced (Element): It's got a distinct absence or disquiet in one element. While in Imbalanced terrain, the TN of Meditation and Theology checks using the aligned Ring are increased by 1. Shadowlands critters and Tainted people decrease the TN of their checks to resist the effects of Meditation or Theology checks of the aligned Ring by 2.
Obscured: It's dense foliage or darkness or cramped or whatever. While in Obscured terrain, you can't see past range 2 of your position into Obscuring terrain, though you can see out of it if within range 2 of an edge. The TN of all Attack checks targeting characters in Obscured terrain are increased by 1.
It should be noted - Water assessments can often 'find' terrain that the GM didn't intend to be there. The GM is encouraged to create Terrain on the spot for these characters to take advantage of, such as dew-slick grass on a steep hill becoming Dangerous terrain, or so on, even if it wasn't before.
Now, damage. Damage is either physical or supernatural, and is reduced by the appropriate Resistance. Any that's leftover is gained as Wounds. If you take Wounds in excess of your Resilience, you take a crit with severity equal to the source's Deadliness. (If not directly stated, invocations have Deadliness (caster's Ring+caster's Strife), maho have Deadliness (caster's Ring+caster's Wounds), kiho have Deadliness 8, extreme temperature have base Deadliness 5 but can vary upwards over time, falls have Deadliness based on distance, and heavy objects hitting you hard have Deadliness (silhouette*3).) You can never have more than (Resilience+10) Wounds. When you hit that level, after any crits are resolved, you become Unconscious. Any further wounds are not recored, but still cause crits. After a full night's rest, you heal (Water Ring*2) Wounds.
When you suffer a crit, its severity is the worst it can do to you. After finding the severity, you make a TN 1 Fitness check, with a Ring of your choice in a narrative scene or your stance's Ring in a conflict. If you succeed, you reduce the severity by (1+bonus successes), to a minimum of 0, then consult the crit chart. If you reduce it to 0, all that happens is your armor becomes Damaged. 1-4 is a Staggering Strike, and based on the Ring you were using for the check, you get one of Immobilized, Dazed, Prone, Disoriented or Bleeding. 5-7 is a Crippling Blow, and based on the Ring you were using, you get one of Injured Arm, Injured Jaw, Injured Leg, Injured Ribs or Injured Brain. An 8-9 is a Devastating Strike, and instead of a condition, you choose a Scar Disadvantage based on the Ring you were using from among Fractured Spine, Lost Eye, Lost Fingers, Lost Memories, Maimed Arm, Maimed Foot, Maimed Visage or Nerve Damage, and you are Bleeding. A 10-11 is a Maiming Blow, and your Scar Disadvantage is one of Blindness, Cognitive Lapses, Damaged Heart, Damaged Organ, Deafness, Lost Hand, Lost Arm, Lost Leg or Muteness, and you are Bleeding and Unconscious. 12-13 is an Agonizing Death. You are Bleeding and Dying (3 rounds). 14-15 is a Swift Death. You are Bleeding and Dying (1 round). 16+, you just die.
You may note that skirmishes and, when we get there, mass battles are much less lethal for most PCs than taking a finishing blow during a duel, though a clash can bring that lethality in. This is because of genre emulation! Characters are far less likely to die in a brawl than in a climactic faceoff. Dying in a skirmish generally takes a very determined and deadly enemy making a concerted effort - it's much more likely to be temporarily taken out and scarred, and this is intentional. Side note: if you would take a second instance of the same Injured Body Part condition, you instead suffer a Devastating Strike result. The GM may also decide that if you would take the same Scar Disadvantage twice, you instead become Dying (10 rounds), but that's optional.
Can you mitigate crits that'd kill you? Yes! Rokugani swordsmanship doesn't really encourage parrying, because it ruins a katana very quickly. However, if the other option is death...well, you can do it. When you take a crit, instead of making a Fitness check to resist the effects, you may spend 1 Void Point to parry it. If you have a weapon, the severity is instantly reduced to 4 and your weapon becomes Damaged. If you are unarmed, the GM may still allow this, but you only reduce Severity to 9 because that's your goddamn body part. If you are Unconscious, you cannot parry.
Next time: Conditions look grim.
Conditional Acceptance
Original SA post Legend of the Five Rings: Conditional AcceptanceConditions are, generally, temporary negative effects.
Afflicted means you are haunted, possessed or otherwise tormented by evil spirits that threaten to taint you. While Afflicted, whenever you make a check with the Afflicted Ring, the GM may change one Kept Ring die to an Opportunity+Strife result. Also, when you haven Outburst, one or more of the following happen depending on the Afflicted Ring or Rings:
- Air: When you suffer an Outburst, you mistake someone in the scene for someone from your past, accusing them of a half-remembered sin or taunting them over an ancient failure until the end of the scene.
- Water: When you suffer an Outburst, you become violently ill and suffer a Severity 5 crit.
- Fire: When you suffer an Outburst, you become consumed with a desire and must pursue it. If prevented due to circumstance or intervention, you become Enraged.
- Earth: When you suffer an Outburst, cumulatively reduce your Resilience by 1. This lasts until you are no longer Afflicted.
- Void: When you suffer an Outburst, you lose all unspent Void Points.
Bleeding means you're bleeding, internally or externally. While Bleeding, when you suffer a Strife, you take equal physical damage that ignores Resistance. Each time wounds inflicted this way cause a crit, its severity is (Strife). Any character at range 0-1 of a Bleeding character can make a succcessful TN 2 Medicine/Earth check as a Support action to cure them of Bleeding.
Burning means you are on fire. While Burning, after performing an action, you take 3 physical damage that ignores Resistance and 3 Strife. Each time wounds inflicted this way cause a crit, it is severity 5. Burning can be removed by smothering the flames with a successful Fitness check (TN 2, Water 1, Air 4) as a Movement and Support action.
Dazed means your focus or vision is impaired. While Dazed, the TN of Attack and Scheme actions is increased by 2. At the end of your turn, if you did not perform an Attack or Scheme action, you lose Dazed.
Disoriented means your senses are fucked up. While Disoriented, the TN of Movement and Support actions is increased by 2. At the end of your turn, if you did not perform a Movement or Support action, you lose Disoriented.
Dying means you're dying. You have a set number of rounds (or amount of narrative time) before you die. Once that runs out, you are dead at the end of your next turn (or after completing a single task in a narrative scene). If Dying is removed before then, you survive. Any character at range 0-1 of a Dying character can make a successful TN 3 Medicine/Air check as a Support action to cure them of Dying.
Enraged means you are fucking pissed. While Enraged, you increase the severity of all crits you suffer and cause by 2. The first time you kill a character in a scene while Enraged, you gain 1 Void Point. You may make a TN 3 Meditation/Void check as a Support action to lose Enraged. Otherwise, it goes away at the end of the scene.
Suffocating means you can't breathe. At the beginning and end of each of your turns, you take 2 Wounds and 2 Strife, but cannot suffer crits from this damage. At the beginning of your turn, if you are Unconscious while Suffocating, you must make a TN 3 Fitness/Earth check. If you fail, you die. There...does not appear to be a way to remove Suffocating mechanically, which seems a bit of an oversight, given there's a spell that puts water in your lungs.
Fatigued means you're exhausted. It is mostly gained by going 24 hours without sleep. While Fatigued, you gain 1 Strife after you perform any check. When you sleep for 6+ hours, you lose Fatigued.
Immobilized means you can't move. While Immobilized, you cannot perform Movement actions or reposition during your turn, and cannot change your stance. At the end of your turn, if you didn't perform a Miovement action, you lose Immobilized.
Incapacitated means you're unable to act. While Incapacitated, you can't do anything that'd require a check, but can still make checks to resist effects. The severity of any crit you suffer increases by 5. You lose Incapacitated when your Wounds drop to or under your Resilience.
Injured Body Part means what it says. The possible versions are:
- Injured Face (Air): You cannot easily keep your balance or speak clearly. Increase the TN of Social Skill/Air and Martial Skill/Air checks by 2.
- Injured Leg (Water): You cannot easily put weight on your leg. Increase the TN of Social Skill/Water and Martial Skill/Water checks by 2.
- Injured Arm (Fire): You cannot wield anything with that arm or use it easily. Increase the TN of Artisan Skill/Fire and Martial Skill/Fire checks by 2.
- Injured Torso (Earth): You cannot easily remain active for long periods. Increase the TN of Trade Skill/Earth and Martial Skill/Earth checks by 2.
- Injured Head (Void): You cannot easily focus or think clearly. Increase the TN of Scholar Skill/Void and Martial Skill/Void checks by 2.
Intoxicated means you're drunk. While Intoxicated, you double all gained and lost Strife. At the end of each scene, you may make a TN 3 Fitness/Water check to lose Intoxicated, and you automatically lose it at the end of any downtime scene spent resting.
Prone means you fell over. While Prone, you cannot move more than one range band per turn. At the end of your turn, if you did not perform a Movement action, you lose Prone.
Unconscious means you're knocked out or asleep. While Unconscious, you cannot move, perform actions or act upon the world. You may still make checks to resist effects, however. The severity of any crit you suffer while Unconscious is increased by 8. Any character at range 0-1 of an Unconscious character may make a successful TN 2 Medicine/Fire check as a Support action to cure it. Also, it goes away on its own after a few hours, and if you're Unconscious for any reason besides physical harm, you will lose it if you suffer harm, hear a loud noise or otherwise experience something that'd awaken someone sleeping.
Now, let's talk Mass Battle. Samurai tend to serve as leaders in battle - particularly PC samurai - and even when not officially in command, ashigaru troops tend to look to them for leadership. Mass Battle conflicts are primarily for largescale battles in which the PCs play a significant role. If the PCs have no ability to influence the greater battle strategically, it's probably a skirmish in a battlefield with battle-based narrative events around it. Likewise, if the PCs are being an elite strike team doing a vital task while the greater battle goes on around them, that's probably a skirmish.
Typically, a Mass Battle will involve two Armies - abstractions of the forces of either side. (In theory you could run with more than two sides; the game believes this will be a rare occurrence and not worth talking about much in the beta). Each Army has one Commander, who directs the whole army. This character is chosen during the Assessment phase, and will usually have been decided on prior by narrative events. If there is conflict over who leads, the character with highest Status is expected to be in charge. The rest of the army is made of cohorts - units of soldiers with a distinct Leader. It is generally a good idea to have about as many cohorts as there are PCs that need to do important things, and there is no limit on how many cohorts an Army can have. Cohorts do not suffer damage - all damage is dealt to the Army itself, as a damaged cohort can usually be reinforced before being wiped out. The GM may, however, rule that a particularly devastating attack destroys a cohort - usually, an Assault that deals at least a quarter of the Army's total strength in damage. If this happens, the Leader takes a severity 10 crit and their cohort vanishes.
At the beginning of every round during a Mass Battle, the commander selects the Army's strategic objective for the round, which influences what the Leaders will do. If the Commander dies, the army immediately takes 10 Panic, and the character with highest Status picks a new Commander for it. The Commander selects all of the army's Leaders during the Assessment phase, and depending on the size of the battle, they might well be generals in their own right, or just squad leaders. Generally, each participating PC will be a Leader, and the GM should assign a similar number of NPC Leaders to the other Army. In each round, each Leader selects an action and attempts to do it with their cohort. The Commander can be a Leader, but that makes them much easier to target by the enemy.
Armies have two primary attributes: Strength and Discipline. An army's Strength is an abstract representation of its ability to take casualties without breaking down. This includes raw numbers of soldiers, good infrastructure, supplies, equipment and proper rest. The game can't decide if the equivalent of Wounds for this is called Casualties or Attrition. I'll be going with Attrition. At the end of each round, if Attrition exceeds Strength, the army is routed and most of its members are killed. Individual leaders, particularly PCs, probably survive, but most of the soldiers do not. It is rare for this to happen - most enemies will flee due to morale loss first. Discipline represents the army's psychological state and ability to function despite the horrors of war. Most of it is training, but it also represents confidence or belief in a righteous cause, and can be lowered by deprivation, fear or prolonged conflict. The damage here is Panic. At the end of each round, if Panic exceeds Discipline, the army has a collapse of morale, breaks and flees or otherwise collapses. This is the most common end of a battle, though there are some troops who are disciplined enough to fight to the last, especially when backed into a corner or dealing with Shadowlands forces. Armies and individual cohorts may also have special abilities, which modify how they act.
So, strategic objectives. If a PC commander has no idea what to name as one, they can make TN 1 Tactics check at the start of the round to have the GM offer them a strategically valid course of action, or help them come up with one themselves. If they already know what they want to do, no check is needed. The game gives a few example strategic objectives, but they're hardly the only ones you might use. At the start of the round, the commander selects the objective for the entire army, filling in some specifics and details to fit the narrative. Once a strategic objective has been fulfilled, it can't be fulfilled again in a round. Whichever Leader performs the action that fulfills it gains 3 Glory, and the objective's completion resolves. Examples:
Capture a Position: A specific fortification or piece of terrain must be taken. (Fortifications grant the Fortified Position advantage to the cohort occupying them - depending on the size, they reduce any damage done to the cohort by anywhere from 1 to 5.) To capture a position, Leaders must inflict 8+ Attrition on the enemy army, or the enemy must vacate the position and a friendly cohort must perform the Reinforce action to claim it. When this objective is completed, the enemy is driven from the position and no longer counts as occupying it. The leader that completed the objective may immediately choose to occupy the position.
Cut Off the Head: A specific Leader or Commander must be killed. This objective is completed when they are dead. When this objective is completed targeting a Leader, the enemy army takes 10 Panic. When this objective is completed targeting a Commander, the enemy army takes 20 Panic.
Draw Them In: The enemy must be made to attack a position as a trap. This objective is completed when the enemy performs an Assault action that does 5 or fewer Attrition to the cohort occupying the chosen position. When this objective is completed, the enemy army takes 5 Panic and your army loses 5 Panic.
Grind Them Down: A number of enemies must die. This objective is completed when when the enemy army takes 10 or more casualties this round, total. When this objective is completed, the enemy army takes 5 panic and your army loses 5 panic.
Seize Victory! The battle must be won. This can only be chosen after a specific number of other objectives have been fulfilled - usually 4, but the GM can modify that. This objective is completed when the enemy army takes 10 or more casualties this round, total. When this objective is completed, the enemy army is driven from the field and the battle is won, though the enemy may still exist - they just can't achieve victory right now.
While a Mass Battle does not use range bands and any cohort can reach any position on the field in a single round, terrain features and fortifications are important to note anyway, as they can be used strategically and tactically - you might drive foes into them or occupy them for their benefits. During Mass Battle, the Command with the higher Initiative choses which side acts first. If they have the same Initiative, the one with lower Honor acts first. Starting with the army that acts first, each Commander picks a single Leader that has not yet acted this round, alternating back and forth until all Leaders have acted.
It is assumed that at the end of the sixth round, the battle ends in a draw because you've been fighting literally all day. If a commander decides to press on, however, both commanders must make a TN 4 Command check each round. If they fail, their army takes (10+shortfall) Panic due to fatigue. The following actions are usable in Mass Battle:
Assault: Your cohort attacks an enemy cohort. As an Attack and Movement action, you may make a TN 2 Tactics check to lead your forces to strike. If you succeed, you deal (bonus successes*2) Attrition.
Challenge: You challenge an enemy Leader to single combat. As a Scheme action, you may make a TN 1 Command check targeting one character at range 0-5. You must stake 10 Honor and 5 Glory on the challenge, which you forfeit if you intentionally avoid fighting or sabotage your target's attempt to participate. If you succeed, the target must accept or decline. If they accept, they stake 10 Honor and 5 Glory, which they forfeit if they take any Attack or Scheme actions before the end of the round. At the end of the round, you and the target enter a Clash. If you win the Clash, their army takes 5 Panic. If they decline, they forfeit (Command+bonus successes) Glory and you gain 1 Void Point.
Rally: You move to support an allied contingent. As a Support action, you may make a TN 1 Command check targeting one friendly leader's cohort. If you succeed, your army loses (bonus successes) Panic. Succeed or fail, the target counts as having your assistance on their next check before the end of the scene.
Reinforce: You dig in at a position. As a Movement and Support action, you may make a TN 2 Tactics check to dig in. If you succeed, the TN of Assault checks targeting your cohort increases by (bonus successeS). If you choose an unoccupied fortification or piece of terrain this way, you are considered to be occupying it until the start of your next turn.
Retreat: You flee the battle. You must forfeit 10 Honor, and if anyone knows you willingly retreated, you must forfeit 10 Glory. If you leave your cohort leaderless, your army gains 10 Panic. If you are ordered to retreat by your lord, you must instead stake 10 Honor and 10 Glory on accomplishing whatever task your lord has given you rather than staying and fighting.
You may spend Opportunities the following ways during Mass Battle:
On Earth checks, you may spend Opportunity symbols to remove Panic from your army, 1 for 1.
On Earth checks, you may spend 2 Opportunity symbols to choose an allied leader other than yourself. That leader's cohort cannot be targeted by Attack actions until the beginning of your next turn.
On Fire checks, you may spend Opportunity symbols to deal Panic to the enemy army, 1 for 1.
When performing an Attack action against an enemy cohort as a Fire check, you may spend 2 Opportunity symbols to deal a crit to the enemy leader with severity of your weapon's Deadliness.
On Water checks, you may spend Opportunity symbols to choose an allied leader other than yourself and reduce the TN of their next Movement check by 1 per symbol spent.
On Water checks, you may spend 2 Opportunity symbols to choose an enemy leader. That leader's cohort cannot perform Movement actions until the beginning of your next turn.
On Air checks, you may spend Opportunity symbols to choose an allied leader other than yourself and reduce the TN of their next Scheme action by 1 per symbol spent.
On Air checks, you may spend 2 Opportunity symbols to choose a leader in a fortification. That leader's cohort loses the benefits of the fortification until the start of your next turn.
On Void checks, you may spend Opportunity symbols to to deal 1 Attrition to both armies per symbol spent.
When performing a Support action as a Void check, you may spend 2 Opportunity symbols to immediately perform a Challenge action against an enemy cohort's leader.
When a mass battle resolves, there are different effects. If the losing army lost due to Attrition exceeding Strength, all Minion NPCs that were part of it are scattered to the winds, and all Adversary NPCs and all PCs that were part of it take a severity 12 crit. The GM may choose to instead have any PC or Adversary NPC be captured or left for dead on the field. If the losing army lost due to Panic exceeding Discipline, all PCs and Adversary NPCs are able to escape in the confusion. If the losing army lost due to the Seize Victory! objective, then it is relatively intact but has failed in its strategic goals, and only suffers narrative consequences for its defeat.
A shitty, basic peasant conscript army is Strength 35, Discipline 20, and has the Conscripted ability: Each leader increases the TN of their Assault actions by 1.
Your average Ashigaru army has Strength 55, Discipline 35, and the Rank Formation ability: When a leader in this army performs the Reinforce action, they may spend Opportunity symbols on this ability. If they do, after an enemy cohort attacks that leader's cohort, they take Attrition equal to the symbols spent. (Presumably this triggers just once, and lasts until your next turn? It doesn't say.)
An army made entirely of samurai is an elite force, rarely seen. It has Strength 50, Discipline 60, and two abilities. The first is Hardened Veterans: Whenever the army loses panic, it loses (commander's Glory Rank) extra Panic. The second is Elite Training: each leader may pick an ability for their cohort from the following list:
- Cavalry: After you perform an Assault action, if you succeed, the enemy army suffers (Survival) Panic.
- Siege: When performing a Rally action, if you succeed, you get (Labor) bonus successes.
- Infantry: When you perform an Assault action, if you succeed, you get (Command) bonus successes.
- Archery: After you perform the Reinforce action, if you succeed, the enemy army suffers (Tactics) Panic.
- Shugenja: After perform a Support action, if you succeed, your army loses (Theology) Attrition or Panic.
Next time: GM Advice
Wheels
Original SA post Legend of the Five Rings: WheelsThe GM section is truncated, including mainly what FFG decided would be useful for the beta. First: the players and GM should be working together, not undermining each other, and the game works best if no one tries to use the rules to trap other people, because that's being a dick and makes things break. The GM should always offer a choice of Rings when a player's approach might fit under multiple takes (and the rules don't say otherwise, like stance locking you in). You should also allow players to be creative in what skills they use to approach problems, though keep in mind that the TNs for some solutions will be lower than others, as different approaches are of different ease of use. While the GM should reveal TNs most of the time, they can choose to do so after the player announces how they are planning to do it, if the PCs shouldn't have foreknowledge of how hard a task is. When they do, though, you might hint that, say, it'd be easier to smooth-talk this guy they know, rather than browbeating him, even if the player has no idea. For an unsuited approach, TNs should rise by 1-3, to a max of 8, and for very well-suited approaches, drop TNs by 1-3, to a minimum of 0.
Typically, the GM should reveal the TN, however, because it allows players to make interesting tactical decisions about what dice to keep, between successes and Opportunities. When TN is concealed, many players will just choose as many successes as possible without considering the interesting possibilities of Opportunity spends, because they won't know how many successes they need. Thus, the GM should only conceal TNs rarely, and whenever they do, the player making the check gets a Void Point. Generally speaking, players will decide when Advantages or Disadvantages should apply because that means the GM doesn't have to track them so closely, and should describe how they factor in. The game also says to skip using them when their use wouldn't really change much - if you've already clearly failed, no point bringing in a Disadvantage. The GM should ask players and bring it up if they think an Advantage or Disadvantage could apply in a meaningful way, but it's best to encourage them to think about that themselves, perhaps by asking if they have any applicable advantages when they roll a failure and dropping a hint or two about what you think might apply.
The GM is instructed to generally give 2 XP per hour of play, plus 3-5 XP whenever the party hits a significant milestone, gets past a significant obstacle, or beats a recurring foe. You can scale that up or down to taste. XP should generally be standardized across the group, though, to keep everyone roughly on par. When a PC dies or is retired, the GM should allow the player's next character to have an equal amount of XP, so that death is not a punishment, but an interesting story event.
The GM is also instructed to keep everyone's Giri and Ninjo in mind, and to help this, there are the Discord Trackers. These are optional, and designed to lead to intraparty conflict in interesting ways. See, you make a wheel with spokes equal to the number of players. The wheel's outside lists the players' giris, and inside their ninjos. At the first session, you start at the first spoke for both, and for later sessions, begin where you left off last time. You roll and keep Ring dice equal to the number of players, resolving explosions as normal, then count up the successes. Move that many spokes clockwise on the giri track. Count up Stress and Opportunity results, and move that many spaces counterclockwise on the ninjo track. The giri and ninjo selected will be in conflict somehow this session.
The players whose PCs' ninjo and giri get involved each gain 1 Void Point, and the GM may or may not tell them to start thinking about how to bring their ninjo/giri up. Then, the GM notes down the two. Discord can be in the form of direct opposition - two goals that are mutually incompatible and exclusive. However, the game notes this is rarely the best approach, and that direct opposition between PCs should usually be saved for dramatic climaxes or turning points. Rather, it is easier and better to set them into indirect opposition most of the time. You might have both goals be pursuable but limited by time and circumstance so that the group can't easily do both, or you might make an NPC with a strong resonance to a family member, so that one party member wants to help them because it reminds them of their giri or ninjo, or reject them, and then set the other PC into opposition with that NPC.
The idea of Discord isn't to trap the PCs or force them to beat each other - that's usually a very bad idea unless both parties are very invested in it from the start. Rather, the idea is to offer them incentives or rewards to act against each others' interests, overtly or covertly, to make an interesting story. Even if there is a way both can succeed, you have created interesting effects by making them compromise or act against each temporarily. Often, Honor and Glory are good incentives, as they are meaningful resources but can easily be lost and regained. If you don't want to have the PCs act against each other, you can instead use the Discord Track to just pick out PC storylines to highlight in the session and how. It is definitely a good idea to have a tension release valve ready - some way to let the PCs vent frustration or concern without hurting each other too badly, like a shared enemy or a way to peacefully resolve the problem, or an offer to grant the Favor from [Character Name] Distinction as a reward for gracefully compromising one's own desires. This is a temporary Advantage that you can call in once to get a narrative benefit or for the Advantage boost.
Now, Honor in play! As we've discussed, you have to forfeit Honor to act dishonorably, or stake Honor against keeping a promise to someone else if it's really important, and you gain Honor by doing things for your code that require you to make sacrifices or put yourself at risk. There are charts for each of the Bushido virtues to give examples of what might gain or lose Honor. Remember - each clan has one tenet that they earn double Honor on, and one (or two, in the case of Scorpions) that they lose and gain only half Honor on. You may note that Honor is lost and gained pretty frequently - that's intended.
Gi (Righteousness) embraces that there is only truth and falsehood, only just and unjust.
A Trifling breach of Gi might be abetting or covering for a Minor breach of honor or lying to protect someone or their feelings. This would only lose 1 Honor.
A Minor breach of Gi might be abetting or covering for a Major breach of honor or lying to someone of equal or lower status for personal gain. This would lose (Honor Rank) Honor.
A Major breach of Gi might be abetting or covering for a Massive breach of honor or lying to someone of higher status for personal gain. This would lose (Honor Rank)*2 Honor.
A Massive breach of Gi might be murdering someone of equal or higher status in cold blood, or lying to your lord for selfish gain. This would lose (Honor Rank)*4 Honor.
A Trifling sacrifice for Gi might be correcting someone's positive misconception about your abilities or giving proper credit to someone else, forfeiting part of your Glory award for a heroic deed. This would earn you 1 Honor.
A Minor sacrifice for Gi might be delivering bad news to your lord without deflecting blame from yourself, or taking responsibility for the failure of a subordinate or lower-Status character in your charge. This would earn you 3 Honor.
A Major sacrifice for Gi might be retiring honorably from a position you can no longer fulfill properly, or giving up your claim to something in favor of someone of equal or higher Status. This would earn you 6 Honor.
A Massive sacrifice for Gi might be refusing to deny true allegations of a failure or misdeed that'd require you to forfeit 9+ Glory or Status. This would earn you 9 Honor.
Yu (Heroic Courage) embraces that only fear of death can destroy you, and that death in service to your lord is to be embraced.
A Trifling breach of Yu might be allowing fear for someone else's well-being to influence your actions, fleeing from battle at your lord's order (rather than being ordered elsewhere to do something), or concealing your identity in battle or other dangerous situations. This would lose 1 Honor.
A Minor breach of Yu might be allowing fear for yourself to influence your actions, or fleeing from battle to protect your lord's interests without direct orders to do so. This would lose (Honor Rank) Honor.
A Major breach of Yu might be allowing fear to prevent you from acting at all, or fleeing from battle to save your own life. This would lose (Honor Rank)*2 Honor. (And yes, many samurai do prefer survival to maintaining Honor. Honor is lost and gained.)
A Massive breach of Yu might be allowing fear to make you do something despicable or sacrificing someone else to save your own life. This would lose (Honor Rank)*4 Honor.
A Trifling sacrifice for Yu might be refusing to back down in the face of a numerically superior force or accepting a challenge from a foe of unknown skill. This would earn 1 Honor.
A Minor sacrifice for Yu might be refusing to back down from an armed foe while unarmed, or accepting a challenge from someone you know is better than you. This would earn 3 Honor.
A Major sacrifice for Yu might be refusing to back down from an inhuman or monstrous foe (like an ogre, Troll or oni), trying to stop a comrade from performing a Major or Massive breach of honor, or suffering a Severity 8- crit in direct defense of your lord. This would earn 6 Honor.
A Massive sacrifice for Yu might be acting to stop your lord from performing a Major or Massive breach of honor, or suffering a Severity 9+ crit in direct defense of your lord. This would earn 9 Honor.
Jin (Compassion embraces that the duty of a samurai is to help and protect others.
A Trifling breach of Jin might be saying something deeply cruel to an enemy, failing to offer proper respects to an animal you killed or wasting its sacrifice, or letting someone die when trying to save them probably would have killed you. This would lose 1 Honor.
A Minor breach of Jin might be saying something deeply cruel to a stranger, failing to assist someone with a significant problem you could trivially solve, or tormenting an animal. This would lose (Honor Rank) Honor.
A Major breach of Jin might be saying something deeply cruel to a friend, physiscally harming someone for no purpose but revenge, or letting someone die if you could have saved them without much risk to yourself. This would lose (Honor Rank)*2 Honor.
A Massive breach of Jin might be murdering someone of lower status in cold blood or physically harming another person for no purpose but your own satisfacton. This would lose (Honor Rank)*4 Honor.
A Trifling sacrifice for Jin might be showing kindness to someone of lower status when doing so would lose you 1+ Glory, sharing your rations with a person or animal that has no food or acting as a second to someone committing seppuku. This would earn 1 Honor.
A Minor sacrifice for Jin might be giving something useful but replaceable to someone, spending 2+ downtime scenes helping a friend rather than advancing your own interests, or treating a foe's wounds after battle. This would earn 3 Honor.
A Major sacrifice for Jin might be giving up the chance to do something that'd earn 6+ Glory so someone else can or saving someone's life despite knowing they don't like you and may trouble you later. This would earn 6 Honor.
A Massive sacrifice for Jin might be giving someone an irreplaceable item such as an heirloom or relic or completing a dangerous and heroic task for someone that cannot repay you or spread word of your deeds. This would earn 9 Honor.
Rei (Courtesy) embraces that a samurai must always treat others with respect.
A Trifling breach of Rei might be cursing or using disrespectful language around someone of higher Status, publically and explicitly discussing your finances and mercantile business or forgetting the specifics of a minor social ritual, such as tea ceremony or polite address, in front of someone of higher Status. This would lose 1 Honor.
A Minor breach of Rei might be being visibly drunk in the presence of someone of higher Status, directly asking an equal or someone of higher Status about their finances and mercantile business or letting an insult to your clan or family pass unremarked. This would lose (Honor Rank) Honor.
A Major breach of Rei might be directly insulting someone of equal or higher Status or letting an insult to your ancestors, sensei or lord pass unremarked. This would lose (Honor Rank)*2 Honor.
A Massive breach of Rei might be directly insulting your lord. This would lose (Honor Rank)*4 Honor.
A Trifling sacrifice for Rei might be paying an honest compliment to an enemy in battle or letting a serious insult (that ignoring will lose 1+ Glory) to your person pass unremarked. This would earn 1 Honor.
A Minor sacrifice for Rei might be allowing a tired foe to rest before attacking or allowing someone of equal or higher Status have their needs attended first. This would earn 3 Honor.
A Major sacrifice for Rei might be giving an unarmed foe a weapon or putting aside weapons to fight them. This would earn 6 Honor.
A Massive sacrifice for Rei might be taking an enemy of equal or higher Status captive without killing or permanently harming them. This would earn 9 Honor.
Meiyo (Honor) embraces doing what is right, always.
A Trifling breach of Meiyo might be touching dead flesh in battle or openly displaying raw emotion in the presence of someone of equal or higher Status. This would lose 1 Honor.
A Minor breach of Meiyo might be touching dead flesh outside of battle or persuading or manipulating someone else to act dishonorably. This would lose (Honor Rank) Honor.
A Major breach of Meiyo might be neglecting your duty to your lord in favor of your own desires or killing someone in an unjustified duel. This would lose (Honor Rank)*2 Honor.
A Massive breach of Meiyo might be refusing to commit seppuku when your lord orders it. This would lose (Honor Rank)*4 Honor.
A Trifling sacrifice for Meiyo might be suppressing your (positive or negative) feelings about someone despite the angst it causes or choosing to leave a scene in which your Strife is equal to your Composure to avoid an Outburst. This would earn 1 Honor.
A Minor sacrifice for Meiyo might be persuading someone to abandon a plan that'd help you but require them to lose 1+ Honor. This would earn 3 Honor.
A Major sacrifice for Meiyo might be convincing someone not to make an unjustified challenge. This would earn 6 Honor.
A Massive sacrifice for Meiyo might be offering to commit seppuku for failing your lord with the expectation that they might accept. This would earn 9 Honor.
Makoto (Sincerity/Integrity) embraces being truthful without causing offense and never breaking your word.
A Trifling breach of Makoto might be breaking your word to someone of lower Status, spreading rumors you know to be false or impersonating someone of lower Status. This would lose 1 Honor.
A Minor breach of Makoto might be breaking your word to someone of equal or higher Status or using false courtesy to mislead a friend or ally to your own advantage. This would lose (Honor Rank) Honor.
A Major breach of Makoto might be manipulating someone for no reason beyond the satisfaction of it or impersonating someone of equal or higher Status. This would lose (Honor Rank)*2 Honor.
A Massive breach of Makoto might be breaking your word to or manipulating your lord. This would lose (Honor Rank)*4 Honor.
A Trifling sacrifice for Makoto might be going significantly out of your way to keep your word to someone of lower Status, getting someone of equal or higher Status to take constructive criticism by suggesting how they might improve instead of stating shortcomings or claiming responsibility for the failure of a subordinate or character of lower Status that requires the forfeit of 1+ Glory. This would earn 1 Honor.
A Minor sacrifice for Makoto might be publically revealing a truth that loses you 3+ Glory or getting your lrod to accept constructive criticism as above. This would earn 3 Honor.
A Major sacrifice for Makoto might be giving honest testimony against a possible political ally from another clan that jeopardizes future relations. This would earn 6 Honor.
A Massive sacrifice for Makoto might be pointing out a serious flaw in your lord's strategies by claiming it as your own failure and losing 6+ Glory. This would earn 9 Honor.
Chugi (Duty/Loyalty) embraces obedience to one's masters and one's family.
A Trifling breach of Chugi might be disbelieving someone of equal or higher Status, intentionally misinterpreting your lord's orders to protect their interests or asking your lord to relieve you of a duty. This would lose 1 honor.
A Minor breach of Chugi might be committing an act of disloyalty to a spouse or superior, refusing an order from your lord to protect their interests or intentionally misinterpreting your lord's orders to advance your status. This would lose (Honor Rank) Honor.
A Major breach of Chugi might be refusing an order from your lord for personal reasons or obeying an unjust order from someone of equal or higher Status that is not your lord. This would lose (Honor Rank)*2 Honor.
A Massive breach of Chugi might be committing an act of disloyalty to your lord or forsaking your post to serve someone other than your lord for personal gain. This would lose (Honor Rank)*4 Honor.
A Trifling sacrifice for Chugi might be refusing to commit an act of disloyalty to your spouse or superior despite your significant personal feelings or choosing to believe someone of equal or higher status despite evidence to the contrary. This would earn 1 Honor.
A Minor sacrifice for Chugi might be refusing to commit an act of disloyalty to your lord despite your significant personal feelings. This would earn 3 Honor.
A Major sacrifice for Chugi might be refusing to obey an unjust order from someone of equal or higher Status that is not your lord but can make your life very unpleasant or harm you. This would earn 6 Honor.
A Massive sacrifice for Chubi might be giving up a once-in-a-lifetime chance to advance your own interests or Glory in order to complete a task for your lord. This would earn 9 Honor.
Next time: Glory and NPCs.
Glory, Glory, Hallelujah
Original SA post Legend of the Five Rings: Glory, Glory, HallelujahGlory, as we'll recall, is not an internal measure like Honor, but rather an external measure of how others see you as a successful and competent paragon of samurai ideals. You must forfeit Glory to do certain things publically, such as admitting to failure or dishonor, or publically questioning Bushido or defying it. However, the deeds must be publically acknowledged - if you do something in secret or while disguised, your Glory is safe, though it might be staked against being discovered until you clean up all the loose ends. You will also generally stake Glory when you brag about your plans to do something until you manage to do it (or fail at it), based on how great your claim was.
You gain Glory by being acknowledged for your deeds.
Trifling acknowledgements give 1 Glory, and might include being publically acknowledged by someone of equal or higher Status, getting someone of equal or higher status to accept something you crafted as a gift, bragging publically after being recognized for a great deed, getting others to gossip and speculate about your love life without knowing the identity of your lover, publically defeating a group of bandits, being a Leader in a Mass Battle, publically challenging someone to a duel, getting a marriage proposal from someone of equal or higher Status, or publically reading an anonymous love letter.
Minor acknowledgements give 3 Glory, and might include achieving a Strategic Objective as a Leader in Mass Battle, publically receiving a Rarity 7+ gift from someone of equal or higher Status, being part of the winning side in a public debate, defeating a Glory 40+ opponent in a duel, clash or other relevant contest, receiving accolades for completing a minor task from someone of equal or greater Status, marrying someone with higher Glory than you, orchestrating the marriage of one of your relatives to someone of equal or higher Status or reaching School Rank 2-4.
Major acknowledgements give 6 Glory, and might include being a Leader on the winning side of a Mass Battle, defeating a Glory 60+ opponent in a duel, Clash or other relevant contest, receiving accolades for completing a major task from someone of equal or greater Status, defeating a superhuman creature such as an ogre or oni with the aid of allies, marrying someone of equal or higher Status than you, reaching School Rank 5 or formally settling a longstanding feud, complete with agreements of palliation from both sides.
Massive acknowledgements give 9 Glory, and might include defeating a Glory 80+ opponent in a duel, Clash or other relevant contest, defeating a superhuman creature in single combat, being the Commander on the winning side of a Mass Battle, marrying someone in the Imperial family or reaching School Rank 6.
You lose Glory by doing things that diminish it.
Trifling diminishments lose 1 Glory, and might include choosing to share credit for a deed with someone of lower Status, admitting to a minor lie publicly, having a gift declined by someone of higher Status, declining a gift from someone of lower Status (beyond the customary 2 refusals of politeness), being seen retreating from a brawl, killing an opponent who can't fight back or choosing to leave the public eye for a month.
Minor diminishments lose (Glory Rank) Glory, and might include allowing an insult to your person to pass uncommented, choosing to share credit for a deed with someone of equal or higher Status, admitting a serious lie publicly, declining a gift from someone of equal or higher Status (beyond the 2 politeness refusals), allowing an ancestral weapon to be lost or destroyed, being seen retreating from a skirmish, choosing not to commit seppuku when your lord does if not asked to do so or choosing to leave the public eye for 3-6 months.
Major diminishments lose (Glory Rank)*2 Glory, and might include murdering someone of lower Status in cold blood, withdrawing from a Mass Battle, failing to show up for a duel, attacking a surrendering enemy army or choosing to leave the public eye for 6 months to a year.
Massive diminishments lose (Glory Rank)*4 Glory, and might include murdering someone of equal or higher Status in cold blood, ordering a retreat from Mass Battle, refusing to commit seppuku when ordered to or choosing to leave the public eye for years.
Status changes extremely infrequently, and is mostly used as a comparative value. NPC Status should be shown by how they act towards others, along with their personalities. Most will be obedient towards those of higher Status publicly, but might work against them privately if they dislike them, for example. PCs that learn the Status values of others can often make use of it socially. Players, being notoriously disdainful of authority, should always get the option to un-say something especially rude or biting that was meant as an OOC quip.
NPCs are handled either as Minions or Adversaries, with Minions being simplified minor characters and Adversaries more important and fully statted characters. They always have at least one Advantage and/or Disadvantage, a Conflict Rank, a set of Derived Attributes set for them rather than derived from Rings, Rings, ranks in Skill Groups or skills, various special abilities and a Demeanor. More on those in a bit. NPCs roll dice openly most of the time, but the GM may choose to conceal a diceroll. If a PC has altered that roll in any way, they get a Void Point and don't count as having used the ability if it was a limited-use one. However, concealing dice rolls should not be done often.
Minions function in most ways like any other character, with a few exceptions:
- When a minion's Wounds exceed their Resilience, they do not suffer normal crit effects. If the crit is Severity 7+, they die. Otherwise, they become Incapacitated and Unconscious.
- If a minion takes a crit from any other source, they instead take its Severity in Wounds.
- Minions receive no passive bonus from stance, though they must still take stances to determine what Ring they can use that turn.
- Minions can only spend Opportunity symbols on the spends listed in their statblocks, except in special circumstances determined by the GM.
- Minions never have Void Points.
- Minions have only Skill Groups, not individual Skills - so they might have Martial Skills 2 rather than Meditation 2, Martial Arts [Melee] 3.
- Minions cannot have Passions or Anxieties.
- Minions rarely have Ninjo or Giri.
A large group of identical NPCs can be grouped into a squad, and will generally be Minions, though the rules work just as well for Adversaries. A squad is two or more NPCs with the same name and statblock. They share an Initiative value, acting in order the GM likes on that value. The GM may choose to have them all act seperately, or may have all but one of them Assist the one that does a thing. However, if this option is chosen, having more than six NPCs in a squad is not advised due to dicepool size. All members of a squad must use the same stance each round, and the GM may choose to have them pool their Strife, with a 'Composure' equal to 2 or 3 times the Composure of any individual member.
Adversaries function largely like PCs, except for their Derived Attributes being preset, and:
- Adversaries usually have points in Skill Groups rather than individual Skills except as the GM sees fit.
Demeanor is a broad personality archetype for the NPC. Each Demeanor makes the TNs of social checks targeting the NPC harder with (at least) one Ring and easier with another, and an Outburst that the archetype favors over others most of the time. The list of Demeanors is examples - the GM is free to make up others. Examples:
Assertive: This NPC is used to being in charge and doesn't like taking orders. Social Skill/Earth checks get +2 TN, Social Skill/Water checks get -2 TN. Outburst: Become Enraged.
Shrewd: This NPC is used to manipulating and prefers to avoid direct conflict. Social Skill/Water checks get +2 TN, Social Skill/Fire checks get -2 TN. Outburst: Expose a Weakness.
Ambitious: This NPC pursues power whenever they can and hates giving it up. Social Skill/Fire checks get +2 TN, Social Skill/Earth checks get -2 TN. Outburst: Compromise or Flee.
Gruff: This NPC is rough and no-nonsense and has no patience for niceties. Social Skill/Air checks get +2 TN, Social Skill/Earth checks get -2 TN. Outburst: Inappropriate Remark.
Detached: This NPC is meditative and disinterested in the world. Social Skill checks with non-Void Rings get +1 TN, Social Skill/Void checks get -2 TN. Outburst: Shut Down.
The game believes that, at a certain school rank, a party will generally be able to be assumed to have various capabilities. More rounded characters may be slightly less powerful but are quite consistent, while more focused have more ability in narrower circumstances. You determine what kind of Conflict you're doing - Combat or Intrigue - and add up the Conflict Ranks of that type among all the NPCs involved. Then you take the total School Rank of each PC and add them all together. Compare the two. If the numbers are roughly equal, the PCs will probably win but might not. If the Conflict Rank total is 1.5 to 2 times the School Rank total, the PCs are significantly outmatched and will need to be quite clever to win. If the Conflict Rank total is about half the School Rank total, the party will almost certainly win easily.
There are a set of templates that can be added onto any NPC to boost them. Artistic, for example, gives +1 Intrigue rank, +1 Fire Ring, +1 to Artisan and Social skills, a list of Advantages and Disadvantages the NPC might gain, and a pair of appropriate Demeanors. This is generally how the templates go - +1 to a Ring, +1 to two Skill Groups, a list of Advantages or Disadvantages, and +1 to either or both of the Conflict Ranks.
The GM is told that, most of the time, the dice should fall where they may and fudging is bad. If the main villain dies early, that's fine. Maybe a lieutenant rises to take their place, or their former master comes out personally, our someone close to them swears revenge, or maybe the PCs have to now work to prove the dude was actually guilty because they hadn't done that before and are now in trouble. Sometimes, however, having someone die will not provide a narratively satisfying event for some reason. If the GM wants an NPC to not die when the dice say they should, they may invoke a twist of fate. They tell the players they're doing it and narrate how the NPC is saved - maybe reinforcements arrive and drag them off, or the building is set on fire and no one sees the guy die (so he might not have), or the bridge collapses and sends the villain plunging into darkness. Each PC gets 1 Void Point after the NPC is gone, and 1 extra XP for the session.
We then get some example NPCs. Peasants are pushovers, Ashigaru have an ability that massively boosts their ability to assist each other in combat, so they are really dangerous in a massed mob against one guy, bandits do extra damage to Dazed or Disoriented people, bandit lords can move around other bandits and have them attack rather than acting personally, a ronin can, once per round, redirect an attack that hits them to someone else nearby.
We also get some stealth mounted action rules here. first, mounting or dismounting is an Action done at range 0-1 of the mount. Second, while ridden, your mount can't act. However, while mounted, you get its Water Ring in bonus successes to Movement checks, you can use Survival in place of Fitness (I think? It might be the mount's Survival? It's unclear.) for any Fitness check and during narrative and downtime scenes, you double overland speed. Also, if your mount is a Unicorn warhorse, it always provides assistance to you on Martial Arts [Melee] rolls. There's also an evil Shadowlands horse ridden by the Dark Moto (a group of Tainted samurai descended from or part of a group of Unicorn who, on arriving in Rokugan, declared that they could totally take on the Shadowlands and went to go clear them out). It can breathe horrible withering damage at you.
I'm actually going to end it here - I don't want to cover the boxed adventure, for two reasons. First, boxed adventures are boring to me. Second, you might run the playtest and that adventure is designed to give a guided tour of all four conflict types, plus XP spending (as, due to alpha playtesting, PCs now begin with 24 XP to spend so that they won't get murdered by the NPCs.)
The End.