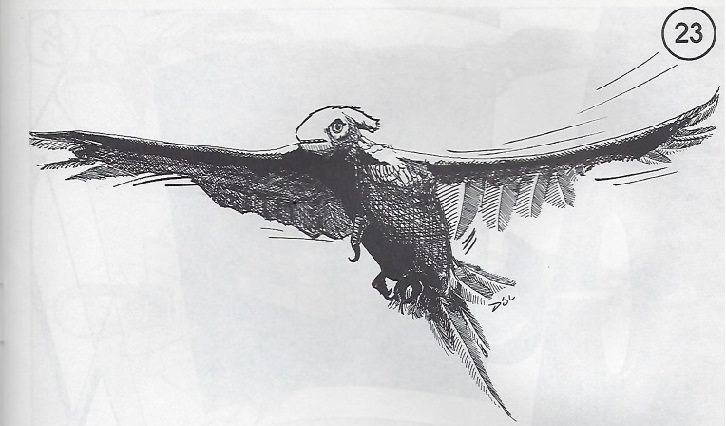
Expedition to the Barrier Peaks by Lucas Archer
Dungeon Module S3 – Expedition to the Barrier Peaks – an adventure for characters levels 8-12
Original SA postDungeon Module S3 – Expedition to the Barrier Peaks – an adventure for characters levels 8-12
It followed us home, can we keep it?
Gary Gygax posted:
This module was the official ADVANCED DUNGEONS & DRAGONS Tournament scenario at Origins II. The author wishes to express his thanks to Mr. Robert Kuntz who contributed substantial ideas for the various encounters herein. This version has been carefully revised and updated to conform to ADVANCED DUNGEONS & DRAGONS game systems. Included herein are background information for players, statistics for a party substantially the same as that used for the tournament, DM notes, six level maps with encounter matrices, and numerous full color illustrations of scenes from the adventure in order to enhance the enjoyment of participants. There are also many new and special monsters designed for this scenario, and they appear nowhere else. This module is located upon the Map of the World of Greyhawk (WORLD OF GREYHAWK fantasy world setting from TSR). If you enjoy this module, be sure and try any of the many other unique offerings in this line from TSR!
After reading this module, I really wish I had been around at Origins II to play this blind.
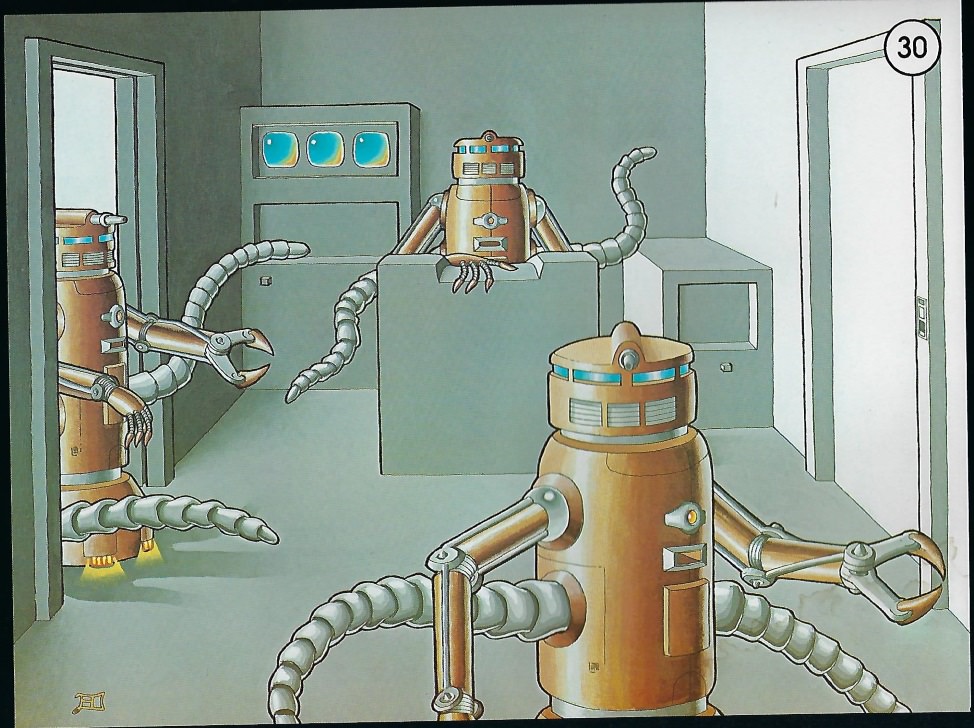
The module, published in 1980 and written by Gary Gygax, contains a 32-page adventure guide, with the map keys, item and monster information. A second 35-page booklet includes 63 individual illustrations for the DM to show the players when they reach specific areas in the adventure. I really want to find a scanner to show you some of this art – it’s fantastic. Finally, the module has two slip covers that have six detailed maps for the adventure. I’m definitely going to try and scan these because otherwise the navigation may prove to be fairly difficult when we get into the guts of the Barrier Peaks.
Gary writes a short preface about writing the module, and how it came about. It seems the Expedition was gestated back in 1976 with another designer, Jim Ward, as an attempt to inject some “science fantasy” into adventuring. He mentions a game called METAMORPHISIS ALPHA, as well as GAMMA WORLD, as inspirations. They did a damn good job as far as I can tell. However, before we send our adventurers off to die, we need to get some housekeeping done. What the hell are our players doing here? And where is here anyway?
The adventure is located at the “mountains northwest of the city of Hornwood in the Grand Duchy of Geoff” in the world of Greyhawk.
Now for some background. The way this was written makes me think it was either intended to be read aloud to the players before the session began or printed out and given to the players beforehand to read. I would recommend the second option – the players eyes will begin to glaze over long before you finish reading this mountain of text.
Short version: A bunch of strange and weird monsters have been coming out of the mountains and harassing the civilized societies nearby. While the presence of monsters isn’t unusual in this area, the attacks have escalated over the past few months. Four fortresses and a walled town have been wiped off the map. Some of the creature’s corpses have been found and preserved (in brine) by local rulers but none of the wisest sages can determine anything about these decomposed creatures. The Grand Duke has put the call out for adventurers to lead an expedition into the mountains. In addition, other powerful state actors have also sent minions to assist in the expedition: The Society of Magivestre, the Fellowship of the Blinding Light, the Magsmen’s Brotherhood, and the High Lord of Elvendom. “A total of 15 have assembled beneath the pennoned turrets at the Grand Duke’s mighty castle near Gorna”. I do like the roleplaying option of having adventurers from different political entities all working together. I can see the possibilities of giving each set of adventurers their own hidden goals that align with the power that sent them.
Let me pause here a minute and skip ahead. When I began reading this adventure, I guess I assumed the expedition would be designed/balanced for a typical adventuring group. You know, 5-8 characters, a good mix of classes and races. On the second to last page of the module, there’s a section to give players pre-generated characters, along with suggested magical items and such. Here, I’ll let Gary take it:
Gary Gygax posted:
THE EXPEDITION TO BARRIER PEAKS was designed for a large party of characters of moderate to high level. Suggested party size is 10 to 15 characters with most having levels between 5th and 10th. Smaller parties may adventure in this scenario but party levels should be increased accordingly, though never exceeding an average level of 12th. Multi-class characters should be considered as one level higher than their highest class. All characters should have at least 2-3 useful magic items.
We’ll come back to the pre-generated characters and their “useful magic items” much later on, but speaking as someone who’s DMed, at the most, 7 people in one session – I cannot imagine trying to wrangle 15 people for this insanity. Nothing but respect for the DM’s back at Origins II who guided players through this for the first time.
Anyway, back to the background. After the expedition has assembled at the Grand Duke’s castle, it’s revealed there’s a strange metal gate in the mountains that is disgorging monsters at seemingly random intervals. Nobody still around has penetrated the gate, but several parties have entirely disappeared. The goal of the expedition: find out what the cave is, what’s causing the monsters to emerge, who is responsible, and to prevent any future incursion. Any other information about strange flora or fauna would be in high demand, as well as any magical devices or new weapons. To placate the freedom of information types in your group, “His High Radiance, Owen III” is promising everyone that any information gained will be shared with everyone. Any wealth or treasure that is found will be distributed based on contribution to the expedition.
Not is all trinkets and rainbows however. The party has a time limit. The Grand Duke is planning on sending in his army to lay waste to the entire area and kill every living creature around if this expedition fails. We are reassured that the powers that be believe this won’t be necessary because the party is full of badass super adventurers, but nonetheless – from the moment the party enters the cave, they have 4 days to complete their expedition and leave before the Duke’s escort (which remains outside the cave, waiting) return to report the expeditions disappearance. What happens then is not outlined, but I can imagine a battalion of wizards just nuking the entire mountain range. So let’s not let that happen, hm?
Finally, the party sets forth towards the mountain range. Take us there, Gary.
Gary Gygax posted:
It is now afternoon, and you have set up camp in a hidden dell but a few bowshots from the strange entrance. The men-at-arms have been detailed to guard the supplies and mounts at your camp while you go onward immediately. They will await your return for four full days before returning to the keep. Gathering your personal gear, you are now climbing the steep slope of the dell’s north side, passing the rim, and forcing your way through a dense growth of trees and undergrowth. There, across a field and beyond a rocky rise, awaits adventure…
NEXT TIME: Colors! Lights! Strange combinations of letters that defy explanation at a glance! Mostly more DM stuff (there’s seriously a LOT for the DM to remember in this place), along with a tiny bit more background that I may or may not get into.
Weapons, Equipment, and Monsters
Original SA post Expedition to the Barrier Peaks – Weapons, Equipment, and MonstersChange of plans on the order in which I'm writing this. I'll go over the map stuff when we start off on level 1 of Barrier Peaks. First, Barrier Peaks introduces a lot of different types of equipment, none of which is easily used for the adventurers due to their technological ignorance. Gems, jewelry and other valuables can be found but the real treasure is all the future tech shit scattered throughout the dungeon. Almost all of the tech that can be found is charged by power discs, which are essentially portable batteries shaped like a small coin. They have a maximum of six charges and can’t be recharged.
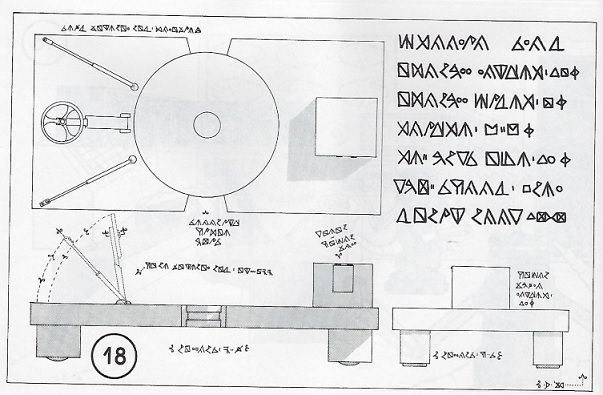
Before we get to the items, we have to cover the technological items system. “Whenever a new item is discovered, the character may attempt to operate it or merely stow it for later inspection. Any attempt to use such items must use a flow chart to simulate ignorance.” We get four of them, and the simplest one is shown below. There are charts for complex non-lethal items, simple lethal items and complex non-lethal items (complexity increasing with each one).
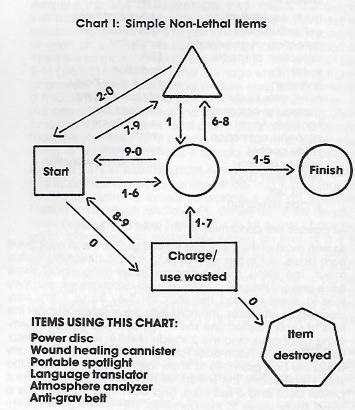
Put a token on the start position and have the player roll a D10. Lower is better, and there are modifiers that can apply. Rather than listing them out I’ll say it’s better to be smart, bad to be dumb, and it’s easier if you’ve seen the item used before or have had someone tell you how to use it. “The DM is encouraged to show the appropriate picture and to describe the steps taken whenever players attempt to learn the use of an item.” I’m a fan of this system both because it’s not something you expect when you play D&D, but also because all the weapons and items look fucking weird. It would be difficult to make this step feel “natural” if you had a bog-standard sci-fi stars wars looking blaster as the blaster pistol. Everyone knows how to use that. But the ridiculous looking blaster we see in this module is alien to us, as players. So I just feel like this system works, thematically speaking. I can’t speak to practicality though, having never actually witnessed it in action.
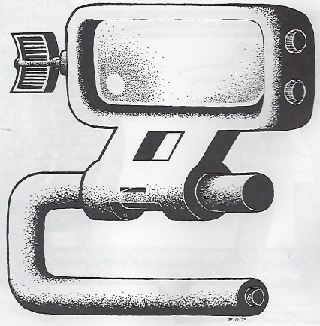
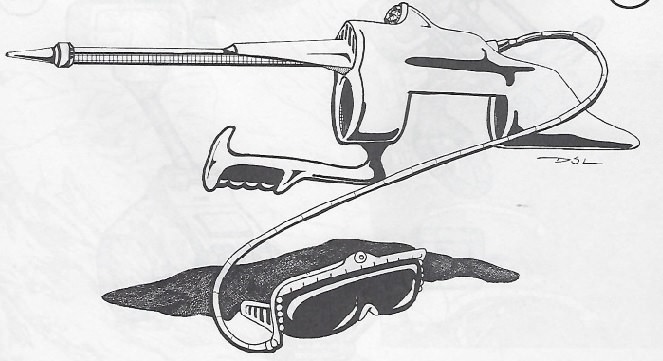
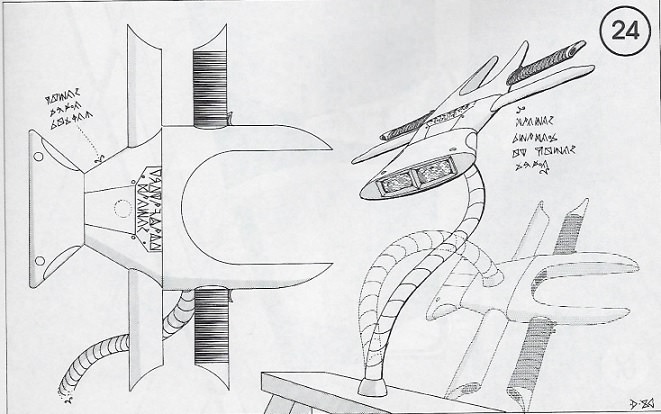
The Blaster Pistol. Look at this crazy thing. The description for the items are all given as if explaining to someone who’s never seen it before. “When found, this item will usually be folded. It weighs about 1 ½ lbs. and will unfold to about 1 foot. It is composed of a U-shaped section of metal rod with a black rivet on one end and an attached piece of thick glass mounted in a frame. This glass is about the size of a hand mirror. On one side of the frame are 2 raised discs, while on the other is a fine mesh, mounted on a rod. The two sides of the glass are dark on one side (the firing side) and clear on the other (the viewing side). In the hinge joining the handle and glass frame is a slot about the size of a coin.” The glass is the viewfinder, displaying targeting information. You grip the bottom handle, thumb on the button to fire. The top dial turns on the viewfinder, the bottom magnifies the screen. Power discs go into the coin slot. The pistol does 5-30 damage, save v. petrification for half. It will disintegrate armor unless the armor saves and destroy all shields less than +3 immediately. It takes 1 power charge per use, and can fire 2/round.
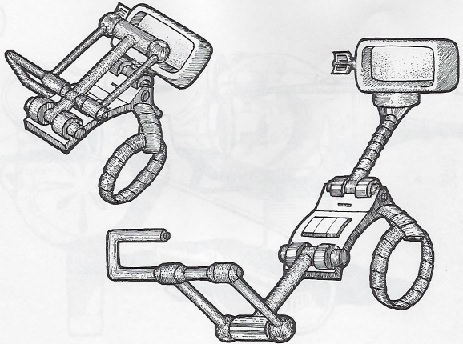
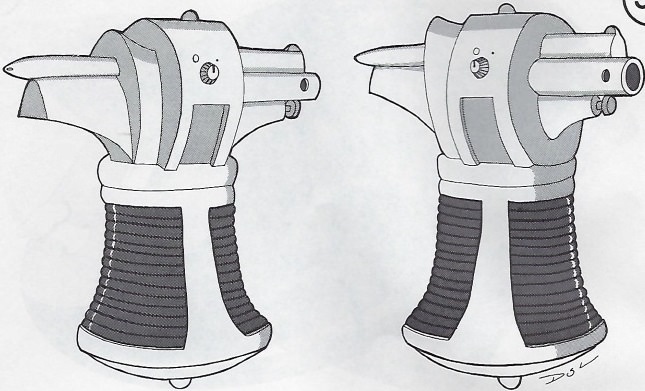
The Blaster Rifle. From what I can tell, this is one of the most powerful weapons you can find. You fit this bad boy on by putting your arm through the leather band and fitting the big metal plate against your shoulder. The band automatically constricts to a comfortable fit so you don’t need to hold onto it the entire time; helpful. It has three differently colored buttons. The black button is a disruption beam, vaporizing “anything short of hull metal when it hits”. Save v. petrification to only take 5-30 damage and be stunned for 1-4 rounds. Shields are destroyed and armor needs to save or be destroyed as well. Nice, what else do we have? The white button fires a heat beam, melting anything in a 4’ beam that fails their save v. petrification. Any metallic armor reduces the saving throw by -7(!), but magic bonuses from armor are added back. Finally, we get to the red button, the flame plane. Really a flamethrower, it shoots a triangle of flame out 5”. Anything inflammable begins to burn, and creatures take 4-24 damage, 2-12 on save v. petrification. This is the only setting which does not harm armor. It can fire 1/round and takes 2 power disc charges. Too bad you only get 3 shots before having to change the disc, and power discs aren’t exactly common.

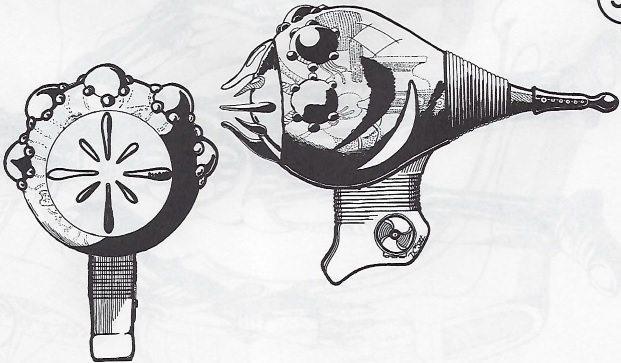
The Laser Pistol. Just put your hand through the hole and take hold of the bottom grip. The beam comes out through the ruby rod on top. It can fire 2/round and only takes ½ power disc charge. Save v. petrification or take 2-16 + AC of target damage (so negative armor classes reduce the damage). However, if not saved against, there is a 10% chance of damaging a limb (rendering it useless) or the head (instant death!). That’s a fun surprise!
The Laser Rifle. Sweet shades. It’s really just a more powerful version of the laser pistol, but with the added bonus of the specs (without which, if you fire the rifle, gives targets a +2 on their saving throws). It can fire 2/round and takes a single power disc charge. 2-20 damage + AC, same as the pistol. Moving on.
The Needler Pistol, one of the few weapons that doesn’t require a power disc to use. But at first glance, this could be anything! I love it. This thing shoots bundles of needles out of the small muzzle, which do 1-6 hp per needle. The dial switches the firing pattern from broad to narrow – narrow is single target (d4+4 needles hit), while broad can target up to 5 creatures (1-2 needles per target). Maximum damage by the needles is limited by AC though - only AC 6 or higher can take full damage. If your AC is 0 or lower, you take no damage from needles. I’m assuming at high level AD&D, it’s easy to get your AC pretty low, so this looks kinda like a shit item. HOWEVER: there is an ~optional rule~. Anyone hit by the needler makes a saving throw. Roll a 1 and they take 12 damage and permanently lose an eye. Fantastic.
This looks like one of those toy pistols that has all that shit that spins arounds and whirls inside colored plastic when the trigger is pulled. It is the Paralysis Pistol. It fires in a 6” cone, and the length of paralysis depends on what range you get hit at: short (2”) will paralyze for 3 turns, medium (4”) for 2, and long (6”) for 1. Successfully save and it’ll be reduced to rounds, or slowed at long range. Fires 1/round and takes 1 power disc charge.
There are a few suits of power armor in the dungeon and they’re pretty fucking badass. Wearing a suit of power armor gives you an AC of 0, 50 shield hit points (regenerating 1 per round), 50 armor hit points, a built in laser pistol, among other powers. What more could a growing adventurer want? How about 18/00 strength for grasping and lifting, immunity to gases or airborne contaminants, infrared sensors and an anti-gravity system? It’s internally powered so no need to hoard power discs for this thing – in fact, the book says “it is only rechargeable at specialized terminals. None of these terminals exist [here].” So it’s not rechargeable. It looks like the only thing that really drains the power is the anti-grav system – which can last up to an hour of continual function. For each round used in operation, it has to recharge for one turn. If that runs out however, the shut powers down. My dickish DM alarm bell is ringing – since the text doesn’t explicitly state what happens if someone is inside when the power shuts off, I can totally imagine an adventurer being sealed inside a suit of dead power armor. Unless you run the anti-grav constantly, I don’t think that would be a problem though.
The wound healing canister adds to the parties healing powers with a spray that heals 2-24 damage and cures any diseases, infections or spores on the skin. A full canister has 6 charges, and there’s a useful dial showing how many charges remain. One spray = one charge.
Finally, there are also multiple types of grenades scattered around. They come in four flavors: explosive, poison gas, sleep gas, and incendiary. They have timers, giving a 2-5 second delay before exploding once activated. Explosive grenades do 5-10 damage within a 10’ sphere, save for half. Those within the blast are stunned for 1-4 rounds and deafened for 1-4 turns, less for those near the blast. It can also create shrapnel from normal material. Poison gas grenades are save or die. Successful saves will be begin puking everywhere for 1-6 rounds and be unable to fight. Sleep gas grenades are save or sleep for 2-5 turns. It requires two consecutive saves to fight off. Incendiary grenades do 2-12 damage, no saving throw. Everything that can catch fire does. For 1-3 rounds, anyone inside original blast radius continues to take 1-6 burning damage from the residue. Hope you don’t fuck up trying to figure these things out!
While Barrier Peaks has quite a few interesting monsters, I’ll get to many of them when they are encountered. These are three of the most common.
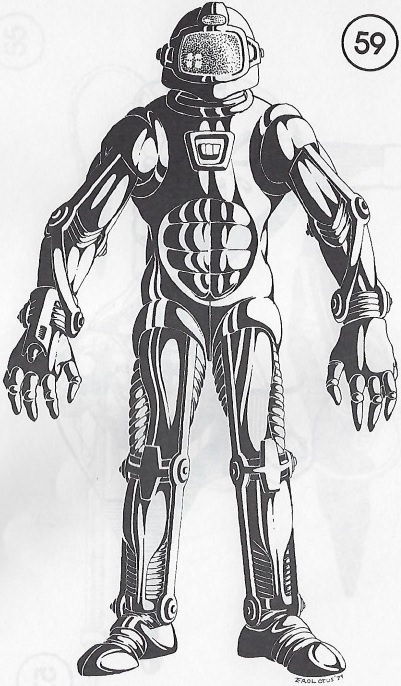
These guys look kinda like daleks from Doctor Who. However, they are the police robots, the programmed lawful neutral police force encountered in the dungeon. They seem pretty tough. The bog standard version comes with 60 HP and a 20 HP shield that regenerates 1/round and an AC -1. All four of those arms can be used as weapons (2 having 18/00 strength). Included in the robot itself is a built in laser pistol, six various grenades, a paralysis pistol, a tractor beam which pulls objects like the telekinesis spell, and a pressor beam which pushes objects like the same (capacity 300lb). They can also never be surprised and are immune to cold. However, they (and all other mechanical devices found) have a weakness to electricity. There’s a chance each time a robot is hit with electric damage it shorts out entirely. It’s a pretty low chance though. Finally, these robots usually will make any attacks non-lethal – they’re trying to arrest you, not kill you. However, there’s a 25% chance any police robot has gone homicidal and will fight for blood. Police robots are pretty common early on in the dungeon, and can make continuous appearances throughout. They’ll carry either a red or an orange card (keys).
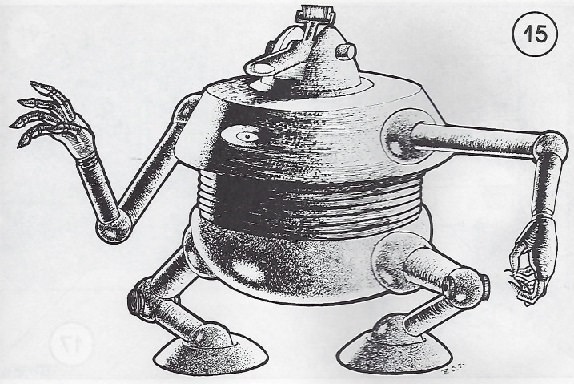
That thing looks scarier than a police robot at first glance, but don’t worry. It’s just a worker robot. There’s both big and small varieties. The big ones move cargo around, while the smaller ones work on repair projects and such. It doesn’t make mention if they’re immediately hostile so I think if the adventurers encountered any while wandering the halls, I would play it as a non-combat encounter (unless my group decides to “investigate” it). They do have one big move though – if attacked, there is a 10% chance a large worker robot will activate its heavy duty tractor or pressor beam – capacity is 2,000 lbs. I’m not sure how much damage that would do but I’m betting it would be a lot.
Get used to seeing these guys because they are everywhere in the first level. The standard vegepygmy is a “vegetable creature” that live in tribes and hunt and scavenge. All they eat is meat, no matter how rotten. They naturally adapt to their environment, color wise, so they usually get some good camouflage when on their home turf. Normal bands have a chief with some bodyguards and sub-chiefs for every 50 vegepygmies. Arrows and other pointy weapons do shit to them – 1 point of damage on hit. They’re also immune to electricity. They reproduce by either propogating buds from their bodies, or by a patch of russet mold. I’ll talk about that when we get to it because it’s part of an extremely cool trap. We’ll encounter these guys really soon.
In addition to other monsters, there are a few more items I’ll get to when we encounter them in the dungeon. As for this, next time we’ll take a look at the map of the first level, and dive into the Barrier Peaks.
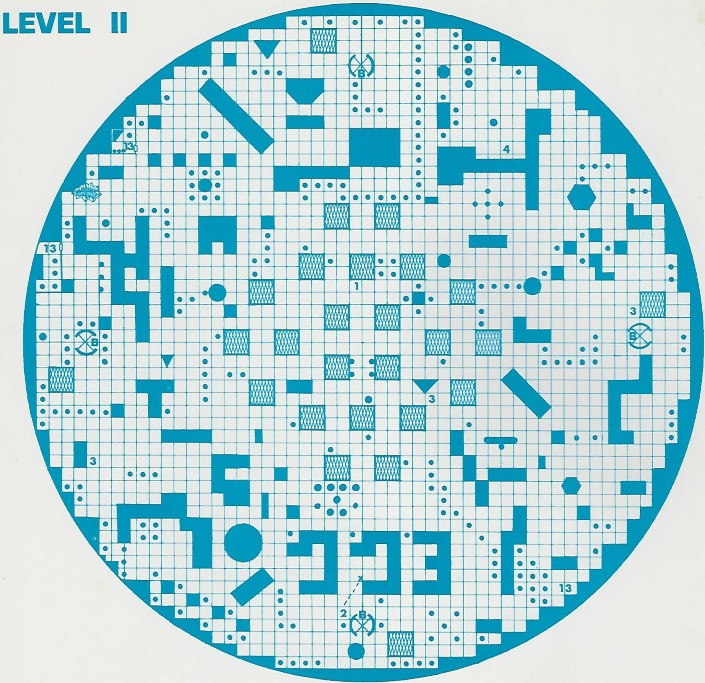
Level I
Original SA post Expedition to the Barrier Peaks - Level I
The party faces two entrances when they arrive. The lower entrance is closed, while the upper one is open. It remains open for 1 hour, then closes for 20 hours, and reopen again for 1. I assume this continues if the party decides to camp outside the door for the next four days. Let’s assume our nameless adventurers don’t dither and they climb up to the entrance. Once the party enters, the door slides close behind them and a wide 20’ inner door slides open to reveal the first glimpse of the interior.
The darkest shaded areas in the south are unlit areas. This is where the party enters. The medium shaded areas are dimly light, while the lightest shaded are brightly lit. All of the white areas have lights that can be activated by the adventurers. Squares are 10’. Most of the unnamed rooms or rooms without an encounter number are thoroughly looted, only containing debris, junk and a possibility of 1-3 human skeletons.
One of the dungeons gimmicks is the color coded key card system. As you see on the map, doors are marked with letters. This denotes the color card required to enter the room. The colors go (highest to lowest in rank) gray (G), red (R), yellow (Y), orange (O), V (violet), B (brown), and J (jet black). Generally speaking, higher ranking color cards can open any ranked door below theirs. There are some exceptions to this, the first of which: Yellow cards will not trigger orange locks. If an incorrect card is used, it will be locked in the door and an alarm will sound. One presumes police robots appear soon after. It's tough to see due to the quality of the scan (sorry about that), but most of those doors in the southern hemisphere that are part of the unlit area require J (Jet black) cards.
We check for wandering monsters each turn, with a 1/12 chance for an encounter. The northern and southern hemispheres have different tables. Roll a D6.
Southern Hemisphere
1. 9-16 “vegepygmies” with 2-5 “dog-creatures”
2. police robot
3. 2-3 displacer beasts
4. worker robot
5. lurker above
6. 9-16 “vegepygmies” with 2-5 “dog-creatures”.
Northern Hemisphere
1. worker robot
2. 14-24 “vegepygmies”
3. 2-5 shadows
4. police robot
5. 14-24 “vegepygmies”
6. 1-2 will-o’-wisps
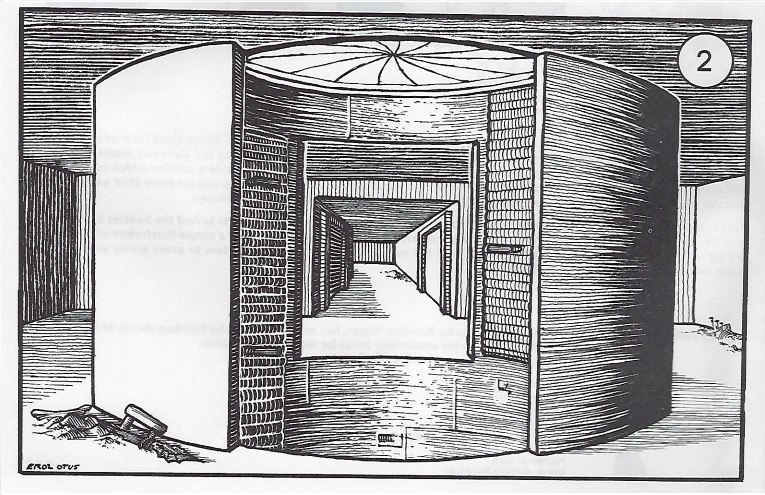
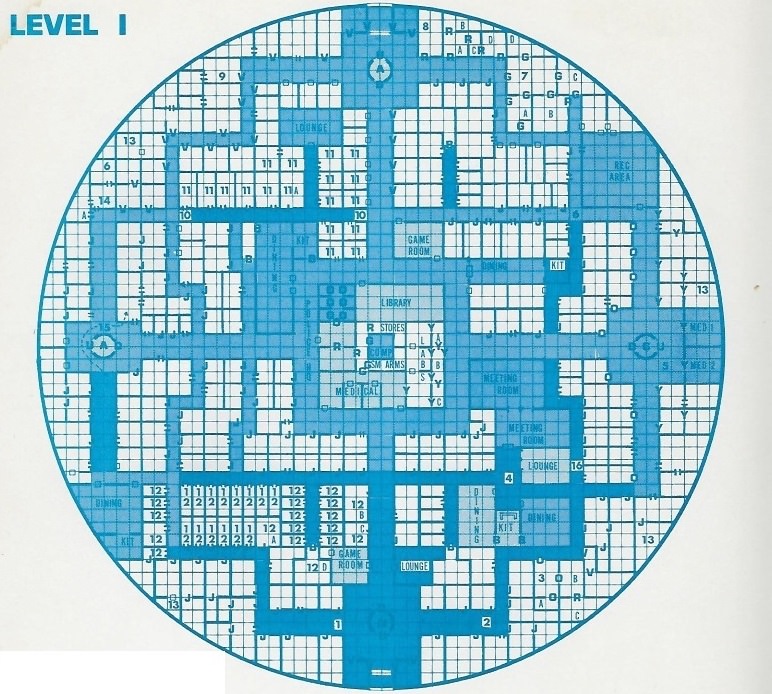
The first thing the players see when they enter is this strange open cylinder. Dark and devoid of movement, this offers no real hints to its purpose. There are four total in the dungeon which connect each of the levels. While the southern tube is broken, the three other drop tubes are in various states of functionality. The northern and eastern tubes are full functional and lit up. If a character steps into one of those, they’ll immediately be grasped by weightlessness. Then, they can take a hold of one of the moving rungs on the side of the tube and go up or down. Of course, being the top of the dungeon, all that’s above is the closed “sphincter” which cannot be opened. The western drop tube has the rungs moving up and down, but whatever caused the lack of gravity in the other two is no longer working here. There’s a chance a character could fall to their death if they tried to ride the western tube down. Since the rungs are 8 feet apart, climbing down the southern tube is pretty much out of the question (although knowing players, they’ll find a way).
I’ll be going through the numbered encounters first, and then move on to the named rooms.
1 is an ambush by a lurker above (surprises 4 in 6). On the floor, amongst filth, is a violet keycard. If the party notices the violet coded doors next to where they entered, they can reveal a couple of storage rooms with storage racks for large bulky suits of some kind, as well as an emergency exit. The same rooms are at the north of the map, behind violet carded doors, but the exit leads to nothing but rock up there.
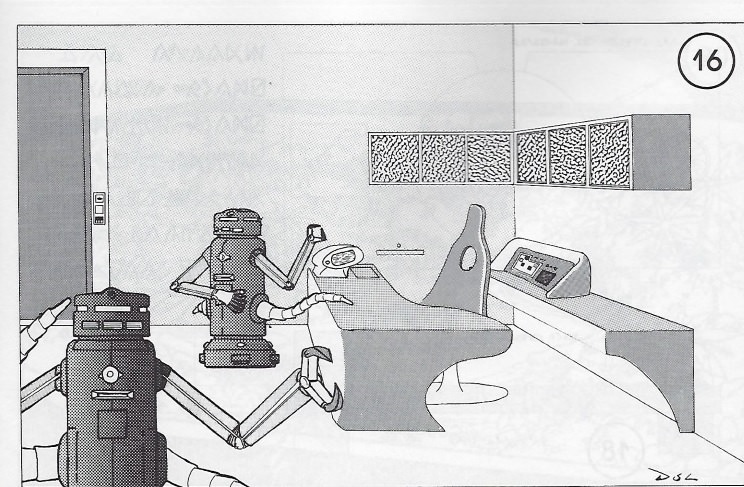
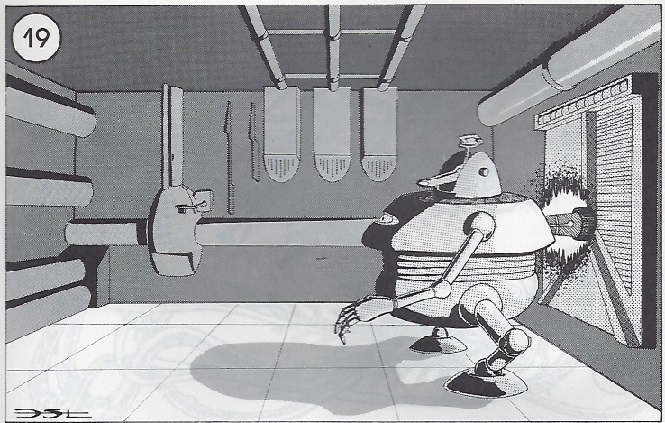
A small repair robot has been discarded at 2. It has some gems inside of it if the players pry it apart. I'm not sure why it got it's own bit of art, but isn't it adorable?
3 is the “Police Robot Area” (not the same thing as the Police HQ). 1 to 6 police robots are here if the adventurers enter, and they will not question any character who displays an orange, red, or gray color card. The book makes sure to note here, “Possession of a card will not allow characters to command police robots”. 3a is the repair parts area, with 12 power discs to find. 3b is a robot clinic with nothing of worth. 3c is the arsenal – a dozen of each type of grenade and power discs. No matter what card you have, the police robots attack anyone taking any munitions. You can try and steal some though! The arsenal is inspected every three rounds by a police robot.
4, A berserk android lies on the floor here, ready to attack any creature within 20 feet. It will shoot twice with a paralysis pistol, then lay into any nearby with an iron bar. If the players can take out the android before it uses all the ammunition, the paralysis pistol starts with a full power disc (six charges).
5 pits the party against 5 displacer beasts. If there are more than 10 party members visible, the beasts will likely flee, but fight to the death if engaged. A brown keycard is stashed in their nest.
There are a couple of 6’s on the map – phase spiders, 1 adult and 2 newborns. They have a jet-black card stuck in their web on the ceiling. 7 small gems, 100 g.p. each, are on the ground beneath the nest – they were used to attract prey.
7 is a place the players won’t be able to get into for a while. It requires a grey card and there’s only one outside this area on the first level. Several skeletons lie amongst the disarray of furniture and sundries. 7a is the personal chambers of whoever lived here. There is a full set of keycards in his desk, except for grey. In the locked closet, there’s a needler with 4 clips of ammunition. The lock works on an unknown handprint, so I guess you’re breaking in. Inside the lavatory cabinet are two cyanide capsules (which the book helpfully informs us: “instant death, no save”). There’s a locked safe on the desk which can be burned open with a fully charged laser. Inside are orders and information about the purpose of this place in an incomprehensible dead language (bonjour!). Depending on what the party has done before coming here, and if they have magic for translation, this could be where the big twist is revealed. Also included are 100(!) diamonds worth 100 gp each, along with a nice little surprise. A packet that explodes for 50 hp of damage when opened to everyone within 10’. The opener gets no save. 7b is the lounge and dining area. There are six crystal flasks with different liquors in each. 1 is a poison (-4 to saves), 2-4 taste excellent (delay the party for 6 full turns if one is sampled), 5 gives the imbiber +1 on dexterity reactions for 1 turn, with 20 charges. 6 causes double vision for 3 turns. The master bedroom is located at 7c, with a platinum model worth 1,000gp on the table. 7d is another lounge, with a skeleton for decoration - there's a gray card nearby along with some more jewelry.
8 is another personal quarters area. 8a was the dining room. A bottle of liquor spiked with truth serum (imbiber must tell absolute truth for 3 rounds) is on the table, with seven charges left. The guide suggests: “DM, here is your chance to sow some dissension…” 8b is the office and study. Three orange cards are inside the desk, as well as a broken blaster (irreparable). 8c has nothing. 8d has what could be a useful item: the portable command control for the police robots. While voice command is keyed to the security chief’s voice, the buttons still operate. Pressing the red and orange buttons at the same time turn off all police robots within 30’ until the control box is more than 30’ away. Pressing one or the other button summons some police robots. It has 7 uses before it malfunctions.
Some will o’ wisps patrol the corridors near 9, and attempt to lure victims towards the nearest 13 area. 9 is their lair, and if they are patrolling, they will return within 3-30 rounds after the party enters. There are some valuable gems in a pile of junk on the floor, along with a language translator. The translator’s power will drain in 3 uses.
10 and 11 are the lair of the northern tribe of vegepygmies. They’re colored gray and brown, so are 50% invisible when up against the ships walls. 5-8 shriekers sit on each 10 square, serving as an alarm to the vegepygmies congregated in the nearby rooms. The corridor through this section is covered in fungi. There are 4 vegepygmies per 10’ of room space – if I’m reading this correctly, the northern tribe of vegepygmies has 224 of the little fuckers stuffed in those compartments. That seems absolutely ridiculous to me, so somebody tell me if I’m off base there. 11a has the leader along with 5 “4HD sprouts”, carrying an orange card and violet card. If a fight breaks out between the party and the tribe, the leader may pull out one of his scrounged tech weapons – this depends on how close the fight is occurring. The closer the fight, the heavier and more deadly weapon the leader might grab. It starts with sleep gas grenades up to a blaster rifle with 2 charges. If the party gets into a fight here, they’ll most likely be fighting the whole tribe so… good luck? I guess? The grunts have HP from 5 to 31, and the boss has 38, so they don’t look tough individually, but just… 224 of them?
12 is where the southern tribe of vegepygmies live. These guys are a little different than their northern counterparts in they are more green colored, giving them 50% invisible only when near green areas of vegetation. Instead of shriekers, their pets are dog like creatures, or “thornies”. 3 vegepygmies per 10’, plus 1 thorny. So we’ve gone up to 243 of these guys, plus 33 thornies. The southern tribe includes 3 sub-chiefs (without which groups of southern vegepygmies won’t attack the party). Each sub-chief has a different colored card: yellow, violet, and brown. The chief doesn’t have the weapons his northern counterpart has, but he does carry a spray can into battle. Discharged into someone’s face and they have to save v. poison (at -3) or be treated as if asleep and subject to the Suggestion spell. Of course, the suggestion has to be made in a language the victim understands - and vegepygmies can't talk. Loot his nest and the party finds a red card, a poison grenade, sleep grenade, 4 gems worth 100gp each, and a broken piece of communicator.
Every room marked 13 is filled with radiation. Save v. poison or get radiation sickness. Within 50 minutes the victim will realize they’re weakening. One hour after that (and every hour thereafter) the victim loses 1 point of strength. At 2 strength, they can no longer walk. At -1, death. There are radiation zones on each floor of the dungeon save level IV, each one marked as 13.
14 is the art workroom. It looks how you might imagine, paint and debris everywhere. The sculpture room is 14a, where various wood, stone, plastic or metal sculptures stand in varying stages of destruction. Most of it is unremarkable, but there is a strange clay like bust of a human head. The bust is actually covered by a grey ooze, which will attack (along with its partner on the ceiling) if anyone gets too close. 2 500gp topazes are the eyes of the bust.
Near the western drop tube at 15 is a pack of 9 dopplegangers waiting to ambush anyone using the tubes. They prefer to wait until the party is split before making their attack. There’s no treasure here, but there is a poster on the northern wall of the drop tube which shows a general map outline of the whole of level 1. “Tube procedures and safety measures are printed underneath the map, and these instructions can be read with magical aid. Included are statements to the effect that unauthorized persons are not to enter service deck areas.” I've always wondered about the doppleganger gimmick in an actual game - did DM's take anyone killed and replaced off, say "you're playing a doppleganger now" and let loose?
At 16, in the middle of a dark corridor, is a blaster pistol with a full charge. 5% chance per person passing it will be kicked and noticed (2% per person passing someone will step on it and ruin it – way to go, Chuck), and 10% chance per searcher it will be found if the corridor is searched.
On to the labeled rooms!
Dining rooms, meeting rooms, and recreation areas have been thoroughly looted and hold nothing of interest. Inanimate skeletons are prevalent, but any usable material or treasure has long since been removed.
Kitchens are mostly pointless except as kind of a trap for the players. There’s nothing of value to loot, but there are a few food dispensers still working. I’m going to quote the description here, because I still can’t picture in my head what these are supposed to look like: “Along one wall is a bench with a number of metal boxes resting on it. Each box has a dark colored glass door in the front of it and arranged beside these are a number of square metal plates (selector buttons). On top of each box is a short, black cylinder (temperature control knob). Inside each box are a number of shelves spaced close together. Along other walls are a fine metal mesh (microphone/speaker grille) and a rivet (call button) below it. Next to these is a long, narrow door that opens to a small shelf-life compartments.” In any case, if the players stumble into getting one to work, 20% to work, it will dispense a small tray with the food wrapped in plastic. There’s also a 50% chance that the food will be poison (what the poison will do is not elaborated upon). So, fairly innocuous, right? Well, if the party lingers and the wandering encounter table turns up vegepygmies, they will get not only a +2 to hit and damage (the food source is threatened!), but one of the vegepygmies will flee to their home are and rouse the entire tribe to do battle. Pretty sure that 200+ creatures will pose a problem for any group of adventurers.
Game rooms are mostly for decoration. They have arcade games, shooting gallery games, and (optionally) gambling machines. Any coinage found on the ship will work. There are games that have replicas of the weapons found on the ship, but if the players haven’t encountered any guns yet, the DM is instructed to describe the fake weapons as “mysterious metal shaped objects”. If the players have encountered blasters or lasers, then they can recognize the similarities. A player with the presence of mind to actually use these shooting galleries as a way to get comfortable with the weapons gets a bonus on their technology checks to figure out whatever weapon they practiced with (requires at least 1 turn of practice).
Lounges are full of broken furniture, burned skeletons, rubble, ashes and other debris. However, each one has a chance at containing a treasure if searched. Rolling on a D6:
1 – notes on an escaped beast deeper in the ship (If 1 is rolled in another lounge after notes have been discovered, a brown card is found)
2 – 1-3 ampules of serum which will cure any disease if injected (70% potent, 20% neutral, 10% poison)
3 – 1 piece of jewelry from 300-1800 gp
4 – 3 pieces of jewelry from 1k to 4k gp each
5 – jet black card
6 – violet OR orange card (50%/50%)
The notes on the escaped beast detail an intellect devourer that was kept in stasis on level 3, but no longer. We’ll encounter the devourer later on.
The Medical Area is deserted, with a robot voice instructing any visitors to Med 1 or Med 2 (both require yellow cards) for emergency procedures. Of course, the voice is in the incomprehensible language. There are three desks in here, with a 10% chance per round of finding a yellow card. If a desk is touched though, an alarm goes off and a police robot arrives soon after to investigate. This can only happen once, but I’m betting that players would take it as a “don’t touch the desks” and abandon any search.
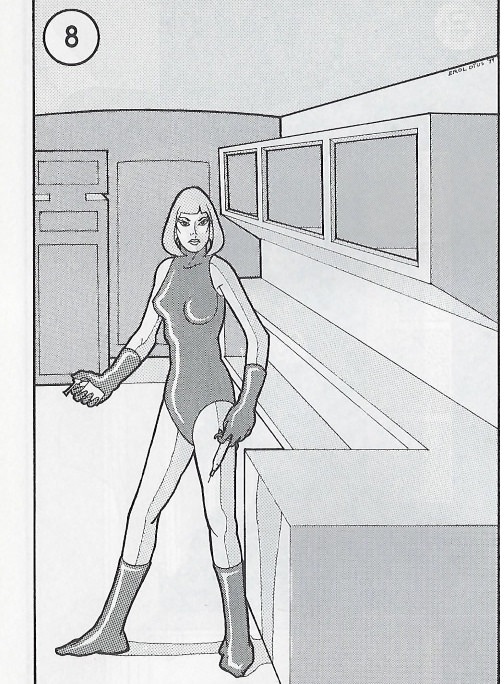
Med Area 1 is an emergency treatment room with the android pictured above waiting to heal any humans that walk through the door. The android has a spray with 5 charges that heals 2d12, as well as injections that cures any diseases, poisons, or radiation sickness (must be administered within 3 turns of affliction though). Better have some magic or a translator device though, since she only responds to those speaking her language.
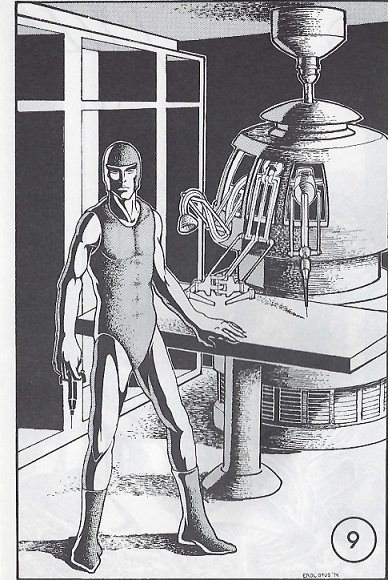
Med Area 2 is the emergency operating room, and the dapper gentleman above is waiting to greet any adventurers with thorough surgical precision. He’ll attempt to grapple the first adventurer he sees (with 18/01 strength), anesthetize them, and begin operating. Anesthetization and operation occur in a single round. Uninterrupted, he’ll kill his patient on the second round. Method of death is unmentioned, but I’d describe it as a horribly silent, ultra-efficient evisceration. I really like the sudden terror of this encounter.
The Laboratories are full of research equipment, beakers, lab-coats, vials, and some small cages with bones in them. The interior of the lab is pretty nondescript, but the three smaller rooms on the east side are where all the action is. They all require a yellow card to access.
Lab A has a single lab technician robot worker still busily plugging away at whatever last task it had. When the party enters, the robot will attempt to scan for a displayed yellow or higher card. Since the players were able to enter the room, they should be able to do that and help themselves to the lot. 2 poison antidote, 2 cure disease, and a healing spray canister with 3 charges. Fail to produce the card, or try to disrupt the robot’s research, and it’ll call the guards, bringing up to 3 police robots within 4 rounds. So don’t do that.
Lab B is a marvelous trap, but one that I’m really curious if anyone who’s played/run this has seen it tripped. This was the hydroponic culture lab. While most everything is dead, there are some spores of russet mold still lingering about. If the adventurers enter the room before “any use of a computer console”, then all they see in here some faint rust on the walls. The russet mold is pretty nasty stuff, so if anybody gets within 3’ of it, they have to save v. poison, or become a mold culture medium. Dead in 2-5 turns unless you get a cure disease. Even if you save, you still take 5-20 damage. But that’s not all. Anybody who dies from the disease immediately sprout mold where the spores made contact on their bodies. Let the mold grow for an hour and they can’t be raised anymore. It spreads to cover the entire body, and 20-24 hours later, a vegepygmy will emerge with no memory of their previous life. So, pretty gross, but manageable.
If a computer console has been used, then a malfunction in the software sends a signal to the hydroponics bay to pump nutrients into the room. Thus, the room gets stuffed with russet mold. When someone opens the door, the mold explodes out over 100 square feet. Looking at the size of these corridors, and guessing a party size of 15, I don’t see it as unreasonable the mold could hit almost everyone. And of course, with so many saving v. poison, someone is gonna fail. The only problem is the computer console than triggers this trap is locked behind a much higher card key, so I’m betting players would make it here first and have no reason to come back later (especially since there’s no indication anything changes in the lab when the glitch occurs).
Lab C is full of chemicals. There are 6 different types of containers, with 20 containers each. Only a few of them have uses, so this would require a lot of experimenting and patience (a rare quality in adventuring) to determine all of these. Some do damage, one poisons, etc. The first interesting one to me is the 1st large ceramic bottle, which holds a plant growth potion with 20 charges. If there are any vegepygmies within 30’, the odor of this will drive them into a frenzy. The 2nd large ceramic container is a specially lined container for an acid powerful enough to eat through deck metal and dissolve a 10’ diameter section of the floor in 1 turn. It does damage over three rounds when weaponized. Eh, damage can be done multiple ways. This is an instant ticket to the next level (but best to hold onto it for now).
Moving on from the labs, we come to the Library. Here’s a chance for the players to get some real clues about where they are and what this place is. The place is in good shape since there’s nothing here for the vegepygmies to loot. There are a bunch of microfilm viewers lined up, four of which work. If someone flips a working microfilm viewer on and looks through, they’ll see either unintelligible writing and diagrams, or pictures of space, stars, galaxies, as well as other alien lifeforms (sir not appearing in this film). This repeats for 2 turns, and at THAT point, there is a 1/6 chance the viewer will begin showing schematics of the first, third and fifth level of the dungeon. “All of the viewers operate at a fast rate, so when these appear describe the scene as a circular form with many lines, marks, and colors upon it. Allow 6 questions and about one minute of explanation per level.” Interesting. There’s a chance the viewer will break after each level, and will immediately break after level V. Hope you took good notes. The viewer isn’t the only thing of note in the library though. There’s a grey card(!) well hidden underneath a sealed cabinet which is itself concealed by a uniformed skeleton. It does mention the uniform is fairly beribboned, which should clue a sharp adventurer in that this may have been someone high ranking. It says only if the cabinet is examined, or the 10’ around the skeleton “minutely” searched is the card discovered. Can we open the sealed cabinet? What’s inside? :itisamystery: Anyway, I’m guessing this is the grey card most parties discover since it doesn’t require anything to get to. It also gives you the clue that grey is a high-ranking color.
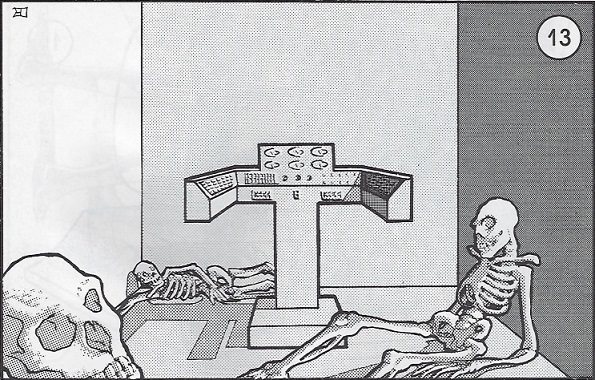
The Police HQ is, unsurprisingly, where we get tossed in the clink. It’s also the first full color illustration! 1-3 police robots greet the adventurers upon entry, inquiring about the nature of the visit. It takes 1 turn for the robots to translate the characters language, and unless they display a red, grey or orange card, they will be arrested and detained. They use non-lethal methods unless they are attacked. If arrested, the players are thrown into the cells and left to starve to death. The cells use force screens so magic is right out, but someone can hit the lock with cold, fire or electrical damage for a chance to make it malfunction. The adventure does note the robots don’t remove any of the players equipment unless it’s something the robots recognize (laser pistol, blaster, etc). There’s a chest in the cellblock that has some sleep grenades, gas masks and a couple of needler pistols. If the party destroys or disables a police robot here, they have a chance of getting a red card by prying it out of the robots chest, but also risk destroying it.

The south room of the police HQ can onlybe opened by a red colored card. The grisly scene is reproduced above. The skeleton is barren, but there is that strange thing on his desk. Before we get to that though, there is the storage locker to the left. 1/6 chance of being pryed open by magical items, otherwise it’s locked. Inside is some jewelry, a blaster pistol with a full charge, and a suit of power armor But it's trapped; this particular power suit is malfunctioning, so roll a d4. 1, your suit is normal – for 10 rounds. Then it freezes up and you get to roll again. 2, the suit does 3d6 damage to the wearer and forces the person to leave the suit as it becomes engulfed in flames. 3, and the suit moves randomly. Roll a d10 to see what you do. 4, the suit floods itself with poison gas, save or die. If the suit is removed, the gas spreads and fills a 20’ radius. Everyone in the area gets to save or die. I love this last bit here: “If a small green canister is taken from the locker wall, pointed at the suit, and a tab pulled, it will cover the suit with a foam which will instantly neutralize the gas.” Unless liberal DM guidance was involved I can’t see how anyone would ever figure to do that. Anyway, this suit is a really genius trap. If this is the first suit of power armor the party finds, they’re definitely going to have someone put it on and try it out. If this isn’t, they will most definitely have someone put it on. It would probably be more effective on a group that hasn’t found a suit yet since they wouldn’t know this isn’t normal malfunctioning, but still. I like it.
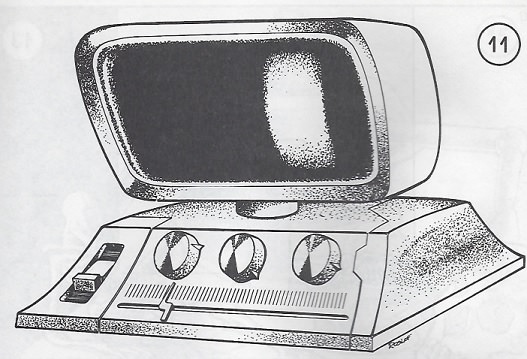
The device on the desk is another opportunity for the adventurers to get some a clue or two about this place. If the characters fuck around with this item for a bit, they’ll probably figure out it’s a viewscreen for different areas in the dungeon, but only when the slider on the bottom is on positions 11-16 (out of 57 possible positions). The three dials change rooms, but the room key is long since gone. It doesn’t specify for the DM how to choose the rooms the viewfinder sees, so I would just give them glimpses of interesting areas or hint at upcoming events. 1% chance per round (cumulative) the viewer breaks.
The small arms locker is next, locked by a grey card. This place is a bonanza for the players, mostly for the stash of power discs (20 of them). It also has bevy of weapons, most notably a blaster rifle and 20 of each type of grenade. Included is a fully functional suit of armor in a locked storage cabinet.
The Stores area is full of crates and boxes of garbage. There are sufficient food stores to equal 100 iron rations, so no more worrying about food I guess. There are 14 healing spray canisters, but only 1 in 6 will function and not even at full capacity. The most interesting find is the repair robot remote control. By pressing a black button, a robot repair worker will arrive in 1-4 turns. Once the worker robot arrives, the holder of the box can give the robot commands by holding the black button and speaking into the receiver. The language has to be one the robot comprehends however, and worker robots are not installed with language translation software. 2% cumulative chance per turn of use that the power begins to drain slowly – 1-10 rounds later it goes dead. Uses ½ charge/turn.
The room in the very center of the first level requires a grey card to enter. “In the center of the room is what appears to be an altar. It is supported by a single metal column and 2 arms are bent towards the door. The wall opposite the door is made entirely of glass, although this is too dark to see through.” When the players approach the altar, they see:
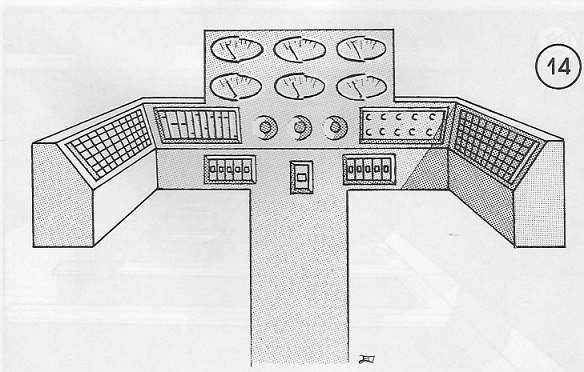
“In the center of the altar are 6 fist-sized circular windows, 3 coin-sized holes below them, and a single metal box under these. To the left of these are 10 small blocks set in grooves, and to the right are 2 rows of rivets. The wings or the altar are decorated with panels of small glass squares set in rows.” If the players hit that single metal box, the darkened wall will light up and a strange metal voice will begin speaking out of thin air, all in unintelligible garble. If the players can translate with magic, the voice will be explaining where they screen is showing them and what the status is of the area. The rest of the console is an elaborate trap. First, touch any of the buttons, levers, whatever on the main console and 2 things will happen: first, the mold culture in lab b (remember that?) will get some delicious nutrients. Second, the DM rolls a D12. The results vary from a fire, to the viewscreen malfunctioning, to calling police robots to the area. If a 7 is rolled: “unlock doors: security alert cancelled; pink and amber lights go out.” Why is that important to find? Because if a 12 is rolled though, it’s “Full alert. All doors and sphincters shut and locked tight; red lights flash, alarm sounds at 10 second intervals; sleep gas will be pumped into the central complex of rooms in 1 round; 4 police robots and 2 worker robots will enter the computer room in 2-8 rounds; only a gray card slipped into the slot in the console and the action noted at 7 will cancel the alert.” Ouch. Finally, any destruction of the console will be as if the DM rolled a 12 as above. The robots will try and kill all intruders not displaying a red or grey card inside the room.
And that’s it for the first level of Barrier Peaks! Whew, that was a monster. There’s so much stuff crammed into the first level, I wouldn’t be surprised if there’s been very few parties that have fully cleared the first level (given my experience in RPG’s, that is). You can’t move in any direction without something interesting happening and pulling you deeper into the dungeon. That said, I’ll be glad for a much shorter and easier level next time.
NEXT TIME: Taking a breather 'tween decks
Second and Third levels
Original SA post Expedition to the Barrier Peaks – Second and Third levelsSorry for the delay on the update, it’s been a crazy few weeks for me. Anyway, let’s continue.
After the monster of the first level, the second is much shorter. That is if the party has found a brown card or higher rank in their travels. When the party first enters one of the drop tubes and descends, they’ll notice about halfway between the opening they came in and the next one farther down, there’s a small hatch keyed brown. If the players are thorough, they should have a brown card or higher rank by now.
The entire area is unlit. Radiation areas, marked 13, are scattered around the level. The black dots are metal pillars. All of the cross-hatched squares on the map are dangerous machinery filled with electrical equipment. If a character decides to fuck with them, there’s a 10% chance per round of a discharge of electricity which instantly kills the moron. If that doesn’t happen, there’s still a 10% chance of explosion which damages everyone within 10’ for 5d6 damage, save v. magic for half. That itself has a chance to set off a series of explosions on any other danger area within 40’. So, essentially, the entire middle section of this level is a giant deathtrap. Marvelous. Oh yeah, after the explosion settles a worker robot will show up to repair the damage. If not shown a brown, violet or gray card, it will summon some police robots to arrest the offenders.
So, right in the center, we have our first encounter at 1. And a doozy of one it is. An Intellect Devourer has made this place its home. “Impervious to most spells and weapons under +3 – lasers do no harm, but a blaster causes 2-8 (2d4) hp.; the ‘devourer can hide in shadows with 63% chance of success. The monster is trapped ‘tween decks, for the [dungeon’s] energy fields prevent it from becoming ethereal and even its great intelligence does not understand the concept of doors operated by color cards.” This is the beast that was referenced by the notes in the first level lounge. There is a chance it’s in a cargo hold on the third level when the adventurers arrive, but it will come to any explosion within 2-5 rounds. If it is in the cargo hold, it will return in 1-6 turns and sense the thoughts of the adventurers within 12 rounds. The hunt then begins.
At 2 is a small pile of bones with a laser pistol (4 charges left) in a skeletal hand. A victim of the intellect devourer when the dungeon was still populated, his security card (grey), is at the end of the dotted line marked by a small x. “The chance of spotting the card is 5% per person if a cursory examination of the area is made, 20% per person if a thorough search is conducted. Check separately for each individual.” That seems generous.
Devices called wheely sleds are scattered across the level, all marked by number 3. If the players can figure them out, they allow for quick movement around the level, going from 1” to 15” based on a level setting. Of course, go too fast and there’s a chance you get knocked off or run into one of those mechanical hazard areas.
At 4 (northeast quadrant) is a recharging repair robot. If a character displays a violet or gray card (and can communicate in the robot’s language), it will obey their orders and follow them for an hour before its batteries run dry. If it spots the party and they don’t display a violet, grey or brown card, it will summon some police robots.
You’ll notice a small jagged hole in the floor in the upper northwest corner of the map. This is a hole leading to the cargo bay on level III. When the devourer comes back up, this the hole it emerges from.
And… that’s it! The entirety of level 2! There are no random encounters on this level either. In fact, other than the decision to hunt the devourer, there’s really not much reason to come to this level. Not that the players would know that.
Since the first ‘tween level is kind of boring and light, let’s move right on to level 3!
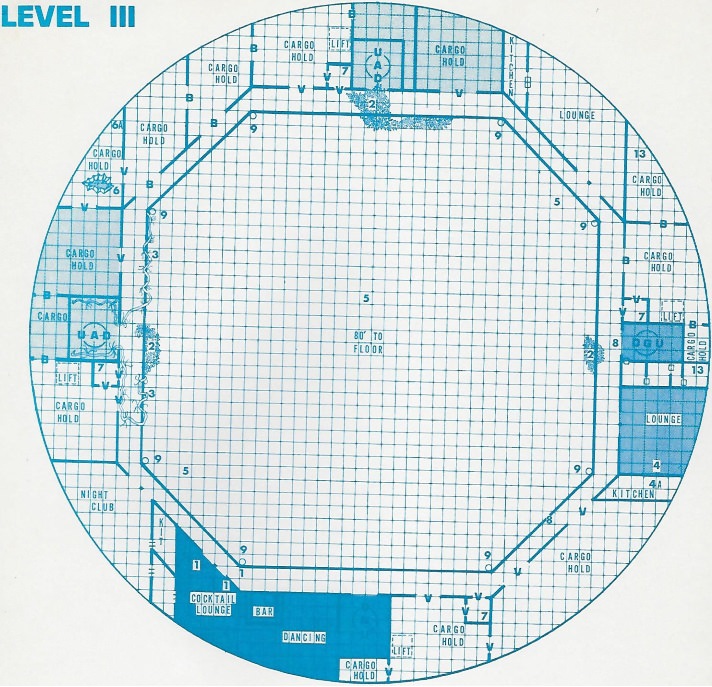
Unless the players figure out a clever solution to descend the southern drop tube, they’ll most likely be coming in from the western or northern tubes (the ones that are fully functioning, with anti-gravity active). We’ll assume our party has descended the western drop tube and go clockwise from there. Just inside the drop tube room are thick vines that stretch out onto the walkway ahead.
Random encounters here aren’t as prevalent as on the first floor. 1 in 20, checking each turn.
1 police robot
2-5 nothing
6 lurker above
7 worker robot
8-11 nothing
12 green slime
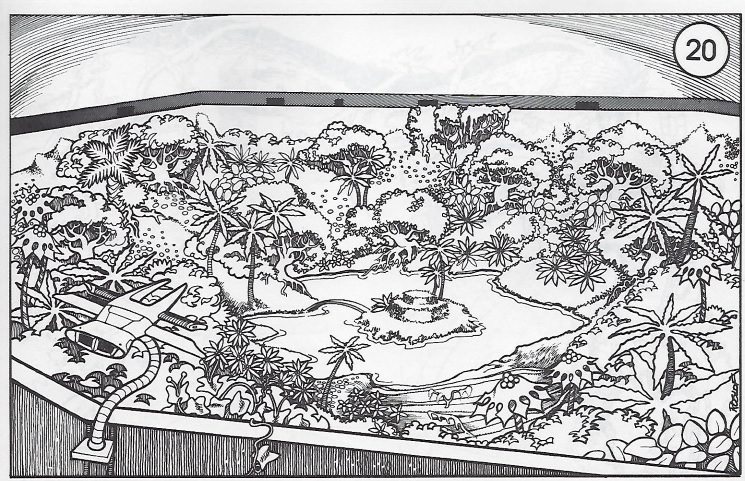
When the adventurers step out onto the walkway, this magnificent view greets them. This should be a great wtf moment for the players, or at least that’s how I’d hope it would play out. This is also a moment where how much time the characters have been inside the dungeon matters. The lights on the fourth floor (where all that foliage is) are on a timer. For the first 14 hours the 4th floor lights are on, then they turn off for 7 hours. It alternates like that. Depending on how long the players dither about on the first few floors, they may not be able to see this, just a large dark area. But they can definitely hear it. The sounds of life are plentiful down below. But we’ll get there next time. For now, this is also a cool trap as well because lurking just on the other side of the barrier is a freaky plant monster.
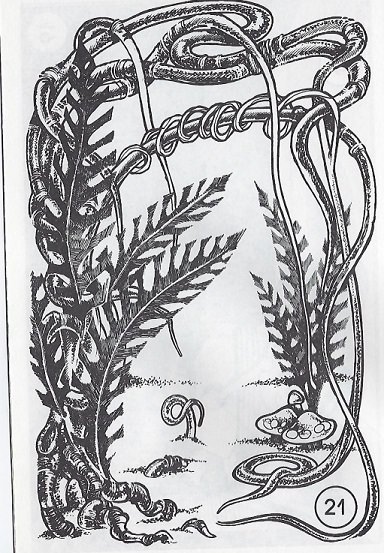
These strangle vines at 2 are pretty nasty. They’re slow and easy to hit, but they have an “unlimited number of attacks”. Someone with better AD&D knowledge, please enlighten me on this bit of craziness. They don’t do a lot of damage, 1-4 per hit, but have a 10% chance to strangle a character to death. It is immune to regular fire, and electricity will double the plants growth and speed. They are attracted to light. I wouldn’t even want to fight this thing. Get away from it and move on – it only moves ½”.
Turning north, the adventurers will encounter vampire thorn vines at 3, the same plant that was growing inside the drop tube. These suckers have 4 tendrils every 10’ that can lash out up to 5’ away, sucking HP out of their victims – 25% of their maximum HP total per hit. Hit 4 times and death, no matter how much HP you have. That’s rough. A full 10’ length of vine with 4 tendrils has 44 HP and fire causes it to recoil. Electricity heals it. They creep for ¼” per round so again, I say move past it as quickly as possible.
Stationed at the angles of the walkway are these magnifying viewers (9). 1 in 6 chance for a character to figure out how to use them. If successful, they can zoom in up to 5 times closer. I like this natural preview of the next level, and clever players can get a good look at what’s coming up (including showing appropriate illustrations, the key says). They are not portable though. They can’t be removed without breaking.
Through the brown coded double doors, and then violet double doors, comes another possible entry point for the players if they went ‘tween decks with the hole in the ceiling. If they didn’t, there is a 40% the intellect devourer is here, checking each turn. Some empty and busted open cages are in here as well, with a blaster rifle (2 charges left) and an orange card underneath a skeleton. Putting it all together, this is where the intellect devourer was caged and then escaped. It killed a high-ranking person and took his form. Once others realized their leader was no longer their leader, they pursued the devourer into the ‘tween decks (blasting the hole in the ceiling in the process during the chase). The devourer then killed them. It also broke open the other cages to feed on whatever was kept within. However, there was one cage it did not open. At 6a: “After no less than 2 turns of careful searching the party will discover a wrapped crate – a transparent stasis cage with a black dial, which will free the cage occupants if turned. The cage holds 4 COUATL”. These are good creatures it seems and will both heal the party (if not attacked) and cure diseases. They will also kill the intellect devourer if it appears, with 2 casualties if the party doesn’t assist. I wonder how many parties would spend 20 minutes searching a single area. Anybody who’s played this – you find these guys?
Moving on, most of the other cargo holds are full of garbage that isn’t useful to the players. Building materials and fertilizer (another clue of the purpose of this place) mostly. Some of the cargo holds have lifts that if used correctly can be a quick transport to lower levels. They are easily broken as well, with chances for worker and police robots to show up.
As the party approaches another group of strangle vines at the north of the map, they could make a quick stop into 7. These robot stations are next to all the drop tubes (except south) and contain some worker robots and a police robot. Nothing special, and no loot in any of the rooms. After the strangle vines will come another ambush at 5.
Any observant players will notice a flock of these guys (3d12 of them) flying around the center of the level, above the forested area below. See that little hook on their chest? Remember that. If anybody gets within 40’ of one of the 5’s, the flock of webbirds will fly overhead and begin spinning webs to capture the party. The chance of this is determined with a D6 roll, adding 1 for every 6 webbirds.
Under 3, it’s an ineffective attack
3-5, they snare one character and they are held for 2-8 rounds
6-8, they snare 2-5 characters
Over 8, they snare the entire party. Everyone’s speed is reduced to 1” per round, and attacks are impossible until the web is destroyed. The webs are not flammable, but alcohol will dissolve them in one round. But for fun, let’s assume nobody gets free. Anybody caught will have 1-4 of the birds land on them. Here, I’ll let the key take it: “Their chest appendage is inserted into the immobile victims flesh, and the webbirds commence to deposit their eggs therein. These eggs will hatch in [1d4+2] turns, and thereafter the larva-like grubs will begin to devour the host, causing extreme pain and 2-8 hit points of damage per turn until the host dies and the webbird grubs can crawl out. Any disease curative will kill the grubs.” Gross. Super gross. They avoid flame and can be caught by hand and crushed easily (just requiring a to hit roll, no damager roll). Another monster I really like, and it continues the theme the vegepygmies started, with monsters infecting the characters to kill them and produce more monsters.
The lounge and kitchen areas are uninteresting, with tables, chairs, loungers, and other furniture still in good condition. There are more radiation areas on this level, all marked as 13 just like the first floor. Moving south now, right next to yet another group of strangle vines, is a green slime at 8. This shit will drop on 2 in 6, checking for each character, until 4 pieces have landed. Gross again. Moving farther south, the adventurers will find a dimly lit lounge that has a single occupant – 4. When they enter, a dining servo robot will approach and attempt to seat them and serve them food. “The substance in the dishes will be a decaying mush covered with nauseous blue-green mold. If any creature so much as tastes a drop of it, it will cause insanity in the next round as the blue-green spores attack the brain. Insanity lasts for 1-4 turns, and the person then dies.” Awesome. Even better, if nobody eats the food the robot will then try to force feed the closest person and will purse them if they flee (but will not leave the level). Purify food and drink doesn’t work on the food either. I love this encounter. Inside the kitchen to the south – 4a – is a pile of bones that hide a jet black card and a violet card, along with an empty needler and 3 expensive pieces of jewelry.
Continuing further south on the walkway, there’s another green slime (camouflaged as peeling paint) covering the railing at 8. “Contact with this substance turns exposed flesh into green slime within 1-4 melee rounds.” Quick question – is a “round” different from a “melee round”?
The last point of interest on the third level is at 1, near the southern drop tube. 3 ropers lie in wait here. I don’t know if these are standard enemies or not, so I’ll just list the stat block: “AC 0, MV 3”, HD 10/11/12, hp 47/50/62, #AT 1, D 5-20; 1-6 strands from 20’-50’, hits causing weakness in 1-3 rounds (lasts 1-3 turns); blaster damage as normal, but laser hits cause +4 hit points.” They look dangerous. They’ve also accumulated a bit of loot, including a fire extinguisher, platinum wire worth 1,600 gp, 2 explosive grenades (duds, because of course), and one more special item. An anti-gravity belt is kept here. With this equipped (and if you figure out how to use it), you can float up and down at 3” per round with up to 500lbs. It does require a power disc and drains 1 charge per turn. Per the key: “Note that this device can be used to make an object up to 500 pounds weigh only as much as a 1 pound object, but the mass will still be that of a 500 pound object.” Emphasis in original. That distinction has to be there because of some spell, right?
The rest of the level, the bar, cocktail lounge, dancing area, and nightclub are all either trashed and useless, or just plain empty. The only exception is the bar, which still has a single bottle of highly flammable alcohol. Good luck finding that in the pitch dark though, and given how barren some of these areas are, I’ll bet this bottle has very rarely been found.
That’s all for levels 2 and 3. I can tell these are just a buildup, anticipation wise, for the next level. I’m guessing some groups don’t even fully explore 3, and just go straight to 4 after seeing the giant open area full of trees and vegetation down below. That’s where we’ll pick up next time, and it’ll be a doozy.